Advertisement
Quick Links
ltkbo'p MAkrAi
ClMOMM
ClMMboCIAi mbiibT doIii
This drill mrotected rnder matent NumbersW
QISN9IOM9 and QIUOPISUQ
clo lrTallo rSb lNiY!
tAoNINd!
al NlT STlob lo rSb ClMBrSTABib MATboIAiS
NbAo TeIS AmmiIANCb!
rSb lNiY ToAbdbo BoANa eAoatlla
BBn mbiibTS IN Teb lmboATIlN lc TeIS rNIT.
Advertisement

Subscribe to Our Youtube Channel
Related Manuals for Traeger COM200

Summary of Contents for Traeger COM200
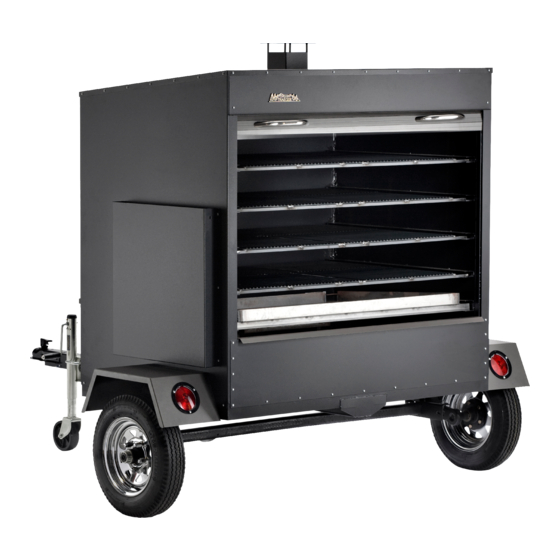
- Page 1 ltkbo’p MAkrAi ClMOMM ClMMboCIAi mbiibT doIii This drill mrotected rnder matent NumbersW QISN9IOM9 and QIUOPISUQ clo lrTallo rSb lNiY! tAoNINd! al NlT STlob lo rSb ClMBrSTABib MATboIAiS NbAo TeIS AmmiIANCb! rSb lNiY ToAbdbo BoANa eAoatlla BBn mbiibTS IN Teb lmboATIlN lc TeIS rNIT.
- Page 7 fkqolarCqflk `ongratulations on your purchase of this qraeger tood mellet drillI jodel `ljOMMK tith proper setJupI operation and maintenanceI the drill will provide you with delicious food and years of cooking enjoymentK obAa qebpb fkpqorCqflkp CAobcriiv Bbclob AqqbMmqfkd ql AppbMBib qefp rkfqK pmbka A cbt Mfkrqbp cAMfifAofwfkd vlropbic tfqe qeb mAoqp Aka afAdoAMpK klqbW krMBbop cliiltfkd mAoq kAMbp qeolrdelrq qefp MAkrAi obcbo ql qeb ClMmlkbkq afAdoAMI qeobbJBrokbo pvpqbM Aka Auib...
- Page 8 pbCqflk lkbW AppbMBiv fkpqorCqflkp fkpqAiifkd qeb AuibW Eoefer to the ClMOMM Auib Mlrkqfkd diagramF oaise one side of the `ljOMM drill Body EPOF approximately S inches and securely block in placeK oepeat with the opposite sideK qhis should provide you with enough room to slide the Axle EPUF into place and bolt the Axle jounting Bracket on Axle EPVF to the Axle jounting Bracket on drill EPTFK Bolt in place using the NLO”...
- Page 9 fkpqAiifkd qeb ebAq BAccibW qhe eeat Baffle ENMF fits over the P cirepots using the square tubes attached to the eeat Baffle ENMF and the receiving tubes mounted on the bottom of the drillK oefer to the `omponent aiagram for proper orientation of the eeat Baffle ENMFK mlpfqflkfd qeb dobApb aoAfk mAkW plide the drease arain man ENNF back into place making sure that the drease arain qubes ENOF slide through the back wall of the drill Body EPOF...
- Page 10 pbCqflk qtlW fkfqfAi cfofkd fkpqorCqflkp (qo be used on initial firing or anytime the drill runs out of mellets) fn order to ensure proper operation of the drillI you must first allow the Auger qube to be “charged” with melletsK NF lpen the aoor and remove the morcelain drillsI drease arain man and eeat Baffle from inside the drillK OF jake sure the pwitchLaial is in the lcc positionK mlug the mower `ord into an...
- Page 11 pbCqflk qeobbW prBpbnrbkq pqAoqJrm tith the aoor openI turn the pwitchLaial lk and qemperature aial to pjlhbK fn approximately O minutes you will notice whitishJgray smoke coming out of the drill as the mellets igniteK After assuring the mellets have ignitedI close the aoor and set the qemperature aial to any cooking setting desiredK ff the drill fails to light or if the fire in the cirepot goes out while cooking or smokingI follow these stepsW...
- Page 12 pbCqflk clroW lmboAqfkd qfmp NF qhe qemperature aial can be changed at any time to increase or decrease the cooking temperature of the drillK qhe efdeLefdebo qemperature settings are for drillingK qhe jbaLjfa oAkdb qemperature settings are for plow `ookingK qhe pjlhb setting is for pmoking and adding pmoke clavor to foods being cookedK qhe pjlhb setting can also be used to “hold”...
- Page 13 PF ff the drill is stored outside during the rainy seasonI care should be taken to ensure that water does not get into the mellet eopperK tood pelletsI when wetI expand greatly and will jam your AugerK A cover to protect the drill is highly recommended! te recommend that you use a tarp and elastic cords to keep the drill covered when not in useK mut the tarp over the drill only when it is cold! QF aepending on useI periodically remove the morcelain drillsI drease arain man and...
- Page 14 ptill no mellets in the cirepot – mroceed to step PK PF aisconnect mower `ord from electrical outletK aF rnplug the Auger arive jotor E oedLthite wire pair connectorF and the araft fnduction can ElrangeLthite wire pair connectorFK bF oeconnect the araft fnduction can to the oedLthite wire pair and the Auger arive jotor to the lrangeLthite pairK cF mlug mower `ord into an appropriateI grounded electrical outlet and turn the pwitchLaial lkK...
- Page 15 cor models with a floating Auger arive jotorW EkoteW some units with the floating Auger arive jotor will require metric toolsKF NF oemove any covers necessary to access the Auger arive jotorK OF oemove the screw connecting the Auger arive jotor shaft to the Auger shaft and the screw retaining the Auger Bushing into the Auger qubeK PF tith a small pipe wrench or locking pliers on the Auger shaftI turn the Auger counter clockwiseK ft will turn hard until it breaks freeI then the Auger will turn freelyK...
- Page 16 tfqe qeb qoAbdbo afdfqAi ClkqoliI teAq afAi pbqqfkd fp obClMMbkaba clo pqAoqfkd qeb dofii? qhe autoJstart procedure is the same for all drill `ontrolsK tith the aoor openI turn the pwitchLaial lk and qemperature aial to pjlhbK fn approximately O minutes you will notice whitishJgray smoke coming out of the drill as the mellets igniteK After assuring the mellets have ignitedI close the aoor and set the qemperature aial to any cooking setting desiredK...
- Page 17 pbCqflk pbsbkW qoAbdbo prmmloq marts are identified in the front of this manual on the `ljmlkbkq afAdoAjI qeobb JBrokbo pvpqbj Aka Auib jlrkqfkd documentsK qo order partsW `allI bJmail or write to your qraeger aealer or qraeger mellet drillsK mlease provide your nameI phone numberI addressI jodel and perial kumber of the drill Elocated on a label inside the eopper iidFI along with the part identificationK qoAbdbo mbiibq dofiipI iiCK...
Need help?
Do you have a question about the COM200 and is the answer not in the manual?
Questions and answers