
Summary of Contents for Novolink Lightscape LS-101B-WLVCTL
- Page 1 LS-101B-WLVC TL LS-201-WMSR-SPL Controller Motion Sensor & Spotlight Installation and Use...
-
Page 2: Table Of Contents
Contents The Novolink Lightscape™ System What’s Included Download the App Tools You’ll Need Controller Installation Motion Sensor Installation Spotlight Installation Online Resources & Help... -
Page 3: The Novolink Lightscape™ System
Zone 1 Novolink Lightscape™ Landscape Lighting System gives you simple, With the Controller in place, use our handy Novolink Lightscape™ convenient, and wireless control of your hard-wired, low-voltage App to schedule when lights will turn on and when they’ll turn of f, landscape lighting environment. -
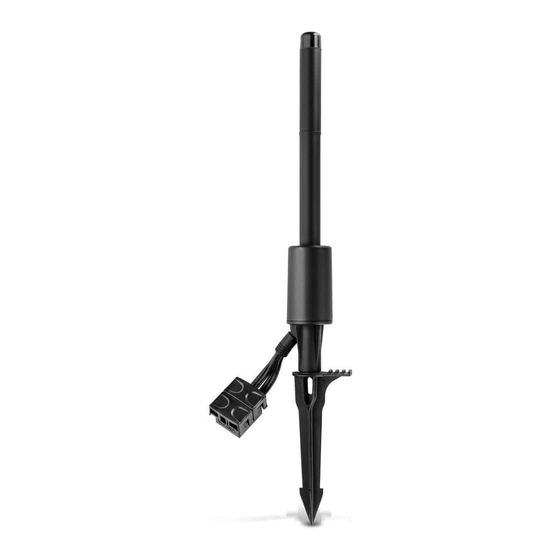
Page 4: What's Included
What’s Included Novolink Lightscape™ Controller Motion Sensor & Spotlight Q ui ck St ar t G ui de Q ui ck St ar t G ui de antenna main body connector stake motion sensor quick star t guide sensor wall mount... -
Page 5: Download The App
Download the Novolink Lightscape™ 1. Before you install any Novolink 2. Make sure your device’s Bluetooth® is ON. You may find Lightscape™ components, download the this in your device set tings. app from Google Play (Android) or from the App Store (iOS). -
Page 6: Tools You'll Need
Tools You’ll Need 4× 3× protective eyewear wire stripper / cut ter (18 to 12 gauge wire) drill philips screwdriver pump pliers (optional) for spotlight: (4) d alkaline bat teries for motion sensor: (3) AA alkaline bat teries... -
Page 7: Controller Installation
Controller Installation... - Page 8 This may require exposing the wire(s) if they’re buried. ensure your low-voltage transformer will work optimally with the Novolink Lightscape™ system on our website: novolinkinc.com/compatibility Electrical Warning: When working with electrical wires of any voltage, exercise caution in moving, cut ting, splicing, or connecting the wires.
- Page 9 Assembly 1. Make sure you have all par ts of the Controller. Check the mechanisms and wiring for damage. Set the par ts on a clean, keep the short length of sturdy work-sur face. this wire in mind when planning where to install 2.
- Page 10 Install the Connector 1. Unplug / disconnect your Low-Voltage Transformer. It ’s best to 3. Unear th this por tion of the low-voltage wire. Make sure there’s turn power OFF at the circuit breaker or fuse, and test that the enough slack to easily cut and manipulate the wire.
- Page 11 5. Locate the end of the wire leading from the Transformer. Place it 6. Replace the cap over this end of the wire, and press until the cap into the lower por tion of the Connector, in the channel marked clips into position.
- Page 12 7. Locate the end of the wire leading to the first landscape light 8. Align the second cap and press it into position until it snaps in fix ture in the series. Place it into the channel in the top half of place and is secured to the Connector.
- Page 13 Complete the Installation Reconnect the Transformer 1. Turn the power ON at the circuit breaker or fuse, and / or plug your transformer in, and turn it ON. Note: It ’s impor tant the transformer remains ON continuously and does NOT automatically shut of f. ensure your transformer is set to MANUAL ON or continuous ON.
-
Page 14: Motion Sensor Installation
Motion-Sensor Installation Insert Batteries 1. Press your palm against the rear plate and twist counter- clock wise (about 5°) to open and access the bat ter y compar tment. - Page 15 Mount the Sensor 2. Inser t (3) AA bat teries. Match the direction of the polarit y markings (+) (−). The Motion Sensor can be mounted onto a wall, or staked to the ground. (Cradle, stake, and pole sold separately.) AA 1.5V CAUTION: do NOT open, shor t circuit, or mutilate bat teries as...
- Page 16 2. Use the enclosed template to mark the location where the sensor will be installed. 4. Slide the Motion Sensor onto the wall mount until it click s in place. 3. Fix the mount to the wall with screws. Use anchors if needed.
-
Page 17: Spotlight Installation
3. In the Novolink Lightscape™ 4. The Motion Sensor is ready. 1. Turn the back of the Spotlight counter-clock wise (about a 1/4 App, Search devices. Follow When motion is detected, it turn) and open, to reveal the bat ter y compar tment. - Page 18 2. Press and squeeze the top and bot tom tabs of the compar tment cover to open it. 3. Place (4) d bat teries into the CAUTION: do NOT open, shor t circuit, or mutilate batteries as injur y may occur. compar tment.
- Page 19 5. Replace the back of the Spotlight and turn clock wise until it lock s shut. 4. Replace the bat ter y compar tment cover. Press until it snaps into place. 6. When the Spotlight has power, it can be added to your system on the app.
- Page 20 Mount the Spotlight Mounting to the Wall 1. Choose a location on the wall 6 to 8 f t. above the ground to 2. Twist the locking-ring on the wall mount to loosen it, and inser t mount the Spotlight. Fasten the mount to the wall. Use anchors the base of the Spotlight.
- Page 21 Stake Mounting 3. Set to the desired angle, and twist the locking-ring to hold the Spotlight in place. 4. Turn the knob to loosen the head and adjust the up / down angle. Tighten the knob to lock in place. 1.
-
Page 22: Online Resources & Help
Lightscape™ system including tips, installation videos, and news on the latest ways to expand your system. homedepot.com shopnovolink.com Visit to purchase more Novolink Lightscape™ components or replacement par ts. 3. Use your foot to drive the stake into the ground. - Page 23 The Bluetooth® word mark and logos are registered trademarks owned by Bluetooth SIG, Inc. and any use of such marks by Novolink, Inc. is under license. Other trademarks and trade names are those of their respective owners.
Need help?
Do you have a question about the Lightscape LS-101B-WLVCTL and is the answer not in the manual?
Questions and answers