Advertisement
Quick Links
OGN CUBE3 Installation & User's Manual
Last update 2020-03-10, work in progress
https://ogn.ibisek.com/
Introduction
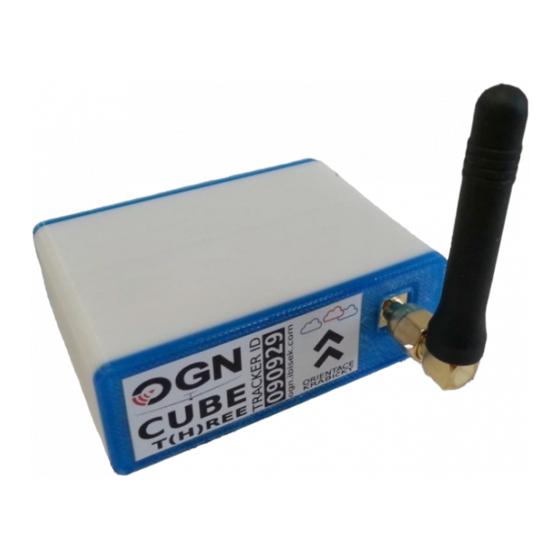
Thank you for purchasing our OGN tracking unit CUBE3! We have devoted a lot of effort and
craftsmanship so it would serve you well and stay reliable for many years to come. We have also
included some extra functionality the other trackers do not sport which make this little the box at
your hands pretty well the greatest one on the planet Earth :)
The third generation of OGN CUBE is a superb smart box purposely designed to not only track
location and flight route of gliders, ultralights, tow planes and other flying objects but also to record
their utilisation and overal usage. Therefore a microSD card and a three-axes accelerometer were
integrated into the unit. The tracker can be interconnected with the other on-board systems via
wired serial line (TTL) or wirelessly using bluetooth. As the usecases may vary for each particular
owner, two variants were developed – denoted as Model A and Model B.
Page 1 of 12
Advertisement

Summary of Contents for OGN CUBE3
- Page 1 Introduction Thank you for purchasing our OGN tracking unit CUBE3! We have devoted a lot of effort and craftsmanship so it would serve you well and stay reliable for many years to come. We have also included some extra functionality the other trackers do not sport which make this little the box at...
-
Page 2: Technical Specification
~ 20mW • communication frequency: 868.2 & 868.4 MHz • data via bluetooth and TTL wired serial (RJ45) • micro SD card slot for logbook recording • three-axis accelerometer • OGN CUBE3 Installation and User’s Manual Page 2 of 12... - Page 3 • battery capacity 1020mAh • on battery life ~ 20 hours, charging time ~5 hours • micro SD card slot for logbook recording • three-axis accelerometer • OGN CUBE3 Installation and User’s Manual Page 3 of 12...
- Page 4 (also when circling in thermals) influences its gain (efficiency) in case when transmitting data to other planes or ground stations. And again, to avoid shielding by metallic or carbon elements that prevent radio waves propagation is strongly recommended. OGN CUBE3 Installation and User’s Manual Page 4 of 12...
-
Page 5: Led Signalling
(4) very short flashes – radio traffic– regularly every second (radio TX), or in random intervals (radio RX). You can check the boot process on Youtube on this address: “OGN CUBE3 boot sequence” https://www.youtube.com/watch?v=_XDIrd3SX6g OGN CUBE3 Installation and User’s Manual Page 5 of 12... - Page 6 (6) and confirm you are owner of this device. By submitting this form the tracker information is added to your list of registered tracker and during the next 15-30 minutes will propagate also into the OGN network. Illustration 3: Tracker registration to OGN device database OGN CUBE3 Installation and User’s Manual...
- Page 7 The units announce themselves with name in form OGN CUBE xxxxxx” where xx is ID of the tracker. The PIN for bluetooth pairing is either none or 1234 pin (depends on the master device).
- Page 8 • tracker configuration (planned) It is available from the PLAY store on this address: https://play.google.com/store/apps/details?id=com.ibisek.cube_control Alternativelly, you can use the following QR code to get it right into your phone: OGN CUBE3 Installation and User’s Manual Page 8 of 12...
- Page 9 Notes regarding pin #5: this input is designed to turn off radio transmission while maintaining the reception on. To activate TX OFF you need to connect this pin using a two-way switch to ground (GND). Otherwise keep it floating (do not connect anywhere). OGN CUBE3 Installation and User’s Manual Page 9 of 12...
- Page 10 The battery is connected to the board using two-pin JST connector as show in illustration 10 right below. Installation of the battery inside the enclosure is depicted in no. 8. Illustration 7: Battery connected to PCB using a 2.0mm JST connector OGN CUBE3 Installation and User’s Manual Page 10 of 12...
- Page 11 Eventually, you can always ask a friend if you feel uncertain :) Illustration 9: Wire leads soldered to the battery pads OGN CUBE3 Installation and User’s Manual Page 11 of 12...
- Page 12 In case there is something you want to share please use information published in Contact section of the https://ogn.ibisek.com/ web site (ibisek@protonmail.com this moment). Alternatively, we can have a chat in person at most weekends at the Křižanov (LKKA) airfield :) OGN CUBE3 Installation and User’s Manual Page 12 of 12...
Need help?
Do you have a question about the CUBE3 and is the answer not in the manual?
Questions and answers