Table of Contents
Advertisement
Quick Links
Checking the parts
Depending on which accessories you ordered, your G-11 mount was shipped in four or more boxes.
The contents of each box are as follows:
• Equatorial Mount
• Adjustable Tripod Legs, Leg Clamps, Counterweight Shaft
• Tripod Center Column, Digital Drive Box, Hand Control, Cables, Mounting Bolts,
Allen Wrench, Counterweight Safety Screw
• 21 lb. Weight, Locking Bolt
Remove all the parts from their respective boxes and place them on a flat, clear work area. A large
floor space is ideal. When setting up your Losmandy G-11, you must start with the tripod and work
from there. To insure proper assembly, each task must be performed in the specific order as defined
by these instructions.
Assembling the tripod
Remove the legs, leg clamps and weight shaft from the box. Place one leg clamp on the end of each
Tripod leg, making sure the screw on the side of each leg clamp lines up with the hole on the tripod leg.
These clamps will remain on the legs and will not be taken off. Slide the legs onto the center column
and lock in place by turning each knob on the leg clamps. The tripod is now ready for the equatorial
mount.
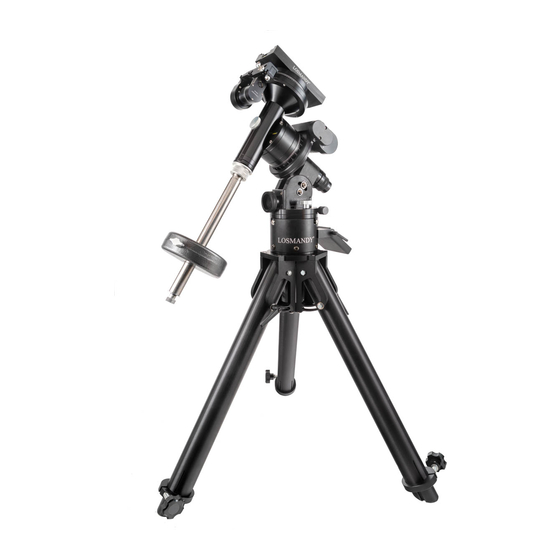
THE LOSMANDY G-11 MOUNT
Location of Parts - Click for larger image
Advertisement
Table of Contents

Related Manuals for Losmandy G-11

Summary of Contents for Losmandy G-11
- Page 1 Remove all the parts from their respective boxes and place them on a flat, clear work area. A large floor space is ideal. When setting up your Losmandy G-11, you must start with the tripod and work from there. To insure proper assembly, each task must be performed in the specific order as defined by these instructions.
- Page 2 Once the bar is securely in place you are ready to attach the counterweight(s). Attaching the counterweight The Losmandy G-11 comes standard with one 21 pound counterweight. To install the counterweight: 1. Orient the mount so that the counterweight bar points toward the ground.
- Page 3 Once the telescope is set up, you will need to point it at various locations to observe different objects. Unlike other systems, the Losmandy mounts have a clutch system. To make rough adjustments, loosen the R.A. and DEC clutch knobs slightly and move the telescope in the desired direction. The R.A.
- Page 4 the east side of the mount there should be a slight imbalance toward the telescope side. This is done so that the worm gear is pushing against the slight load. THE AMOUNT OF THE IMBALANCE IS VERY SLIGHT. When taking astro-photographs, this balance process can be done for the specific aim of the telescope to further optimize tracking accuracy.
- Page 5 Technical Specifications Below is pertinent technical information on your Losmandy G-11 telescope that technophiles may find useful. R.A. & DEC axis •...
- Page 6 Distance from the top of the tripod to the DEC/R.A. junction (at 34°) is 10". Distance from the DEC/R.A. junction to the top of the saddle is 7". Please note that these specifications are sub-ject to change without notice and stated for the Losmandy G-11 mount with the standard accessories.
Need help?
Do you have a question about the G-11 and is the answer not in the manual?
Questions and answers