
Summary of Contents for Agona Grizzly
- Page 1 Owner’s Manual We strongly recommend that you read this entire manual before using your AGONA e-bike...
- Page 2 Thank you for choosing AGONA. It is our goal to provide you with the highest quality electric propulsion systems available, and offer you the best possible after sales experience. This document serves as a supplement to your bicycle user manual. Please read this manual thoroughly, even if you are an experienced cyclist.
-
Page 3: User Precautions
2. Read all of the enclosed installation and operating instructions from the manufacturer and follow the instructions, if any, prior to its first use. 3. Familiarize yourself with your electric bicycle and the functions of the AGONA system in a safe environment before participating in road traffic for the first time. -
Page 4: Table Of Contents
Table of Contents User Precautions……………………………………………………………….3 Your E-Bike………………………………………………….4-6 Introduction General presentation of the vehicle Caring for your AGONA e-bike and pre-use checks……7-8 irst time 3.2 Before you set off for the f Using the bike………………………………………………………………….8-10 4.1 Riding the bike 4.2 Quick-release devices 4.3 Adjusting the height of the seat... -
Page 5: Your E-Bike
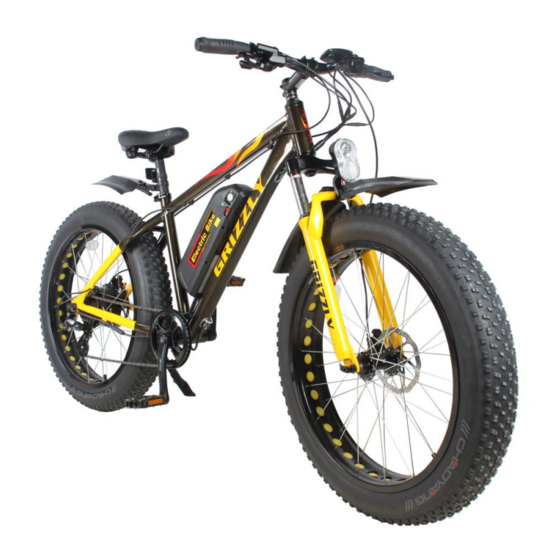
2. Your E-Bike 2.1) Introduction We would like to thank you for your e-bike purchasing. The e-bike, equipped with pedals and an auxiliary electric motor, cannot be propelled exclusively by means of this auxiliary electric motor. You will thoroughly enjoy riding this new and electrical power- assisted bike. - Page 6 GRIZZLY 2.2.2) Spare parts spec Spare parts name GRIZZLY Motor Battery Display Front fork E-Brake Lever 3 TEKTRO Hydraulic, Auriga E-COMP Disc Brake TEKTRO, Hydraulic, Auriga COMP 2 colors Derailleur...
-
Page 7: Caring For Your Agona E-Bike And Pre-Use Checks
** Autonomy: between 50 to 70 KM, depending on the assistance level and road condition. ** 2 charge indicators: 1 is located on the display; 1 is located on the side of battery. ** Weight: 4 KG 3. Caring for your AGONA e-bike and pre-use checks 3.1) Before each use 3.1.1 Check the tyres for any visible damage. -
Page 8: Using The Bike
3.2.7 Load the battery into bicycle and turn on with the switch located at the rear right hand side of the battery. To remove the battery turn the battery key hold in unlocked position and slide the battery out. Remove key from battery and keep save during operation of the bike. -
Page 9: Quick-Release Devices
soon as you start pedaling. When you use the brakes, the contactor located within these brakes will halt the engine’s assistance immediately. The left brake lever controls the rear brake. The right brake lever controls the front brake. You can also use the bike without electric assistance by turning off the battery (switch off the button or by adjusting the assistance level on 0). -
Page 10: Precautions Required Prior To Each Use
Unlock the lever (open), adjust the seat height to the desired position without ever exceeding the mark carved onto the seat’s tube, lock the lever (LOCK). The seat’s height must be set so that your leg is stretched out when the corresponding pedal is in the lower position. -
Page 11: The Battery
5.The battery 5.1) Installing and removing the battery To remove the battery, unfasten the lock which is located along the battery’s box. Remove the battery by pulling it out. To put the battery back into place, insert the battery along to the guide rail. -
Page 12: Battery Autonomy And Lifespan
It takes 4 - 6 hours for the battery to be fully charged when using the standard charger that’s supplied with your bike. 5.3) Battery autonomy and lifespan 5.3.1) Autonomy The bike's autonomy ranges from 50 to 70 kilometers, as it depends on many different factors (degree of assistance used, topology, rider’s weight, frequent stops/start-ups, hills, tire pressure, etcP) 5.3.2) Battery... -
Page 13: Key
5.5) key For repair of your electric bicycle, consult a qualified dealer. The use of spare parts from unknown sources, for example, replacement parts from third parties, is strictly prohibited. Please retain the key number for your records. It is located on the battery key, as well as on the face of the battery lock cylinder. - Page 14 6.1.1) Helmet Helmets significantly reduce the number and severity of head injuries. Always wear a helmet that complies with your state Do not wear loose fitting clothing that can ecome tangled in the moving parts of the E-Bike™.Wear sturdy shoes and eye protection.
-
Page 15: Maintenance
6.2) Maintenance Caution: Bike maintenance and repair require specific skills and appropriate tools. Do not repair your bike or change any of its settings if you have the slightest doubt regarding your ability to correctly proceed with such work. Contact your dealer. Any adjustments or repairs that are not properly done can damage the bike and lead to accidents resulting in extensive injuries. -
Page 16: Accessories
7. Accessories Mudguards (Place the mudguard assembly between the stays, make sure the mudguard bracket holes line up with those in the frame. Tighten all bolts and screws until snug. Helmet, baskets and storage pouch are not provided with the vehicle. To order these accessories, get in touch with your dealer.
Need help?
Do you have a question about the Grizzly and is the answer not in the manual?
Questions and answers