Advertisement
®
DR
RAPIDFIRE™ LOG SPLITTER
SAFETY & OPERATING INSTRUCTIONS
Serial No.
Order No.
Read and understand this manual and all instructions before operating the DR RAPIDFIRE LOG SPLITTER.
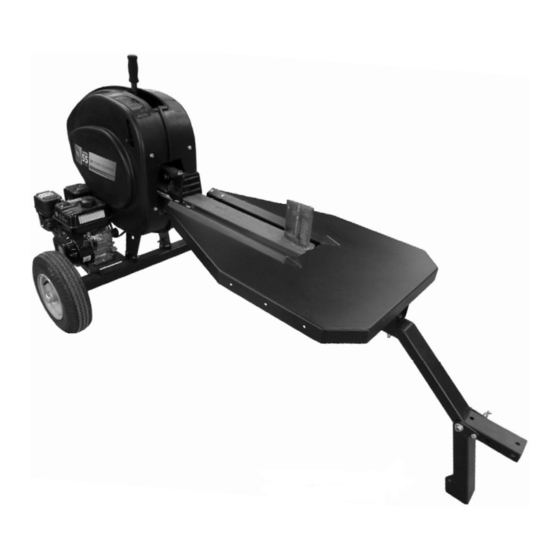
Shown with optional
Tray Kit Accessory
Original Language
DR Power Equipment
Toll-free phone: 1-800-DR-OWNER (376-9637)
Fax: 1-802-877-1213
Website: www.DRpower.com
Advertisement

Summary of Contents for DR Power Equipment RapidFire Pro
- Page 1 ® RAPIDFIRE™ LOG SPLITTER SAFETY & OPERATING INSTRUCTIONS Shown with optional Tray Kit Accessory DR Power Equipment Toll-free phone: 1-800-DR-OWNER (376-9637) Serial No. Fax: 1-802-877-1213 Original Language Order No. Website: www.DRpower.com Read and understand this manual and all instructions before operating the DR RAPIDFIRE LOG SPLITTER.
-
Page 2: Table Of Contents
Number and Order Number in the space provided on the front cover of this manual. Additional Information and Potential Changes DR Power Equipment reserves the right to discontinue, change, and improve its products at any time without notice or obligation to the purchaser. The Figure 1 descriptions and specifications contained in this manual were in effect at printing. -
Page 3: Chapter 1: General Safety Rules
Chapter 1: General Safety Rules Read this Safety & Operating Instructions manual before you use the DR RAPIDFIRE LOG SPLITTER. Become familiar with the operation and service recommendations to ensure the best performance from your machine. If you have any questions or need assistance, please contact us at www.DRpower.com or call toll-free 1-800-DR-OWNER (376-9637) and one of our Technical Support Representatives will be happy to help you. - Page 4 Protecting Yourself and Those Around You This is a high-powered machine, with moving parts operating with high energy. You must operate the machine safely. Unsafe operation can create a number of hazards for you, as well as anyone else in the nearby area. Always take the following precautions when using this machine: ...
- Page 5 Safety with Gasoline - Powered Machines Gasoline is a highly flammable liquid. Gasoline also gives off flammable vapor that can be easily ignited and cause a fire or explosion. Never overlook the hazards of gasoline. Always follow these precautions: Never run the engine in an enclosed area or without proper ventilation as the exhaust from the engine contains carbon monoxide, which is an odorless, tasteless, and deadly poisonous gas.
- Page 6 General Safety (continued) If the machine should start making an unusual noise or vibration, shut down the engine, disconnect the spark plug wire, keeping it away from the spark plug to prevent accidental starting, wait 5 minutes for machine to cool down, then inspect for damage.
-
Page 7: Chapter 2: Setting Up The Dr Rapidfire Log Splitter
Chapter 2: Setting Up The DR RAPIDFIRE LOG SPLITTER It may be helpful to familiarize yourself with the controls and features of your DR RAPIDFIRE LOG SPLITTER as shown in Figure 2 before beginning these procedures. If you have any questions at all, please feel free to contact us at www.DRpower.com. DR RAPIDFIRE LOG SPLITTER Controls and Features Throttle Flywheels... - Page 8 Specifications RapidFire Pro RapidFire Pro-XL (manual start) RapidFire Pro-XL (elec. start) Engine DR 5.8hp (see engine manual B&S, 9.50 CR (see engine B&S, 9.50 XR Subaru 6hp for specifications) manual for specifications) (see engine manual for Wedge Height 6-1/4" 6-1/4"...
- Page 9 4. Install the Tow Bar to the end of the Beam with four 3/8-16 X 2.5 Bolts and Bolts and Lock Nuts (from the product package) using two 9/16" Wrenches (Figure Lock Nuts 5. Pull the Hitch Clip and Clevis Pin from the Leg and fold it to the down Tow Bar position.
- Page 10 1. Support the end of the Beam with a Jack Stand or equivalent to position the Bolts and Locknuts Beam parallel with the ground. 2. Install the Tow Bar to the Tray with four 3/8-16 X 2.5 Bolts and Lock Nuts (from product package) using two 9/16"...
- Page 11 2. Machines are shipped with no oil. Initially add 16 oz. of the oil Gas Cap recommended by the Engine Manufacturer. Wait one minute for the oil to settle. 3. Replace the Dipstick, but DO NOT screw it in to ensure an accurate reading and then remove it to check the oil level (clean the Dipstick with the clean rag after checking).
-
Page 12: Chapter 3: Operating The Dr Rapidfire Log Splitter
Chapter 3: Operating The DR RAPIDFIRE LOG SPLITTER It may be helpful to better familiarize yourself with the features of your Log Splitter by reviewing Figure 1 in Chapter 2 before beginning the steps outlined in this chapter. Read and understand all instructions, safety precautions, and/or warnings listed in “Chapter 1 General Safety Rules”... - Page 13 Splitting Note: All logs should be no longer than 24". Use the following photos for the correct and incorrect methods of splitting logs. Never split a log using an incorrect or unsafe method. Do not place your hands on the ends of the log when loading the Log Splitter.
- Page 14 2. With one hand, lift and hold the Safety Interlock Lever up, then RAPIDLY Engagement Handle press the Engagement Handle fully forward until it contacts the hard stop and hold firmly until the Log is split (Figure 24). 3. IMMEDIATELY AFTER the log is split, pull and hold the Engagement Handle to the Auto-Retract position to allow the Ram to return.
-
Page 15: Chapter 4: Maintaining The Dr Rapidfire Log Splitter
Chapter 4: Maintaining The DR RAPIDFIRE LOG SPLITTER Regular maintenance is the way to ensure the best performance and long life of your machine. Please refer to this manual and the engine manufacturer's owner's manual for maintenance procedures. Service intervals listed in the checklist below supersede those listed in the engine manufacturer's owner's manual. - Page 16 Safety Rail Maintenance Interlock Lever Between each use of the LOG SPLITTER, we recommend applying a rust Guard preventative (Fluid Film or equivalent) to any bare metal areas on the top of the rail (Figure 26). This will assure the smoothest return action of the ram. Greasing the Engagement Handle and Yoke Tools and Supplies needed: ...
- Page 17 Changing and Adjusting the Belts Safety Interlock Lever Tools and Supplies needed: Guard Two 9/16" Wrenches DR Belts 1. Remove the two Flange Bolts and Washers at the front of the right side Guard and the two Locknuts and Washers at the rear of the guard using a 9/16"...
- Page 18 4. Loosen the Jam Nuts with a 9/16" Wrench and turn the Carriage Bolts with a Frame 10mm Wrench until they touch the Rack (Figure 36). 5. Turn each Carriage Bolt back away from Rack two turns. Jam Nut Jam Nut 6.
- Page 19 Replacing the Wheels Tools and Supplies needed: Channel lock Pliers Clean Rags Adjustable Wrench Needle Nose Pliers Jack and Jack Stands Hammer and Wood Block Dust Cap Figure 40 The Splitter must be supported carefully so it does not tip over when jacking or it could cause Splitter damage or personal injury.
- Page 20 1. Disconnect the Battery Terminals (Figure 44). Battery Terminals 2. Remove the Bolts and Locknuts that secure the Battery Strap using two 7/16" Wrenches. 3. Remove the Strap and the old Battery. Battery Strap 4. Install the new Battery. 5. Install the Battery Strap and secure with the Bolts and Locknuts using two 7/16"...
- Page 21 Disposing of the Battery Responsibly The Battery is a sealed lead-acid Battery. Recycle or dispose of it in an environmentally sound way. Do not dispose of a lead-acid Battery in a fire; the Battery may explode or leak. Do not dispose of a lead-acid Battery in your regular, household trash.
-
Page 22: Chapter 5: Troubleshooting
Chapter 5: Troubleshooting Most problems are easy to fix. Consult the Troubleshooting Table below for common problems and their solutions. If you continue to experience problems, contact us at www.DRpower.com or call toll-free 1-800-DR-OWNER (376-9637) for support. Before performing any maintenance procedure or inspection, stop the engine, wait five (5) minutes to allow all parts to cool. Disconnect the spark plug wire, keeping it away from the spark plug. - Page 23 Troubleshooting Table (Continued) Before performing any maintenance procedure or inspection, stop the engine, wait five (5) minutes to allow all parts to cool. Disconnect the spark plug wire, keeping it away from the spark plug. YMPTOM OSSIBLE AUSE Lever not all the way forward when rack comes under full load. Push lever quicker and more Operator Lever snapping forcefully into the full forward position.
-
Page 24: Chapter 6: Parts Lists And Schematic Diagrams
Chapter 6: Parts Lists and Schematic Diagrams Parts List - TOW BAR AND GUARD ASSEMBLY NOTE: Part numbers listed are available through DR Power Equipment. Ref# Part# Description Ref# Part# Description 31358 Mount, Cradle 16003 Pin, Hair, 1/2" To 9/16", .12" Wire 32104 Bolt, Carriage, 3/8-16 X 1", GR5, ZP... - Page 25 Schematic – TOW BAR AND GUARD ASSEMBLY CONTACT US AT www.DRpower.com...
- Page 26 Parts List – DRIVE ASSEMBLY NOTE: Part numbers listed are available through DR Power Equipment. Ref# Part# Description Ref# Part# Description 29461 Flywheel, 75 Lb (K34) 32114 Pulley, 2 Groove, 4l, 3/4" Keyway 32125 Flywheel, 55 Lb (K28) 33356 Belt, 4l700 37075 Engine, B&S, 9.50 XR, E/S, W/Labels...
- Page 27 Schematic – DRIVE ASSEMBLY CONTACT US AT www.DRpower.com...
- Page 28 Parts List – FRAME AND AXLE ASSEMBLY NOTE: Part numbers listed are available through DR Power Equipment. Ref# Part# Description Ref# Part# Description 31357 Frame, Main 11242 Washer, Lock, 0.5" 13447 Battery, 12V, 9Ah 10948 Cap, Round, 1" 11468 Bolt, HHCS, 1/4-20 X 2.0", GR2, ZP...
- Page 29 Schematic – FRAME AND AXLE ASSEMBLY CONTACT US AT www.DRpower.com...
- Page 30 Parts List – TRAY KIT ASSEMBLY NOTE: Part numbers listed are available through DR Power Equipment. Ref# Part# Description 31363 Table, Log 32104 Bolt, Carriage, 3/8-16 X 1", GR5, ZP 15043 Bolt, HHCS, 3/8-16 X 1-1/4", GR5 18081 Washer, Lock, 3/8"...
- Page 31 ® RAPIDFIRE™ LOG SPLITTER 2-Year Limited Warranty Terms and Conditions The DR RAPIDFIRE™ Log Splitter is warranted for two (2) years against defects in materials or workmanship when put to ordinary and normal consumer use; 90 days for commercial use. The engine manufacturer warrants the engine separately.
- Page 32 Daily Checklist for the DR LOG SPLITTER To help maintain your DR LOG SPLITTER for optimum performance, we recommend you follow this checklist each time you use your Log Splitter. Before performing any maintenance procedure or inspection, stop the engine, wait five (5) minutes to allow all parts to cool. Disconnect the spark plug wire, keeping it away from the spark plug.
Need help?
Do you have a question about the RapidFire Pro and is the answer not in the manual?
Questions and answers