Table of Contents
Advertisement
Available languages
Available languages
Quick Links
Advertisement
Table of Contents

Summary of Contents for clarer C3 V2.0
- Page 1 Handbuch / User Manuel Smart Alarm System C3 V2.0 27.03.2018 Version: 23.010.118...
-
Page 2: Table Of Contents
C3V2.0 Alarm System (Starter Set) ................27 Explanation and preparation of the gateway ............28 Connection of the gateway in the clarer Pro App (iOS & Android) ..29 Types of accessories and their characteristics ............ 32 Explanation of the door/window sensor ..............34 Preparation of the window-door sensor .............. - Page 3 Connection of accessories to the central unit ............37 Window-door sensor (S03) ..................... 38 Remote control (F03) ......................38 PIR sensor (PIR03) ....................... 38 Smoke detector (RM03) ....................39 Siren (SI03)..........................39 Water sensor (WS03) ......................40 Control after setup ........................40 Adding users and sharing alarm systems ...............
-
Page 4: Sicherheitsvorschriften
Häusern, Wohnungen, Büros etc. Zur Installation und Überwachung von öffentlichen Räumen sollten Sie sich vorher eine Genehmigung einholen. Bitte nutzen Sie die Produkte von clarer ausschließlich für den vorgesehe- nen Zweck. Jovision Deutschland GmbH haften für keinerlei Schäden, die durch frem- des Zubehör oder Software von Drittanbieter entstehen. -
Page 5: Eu- Konformitätserklärung
Hiermit erklärt Jovision Deutschland GmbH, dass sich die unten genannten drahtlosen Gerät in Übereinstimmung mit den grundlegenden Anforderungen und den übrigen einschlägigen Bestimmungen der R&TTE-Richtlinie und der Richtlinie 2014/53/EU für Funkanlagen (sofern zutreffend) befindet. C3 V2.0 SI03 PIR03 RM03 WS03 EMV-Richtlinie Die folgenden unten aufgelisteten Geräte entsprechen den grundlegenden... -
Page 6: C3V2.0 Alarm System (Starter Set)
Einzelartikel erhältlich. Die unterschiedliche LED-Beleuchtung der Zentrale zeigt den gegenwärtigen Status der Alarm Anlage. Dank der kos- tenlosen App „clarer Pro“, erhältlich für iOS und Android Smartphones und Tab- lets, sind Sie jederzeit mit Ihrem Alarmsystem verbunden und werden jederzeit über die Veränderungen bzw. -
Page 7: Erklärung Und Vorbereitung Der Zentrale
Erklärung und Vorbereitung der Zentrale Name Funktion Blinkt einmal rot: Bereit für die Konfiguration Leuchtet dauerhaft grün: Alarm ist unscharf LED-Licht Leuchtet dauerhaft blau: Alarm ist scharf Blinkt blau: Home Modus ist aktiviert Blink schnell: WLAN-Verbindung verloren Einmal drücken: Startet die Konfiguration von einem Zu- behör Dreimal drücken: Startet die Konfiguration mit der App Fünfmal drücken: Zentrale wird auf Werksteinstellung ge-... -
Page 8: Anbindung Der Zentrale In Der Clarer Pro App (Ios & Android)
Fehlfunktion oder Defekt auszuschließen. Falls ein Defekt vorliegen sollte, setzten Sie sich bitte mit dem Service in Verbindung. Anbindung der Zentrale in der clarer Pro App (iOS & Android) 1. Laden Sie die kostenlose App „clarer Pro“ im App Store oder Google Play Store herunter. (iOS &... - Page 9 4. Wählen Sie Ihr Netzwerk aus und geben Sie das geforderte Passwort ein. (iOS & Android) 4. Wechseln Sie nun von der „clarer Pro“ in die Einstellungen Ihres Smart- phones. (iOS & Android) 5. Gehen Sie in die Netzwerkeinstellungen Ihres Smartphones und wählen Sie den Eintrag beginnend mit „clarerPro-xxx“...
- Page 10 Netzwerk verbunden sind. 6. Nachdem Sie die Verbindung zu der Zentrale aufgebaut haben, wechseln Sie in die „clarer Pro“ App. Die Anbindung zwischen die Zentrale und den Router wird hergestellt. 7. Klicken Sie im letzten Schritt auf „Weiter“. Nun sollte im anschließenden Fenster die Zentrale angezeigt werden (siehe nächstes Bild).
-
Page 11: Arten Von Zubehör Und Deren Besonderheiten
Die drahtlose Außensi- rotsensor werden jegli- Rauchmelder RM03 rene ist ein wichtiges che Bewegungen (7 erzeugt bei einer Rau- Zubehör für die clarer bis 8 Meter / 110° chentwicklung wird ein Smart Alarmanlage. Winkel) im Haus/Woh- Alarm (85 dB) ausge- Die 115 dB laute Si- nung/Büro erfasst. - Page 12 Fenster- und Türsensor Fernbedienung (F03) (S03) Wassersensor (WS03) Die Fernbedienung Der Tür- und- Fens- Der Wassersensor dient in erster Linie das tersensor ist eine zent- WS03, löst bei einer System in den Scharf-, rale Einheit des Überschwemmung in Unscharf-, Heim- und Alarmsystems und Verbindung mit der SOS-Modus zu schal-...
-
Page 13: Erklärung Des Tür-/Fenstersensors
Erklärung des Tür-/Fenstersensors 1. Magnetkontakt 2. Sabotageschalter 3. Zonen Jumper 4. LED-Indikator 5. Schilf 6. Batteriefach Status Erklärung Sensor piept einmal Der Sensor wurde erfolgreich mit der Zentrale ver- LED blinkt einmal bunden Sensor piept zweimal Der Sensor wurde bereit mit der Zentrale verbun- LED blinkt einmal Sensor piept dreimal Der Speicher der Zentrale ist voll... -
Page 14: Vorbereitung Des Fenster- Türsensors
Wichtiger Hinweis: Der Sensor befindet sich im Auslieferungszustand in der Standard-Zone. Vorbereitung des Fenster- Türsensors Öffnen Sie die Abdeckung Ihres Sensors und entfernen Sie die Papierabdeckung zwischen der Batterie (AAAA) und dem Kontakt. Sobald die Batterie Kontakt eine Verbindung haben, wird ein LED-Licht kurz aufleuchten. Das bedeutet, dass der Sensor einsatzbereit ist. - Page 15 Wichtiger Hinweis: Der gewünschte Montagebereich sollte frei von Metall und elektrischen Leitungen sein, da ansonsten der Sensor in seiner Funktion unbrauchbar wird. Sie können den Sensor und den Magnetstift an Fenster und Türen sowohl Vertikal als auch horizontal anbringen. Sensor und der Magnetkontakte darf dürfen versetzt, je- doch nur maximal 1 cm voneinander entfernt sein.
-
Page 16: Anbindung Von Zubehörartikeln An Die Zentrale
Anbindung von Zubehörartikeln an die Zentrale Zwei Möglichkeiten zur Anbindung stehen zur Auswahl. Möglichkeit 1: über Zentrale (z.B. ohne Wifi und Internet) Funktioniert mit und ohne WLAN. Sie Klicken Sie auf die einzige Taste der Zent- rale. Die Zentrale sollte nun rot leuchten (Konfigurationsmodus) und somit zur Anbindung bereit sein. -
Page 17: Fenster-Türsensor (S03)
Wichtiger Hinweis: Bei der Anbindung des Zubehörs, muss die Zentrale unmittelbar in der Nähe des Zubehörs sein Ein Tipp, die Zentrale kann dank des integrierten Akkus, ca. 2 Stunden ohne Strom in Betrieb bleiben. Das bedeutet, Sie können auch nach der Montage des Zubehörs, die Zentrale in die Nähe des Zubehörs tragen und die Anbindung durchführen. -
Page 18: Rauchmelder (Rm03)
Rauchmelder (RM03) • Auf der unteren Seite des Rauchmelders befindet sich ein Knopf. Diesen bitte drücken. Sirene (SI03) • Hinteren Deckel entfernen, die Sirene mit der „POWER-Taste“ ein- schalten und im Anschluss (nach Piepton) die „LEARN-Taste“ drü- cken. Deutsch Seite 18... -
Page 19: Wassersensor (Ws03)
Die Anlage ist nach der Einrichtung sowohl per App als auch über die Fernbe- dienung einsatzbereit. In beiden Fällen werden jegliche Veränderungen der Alarmanlage bei allen Teilnehmern, die mit der Anlage über die clarer App ver- bunden sind, über die Änderung per Push Benachrichtigung in Kenntnis ge- setzt. - Page 20 Fernbedienung (F03) Darstellung Menü clarer Pro App (iOS & Android) Modus Status Scharf Alle Sensoren sind aktiv. Sensoren in Dauerhaft-Zone bleiben aktiv. Unscharf Alle anderen Sensoren sind deaktiviert. Home Mo- Sensoren in Home-Zone sind deaktiviert. Alle anderen Sensoren bleiben aktiv.
- Page 21 Wichtiger Hinweis: Die Fernbedienung wird in der App nicht unter Zubehör aufgelistet. Im nächsten Feld sollten die Option Fernbedienung-Name zu sehen sein. Hier können Sie sowohl den Namen der Fernbedienung ändern als auch den Batte- riestatus prüfen können. 27.03.2018 Version: 23.010.118...
-
Page 22: Hinzufügen Von Benutzern Und Teilen Von Alarmanlagen
Benutzerrechte, um alles zu verändern. So können Sie einen Benutzer hinzufügen // entfernen Öffnen Sie die „clarer Pro“ App. Klicken Sie im Hauptmenü links oben auf das folgende Symbol Wählen Sie die Option „Benutzer“ aus und klicken Sie auf das + Symbo um ein Benutzer hinzufügen. -
Page 23: C3V2.0 Alarm System Spezifikationen
C3V2.0 Alarm System Spezifikationen Produkt Zentrale & Sirene Tür-/Fens- Fernbedienung tersensor Modelbezeich- nung Input: AC DC 1.5V (1 x of DC 3V (2x Spannungsver- 110~240V/50~60Hz AA, LR6 Batte- CR2032 Knopf- sorgung rie) zellen Batterie) Integrierte Akku 600mh/3.7V ≤30μA ≤30μA Standby-Strom ≤70mA ≤25mA Übertragungs-... -
Page 24: Europäische Union- Information Zur Entsorgung
Jovision Deutschland GmbH In der Riedwiese 1 61440 Oberursel E-Mail: service@jovision.de Tel: +49 (0) 6171 9591 268 (Mo. – Fr. 10:00 – 16:00 Uhr) © 2020 clarer. Alle Rechte vorbehalten. Alle Angaben ohne Gewähr, Irrtümer und Änderungen vorbehalten. Deutsch Seite 24... -
Page 25: Safety Regulations
Any use by minors should be monitored at all times in order to rule out incorrect use. • In order to avoid the dangers of damaged products, you should contact the clarer service department (see last page). • Please do not make any repairs or other changes to the products yourself. Other- wise the warranty will automatically expire. -
Page 26: Eu Declaration Of Conformity
EU Declaration of Conformity Jovision Deutschland GmbH hereby declares that the wireless equipment listed below is in compliance with the essential requirements and other relevant pro- visions of the R&TTE Directive and the Radio Equipment Directive 2014/53/EU (where applicable) is located. SI03 PIR03 RM03... -
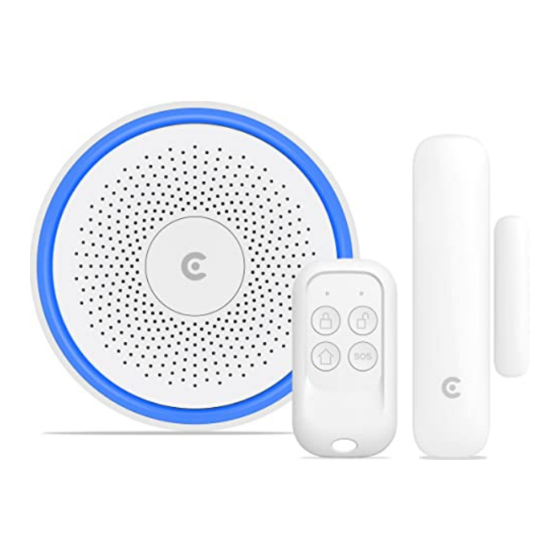
Page 27: C3V2.0 Alarm System (Starter Set)
10 remote controls. The sensors, remote controls and other accessories are available as single items. The different LED lighting of the gateway shows the current status of the alarm system. Thanks to the free app "clarer Pro", available for iOS and Android smartphones and tablets, you are always connected to your alarm system and are informed about changes or messa- ges at any time. -
Page 28: Explanation And Preparation Of The Gateway
Explanation and preparation of the gateway Name Funktion Flashing red once: Ready for configuration Permanently green: Alarm is not armed LED light Permanently blue: Alarm is armed Flashing blue: Home mode is activated Flashing fast: WLAN connection lost Press once: Starts the configuration of an accessory Press three times: Starts the configuration with the app Press five times: The central unit is set to factory settings Press ten times: The central unit is switched off... -
Page 29: Connection Of The Gateway In The Clarer Pro App (Ios & Android)
If there is a defect, please contact the service depart- ment. Connection of the gateway in the clarer Pro App (iOS & Android) 1. Download the free app "clarer Pro" from the App Store or Google Play Store (iOS & Android) 2. - Page 30 Select your network and enter the required password. (iOS & Android) 4. Now switch from the "clarer Pro" to the settings of your smartphone. (iOS & Android) 5. Go to the network settings of your smartphone and select the entry starting with "clarerPro-xxx"...
- Page 31 Please make sure that your smartphone and the C3V2.0 central unit are connected to the same network. 6. After you have established the connection to the central unit, switch to the "clarer Pro" app. The connection between the central office and the router is established (iOS & Android).
-
Page 32: Types Of Accessories And Their Characteristics
(85 sensor is an important vement (7 to 8 metres dB) in case of smoke accessory for the clarer / 110° angle) in the development and the Smart alarm system. house/flat/office. gateway is informed by... - Page 33 Window and door sensor Water sensor (WS03) Remote control (F03) (S03) The WS03 water sen- The remote control is The door and window sor triggers an alarm in primarily used to switch sensor is a central unit the event of flooding in the system to arm, dis- of the alarm system connection with the ga-...
-
Page 34: Explanation Of The Door/Window Sensor
Explanation of the door/window sensor 1. Magnetic contact 2. Sabotage switch 3. Zone Jumpers 4. LED indicator 5. Reeds 6. Battery compartment Status Declaration Sensor beeps once The sensor was successfully connected to the LED flashes once central unit Sensor piept zweimal Sensor beeps twice LED blinkt einmal LED flashes once... -
Page 35: Preparation Of The Window-Door Sensor
Important notice: The sensor is in the standard zone when delivered. Preparation of the window-door sensor Open the cover of your sensor and remove the paper cover between the battery (AAAA) and the contact. Once the battery contact is connected, an LED light will illuminate briefly. - Page 36 Important notice: The desired mounting area should be free of metal and electrical wires, other- wise the sensor will be unusable in its function. You can attach the sensor and the magnetic pen to windows and doors both vertically and horizontally. The sensor and the magnetic contact may be offset, but only 1 cm apart.
-
Page 37: Connection Of Accessories To The Central Unit
Connection of accessories to the central unit Two connection options are available. Option 1: via central office (e.g. without Wifi and Internet) Works with and without WLAN. You click on the only button on the panel. The central unit should now light up red (configuration mode) and thus be ready for connection. -
Page 38: Window-Door Sensor (S03)
Important notice: When connecting the accessories, the gateway must be located in the immedi- ate vicinity of the accessories A note, the gateway unit can remain in operation for approx. 2 hours without power with the integrated rechargeable batteries. This means that even after mounting the accessory, you can still carry the central unit near the accessories and make the connection. -
Page 39: Smoke Detector (Rm03)
Smoke detector (RM03) • There is a button on the lower side of the smoke detector. Please press this button. Siren (SI03) • Remove the rear cover, switch on the siren with the "POWER button" and then press the "LEARN button" (after beeping). English... -
Page 40: Water Sensor (Ws03)
App and remote control are identical in their layout and function keys (see exa- mple pictures). - Page 41 Remote control (F03) Display Menu clarer Pro App (iOS & Android) Mode Status All sensors are active. Sensors in permanent zone remain active. Disarm All other sensors are deactivated. Home Sensors in home zone are disabled. Mode All other sensors remain active.
- Page 42 Important information: The remote control is not listed in the app under accessories. In the next field you should see the option Remote Control Name. Here you can change the name of the remote control as well as check the bat-teriestatus. English Seite 42...
-
Page 43: Adding Users And Sharing Alarm Systems
Super User (= Admin), Standard User and Child. You can get the exact explanations directly from the app. In the last window, add the user who is already registered in the clarer Pro App.Alle Geräte die unter dem „Admin“ angelegt sind, werden für den neuen Benutzer freigegeben. -
Page 44: C3V2.0 Alarm System Spezifikationen
C3V2.0 Alarm System Spezifikationen Product Control Center & Si- Door & Window Sensor Remote Control Model No. Input: AC DC 1.5V (1pc of AA, DC 3V (2pcs Power Supply 110~240V/50~60Hz LR6 battery) CR2032 button cell battery) Built in Battery 600mh/3.7V ≤30μA ≤30μA Standby Cur-... -
Page 45: European Union - Information On Disposal
Jovision Deutschland GmbH In der Riedwiese 1 61440 Oberursel E-Mail: service@jovision.de Tel: +49 (0) 6171 9591 268 (Mo. – Fr. 10.00 – 16.00 Uhr) © 2020 clarer. All rights reserved. All information without guarantee, errors and changes reser- English Seite 45...
Need help?
Do you have a question about the C3 V2.0 and is the answer not in the manual?
Questions and answers