Table of Contents
Advertisement
Quick Links
Advertisement
Table of Contents

Related Manuals for KERN MCC 250K100NM

Summary of Contents for KERN MCC 250K100NM
- Page 1 KERN & Sohn GmbH Ziegelei 1 Tel: +49-[0]7433- 9933-0 D-72336 Balingen Fax: +49-[0]7433-9933-149 E-Mail: info@kern-sohn.com Internet: www.kern-sohn.com Operating instructions Chair scale KERN MCC Type MCC 250K100NM Version 1.1 2018-01 MCC-BAPS-e-1811...
-
Page 2: Table Of Contents
KERN MCC Version 1.1 2018-01 Operating manual chair Contents Technical data ....................4 Declaration of conformity ................4 Appliance overview ..................5 Overview of display ........................8 Keyboard overview ........................9 Dimensions ..........................10 Basic Information (General) ................ 10 Proper use ..........................10 Improper Use .......................... - Page 3 Menu ......................26 Navigation in the menu ......................26 Menu overview ......................... 27 Error messages .................... 28 Service, maintenance, disposal ..............29 11.1 Cleaning ........................... 29 11.2 Cleaning / disinfecting ......................29 11.3 Sterilisation ..........................29 11.4 Service, maintenance ....................... 29 11.5 Disposal ............................
-
Page 4: Technical Data
1 Technical data KERN (Type) MCC 250K100NM Trademark MCC 250K100M Readability (d) 0.1 kg Weighing range (max) 250 kg Reproducibility 0.1 kg Linearity ±0.1 kg Recommended adjustment 200 kg weight (Class) (M1) Weighing Units Warm-up time 10 min Electric Supply... -
Page 5: Appliance Overview
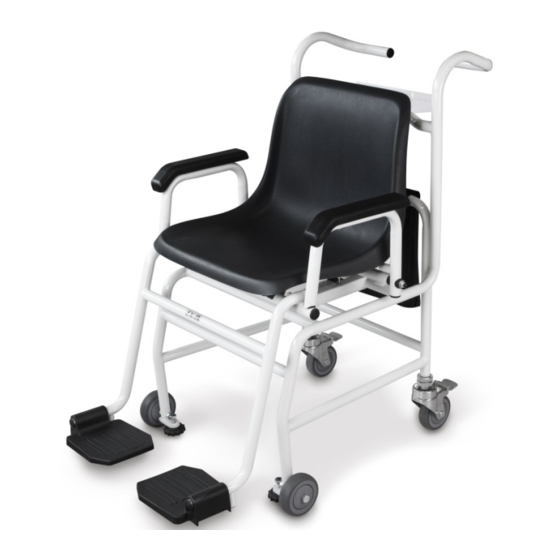
3 Appliance overview 1. Seat pan 2. Bubble level 3. Display Unit 4. Manipulations 5. Parking brake 6. Adjustment switch 7. Terminal power supply unit 8. Connection cable "Display - Chair" 9. Battery compartment MCC-BAPS-e-1811... - Page 6 Details: Accessory bag (option) Parking brake opened Parking brake closed Adjustable footrest and foot MCC-BAPS-e-1811...
- Page 7 Folding arm rests Spiral cable MCC-BAPS-e-1811...
-
Page 8: Overview Of Display
3.1 Overview of display Display Description Description GROSS Gross weight display Lights up during indication of the gross weight Net weight display Lights up during indication of the net weight Illuminated after weighing scale was tared ZERO Zeroing display Should the balance not display exactly zero despite empty scale pan, press the button. -
Page 9: Keyboard Overview
3.2 Keyboard overview Description Function ON/OFF-switch Turn on/off HOLD button Hold function BMI key Calculation of the Body Mass Index In menu: • Confirm selection For numeric entry: • Confirm numerical value In menu: Function key • Call up menu •... -
Page 10: Dimensions
3.3 Dimensions 4 Basic Information (General) 4.1 Proper use These scales are used to determine weight of people sitting at rest, The person should be weighed carefully and have contact with the center of the seat, sit and stay calm. As soon as a stable weighing value is reached the weighing value can be read. -
Page 11: Improper Use
The balances may only be used according to the described conditions. Other areas of use must be released by KERN in writing. The balance must not be used to determine a body weight in practice of medicine 4.3 Warranty... -
Page 12: Monitoring Of Test Resources
In KERN’s accredited DKD calibration laboratory test weights and balances may be calibrated (return to the national standard) fast and at moderate cost. 5 Basic Safety Precautions 5.1 Pay attention to the instructions in the Operation Manual... -
Page 13: Unpacking, Setup And Commissioning
7 Unpacking, Setup and Commissioning 7.1 Place of installation / place of operation The balances are designed in a way that reliable weighing results are achieved in common conditions of use. You will work accurately and fast, if you select the right location for your balance. -
Page 14: Unpacking
7.2 Unpacking Remove the individual components of the balance or the complete balance from the packaging with care and install at the intended location. When using the power pack, ensure that the power cable does not produce a risk of stumbling. 7.3 Scope of delivery •... -
Page 15: Levelling
7.4.1 Levelling Levelling can only be performed by a specialist with thorough knowledge in handling such scales. Place scales on an even surface. Lock brakes Turn the wheel (1) until the air bubble of the water balance is in the black circle ... -
Page 16: Mains Connection
Gap width must not exceed 15 mm! Block the front wheels using the adjustable feet. 7.5 Mains connection Terminal power supply unit MCC-BAPS-e-1811... -
Page 17: Spiral Cable
Power is supplied via the external mains adapter. The printed voltage must correspond to the local voltage. Only approved genuine KERN power supply units may be used The small sticker attached to the side of the display unit indicates the power port: The LED remains illuminated as long as the weighing scale remains connected to the mains. -
Page 18: Rechargeable Battery Operation
7.6 Rechargeable battery operation Open the battery compartment cover (1) at the base of the display unit and insert the rechargeable battery pack. Charge the battery for at least 12 hours before initial use. The appearance of the symbol in the weight display indicates that the battery packs is almost exhausted. -
Page 19: Battery Operation
7.7 Battery operation As an alternative to rechargeable battery operation, the balance may also be operated with 6x AA batteries. Open battery compartment cover (1) at the lower side of the display unit and insert batteries according to the example below. Lock the battery cover again. If the batteries are empty, in the balance display appears the symbol . -
Page 20: Initial Commissioning
7.9 Initial Commissioning In order to obtain exact results with the electronic balances, your balance must have reached the operating temperature (see warming up time chap. During this warming up time the balances must be connected to the power supply (mains, accumulator or battery) and be switched on. -
Page 21: Taring
8.2 Taring The tare weight of any preloads can be deducted by pressing a button so that the actual weight of the person is displayed in subsequent weighings. Put object (such as towel or padding) on the seating pan. (example) ... -
Page 22: Hold Function
8.3 HOLD function The balance has an integrated standstill function (mean value calculation). This allows correct weighing determination of a person although the latter is not keeping still on the seat surface. Start balance by pressing Wait for stability display „STABLE to appear. ... -
Page 23: Calculation Of The Body Mass Index
8.5 Calculation of the Body Mass Index You need to know a person’s body height before you can calculate the BMI for that person. This should be known. Start balance by pressing Allow the person to step onto the centre of the weighing platform ... -
Page 24: Automatic Switch-Off Function „Auto Off
8.6 Automatic switch-off function „AUTO OFF“ The weighing scale will switch off automatically after the allotted time as long as neither the display unit nor the weighing surface is operated. In weighing mode, press and the first function [F1 oFF] will be displayed. -
Page 25: Display Background Illumination
8.7 Display background illumination In weighing mode, press and the first function [F1 oFF] will be displayed. Press repeatedly until [F2 bk] is shown. Press , the last saved setting is displayed, for example [bL on] (example) ... -
Page 26: Menu
9 Menu 9.1 Navigation in the menu Call up menu In weighing mode, press and the first function [F1 oFF] will be displayed. Select function With help of , the individual functions can be selected one after the other. Change settings ... -
Page 27: Menu Overview
9.2 Menu overview Function Settings Description Automatic shutdown off F1 oFF oFF 0* Automatic Automatic shutdown after 3 min oFF 3 cutout Automatic shutdown after 5 min oFF 5 Auto Off oFF 15 Automatic shutdown after 15 min oFF 30 Automatic shutdown after 30 min F2 bk bl on... -
Page 28: Error Messages
10 Error messages Display Description Zero range exceeded (on start-up or when pressing the key) • Load on weighing pan • Excess load, during zero setting of weighing scale • Incorrect adjusting process • Fault on load cell Value outside the A/D converter range •... -
Page 29: Service, Maintenance, Disposal
Sterilisation of the appliance is not allowed. 11.4 Service, maintenance The appliance may only be opened by trained service technicians who are authorized by KERN. Disconnect the scales before opening. 11.5 Disposal Disposal of packaging and appliance must be carried out by operator according to valid national or regional law of the location where the appliance is used. -
Page 30: Instant Help
12 Instant help In case of a fault in the program sequence, the balance should be shortly switched off. The weighing process must then be restarted from the beginning. Failure: Possible causes: • The balance is not switched on. The displayed weight does not glow. -
Page 31: Adjustment
1. Carry out adjustment as closely as possible to admissible maximum load of weighing scale. Information about test weights you will find in the internet under http://www.kern-sohn.com • Observe stable environmental conditions. For warm-up time required for stabilisation see chpt 1. - Page 32 Procedure: In weighing mode, press repeatedly until [tCH] appears. Press , [Pin] is displayed Press subsequently, [P1 SPd] will appear Press , „P2 CAL“ will be displayed Operate adjustment switch; for position see chap.15 ...
- Page 33 Carefully place adjusting weight in the centre of the seating Wait until stability display „STABLE“ appears Confirm with [PASS] is displayed. After the adjustment the balance will carry out a self-test. Remove adjusting weight during selftest, balance will return into weighing mode automatically.
Need help?
Do you have a question about the MCC 250K100NM and is the answer not in the manual?
Questions and answers