Table of Contents
Advertisement
Quick Links
Advertisement
Table of Contents

Related Manuals for DAP Technology FireSpy 1600

Summary of Contents for DAP Technology FireSpy 1600
- Page 1 1394 Analyzer Quickstart Guide FS1600,FS3200 Doc #: DT-PRO141QUS700E...
-
Page 2: Table Of Contents
1394 Analyzer Quickstart Guide Table of Contents Chapter 1. Hardware 1.1 Third Generation Analyzers ........................... Main Feature Summary ....................................3 Specifications ....................................4 FireSpy 1600,3200 ....................................5 FireSpy Front ................................. 5 FireSpy Rear ................................. 6 Chapter 2. Installation 2.1 Windows ........................... -
Page 3: Chapter 1. Hardware
Important! Do not connect or disconnect the FireSpy when the computer is powered on. Please turn on the connected FireSpy 1600/3200 before starting the computer and do not turn it off until after the computer is powered down. 1.1.1. Main Feature Summary General ·... -
Page 4: Specifications
Hardware · Graphical Trigger Sequencer · Different kinds of packet display views, including: · Time View, displays all packets on a time line, including the prefix · Packet View, displays packets as list plus selected packet options · Transaction View, displays transactions as list or flow graph ·... -
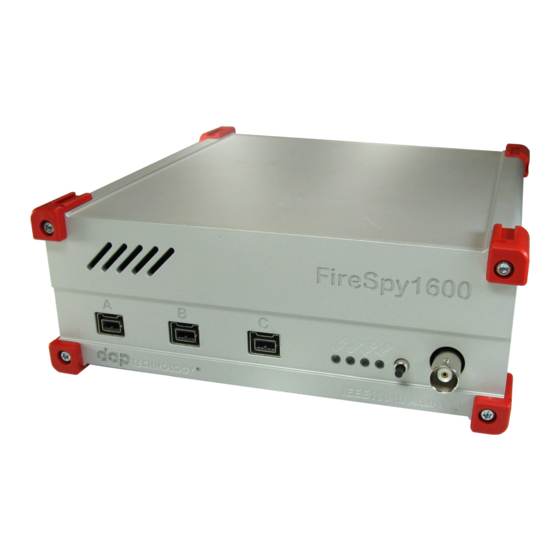
Page 5: Firespy 1600,3200
1.1.3.1. FireSpy Front IEEE1394b Connectors (3x) With these connectors the FireSpy 1600 can be connected to the IEEE1394b buses to be analyzed. All connectors are beta ports. This means that they only can be connected to a 1394b (beta) port S800 or S1600. -
Page 6: Firespy Rear
Hardware 1.1.3.2. FireSpy Rear External PCIe 4x Connector The FireSpy must be connected to the computer using this connector. A PCIe 4x cable, which is part of the FireSpy-package, is connected between this connector and the PCI Express External Adapter card installed in the computer. -
Page 7: Chapter 2. Installation
Installation Chapter 2. Installation DapTechnology analyzers are not packaged with any software-installation media. This is because we would like our customers to use the very latest software available and not an old version that happened to be the latest when we packaged the product. You will be able to download the latest software version from our website: http://www.daptechnology.com Click on the support button at the top of the web page and after inserting the serial number of your... - Page 8 Installation After clicking on "Next", the following window will be showed. It contains the License Information for the software you are about to install. Please read it carefully and check the checkbox to agree to the license agreement before proceeding to the next step. If you are installing a beta software version, an additional license agreement needs to be agreed with before continueing the installation process.
- Page 9 Installation The installer options dialog as shown below allows the user to select which components to install. We recommend installing all components, however it is also possible to leave some components out. If another FireDiagnostics Suite installed version with the same main version number is found it needs to be reinstalled before the installer is able to continue.
- Page 10 Installation The following dialog will show uninstallation progress. Please wait until it finishes. The following dialog will show installation progress. Please wait until it finishes. After the installation is complete, the following dialog will appear. We recommend to always restart your computer after installing the FireDiagnostics software.
-
Page 11: Installing The Driver
Installation 2.1.2. Installing the Driver The driver installation will automatically start following the FireDiagnostics Suite installation, after the machine is rebooted. This installer will install the drivers for Windows 7 and Windows 10. Older Windows versions still work with the supplied drivers, but some additional steps may be required during installation. These steps are described in chapter Older Windows versions. - Page 12 Installation After clicking "Next", the drivers will be installed. Please wait until it finishes. After the drivers are installed the following window will be showed. Click "Finish" to close the installation. Copyright © DapTechnology B.V., 2005-2019 - All Rights Reserved., 5/20/2019...
- Page 13 Installation After your are booted to the desktop, you may check the device manager if the install has succeeded. The device manager will show a FireSpy under "Multifunction adapters". Here you find a several functions the device has. Copyright © DapTechnology B.V., 2005-2019 - All Rights Reserved., 5/20/2019...
-
Page 14: Older Windows Versions
Installation 2.1.2.1.1 Older Windows versions For Windows versions older than Windows 7 some additional steps during the Driver installation may be required. After the FireDiagnostics Suite installation, and after rebooting the machine, the Driver installer will start. During the installation the Windows Driver Wizard may appear, as shown in the following image. Please click "Cancel"... - Page 15 Installation At the start of the installation the following message may be displayed, saying the software has not passed Windows Logo testing. The FireSpy Logo testing is not supported for Windows versions older than Windows 7, but function on these Windows version regardless. Click "Continue Anyway" to continue with the installation.
- Page 16 Installation After the drivers are installed the following window will appear. Click "Finish" to continue starting Windows. Any devices that were connected to the machine during the installation should work now. If there were any unplugged devices, please connect them to the machine now. The Windows Driver Wizard mentioned earlier should appear now.
- Page 17 Installation After clicking "Next" the Wizard will install the driver for the FireSpy device. Repeat this process for any additional FireSpy device that was not yet correctly installed during the installation. Copyright © DapTechnology B.V., 2005-2019 - All Rights Reserved., 5/20/2019...
-
Page 18: Manual Driver (Un)Installation
Installation 2.1.2.2. Manual driver (un)installation Drivers will be uninstalled when uninstalling the FireDiagnostics Suite. The uninstaller can be found in the Windows Start menu, under FireDiagnostics Suite x.x -> Uninstall FireDiagnostics Suite (for Windows 10), or FireDiagnostics Suite x.x -> Administration -> Uninstall FireDiagnostics Suite (for older Windows versions). -
Page 19: Chapter 3. Getting Started
Getting Started Chapter 3. Getting Started This section of the manual provides a quick-start guide for your analyzer and software. If you need help installing the application, please take a look at the Installation. 3.1. FireSpy Standalone Tools In addition to the main FireSpy application with all main FireSpy modules embedded there is also a way to start each module as a standalone application.
Need help?
Do you have a question about the FireSpy 1600 and is the answer not in the manual?
Questions and answers