Table of Contents
Advertisement
Advertisement
Table of Contents
Troubleshooting

Related Manuals for SCP SCIENCE EasyPREP BOD 300


Summary of Contents for SCP SCIENCE EasyPREP BOD 300
- Page 1 EasyPREP BOD 300 User Manual www.scpscience.com...
-
Page 2: Table Of Contents
Table of Contents Introduction ......4 6.5.2 Rack Parameters ....24 6.5.3 Calibration of the Autofill Sensor(s) . - Page 3 Claims: SCP SCIENCE takes great care in the packaging of goods prior to shipment. In the event that breakage occurs during shipment, claims for damaged merchandise must be made to the transport company and reported to SCP SCIENCE within five days of receipt of order. The damaged goods and original packaging must be kept, and a damage report claim must be filed with the transport company.
-
Page 4: Introduction
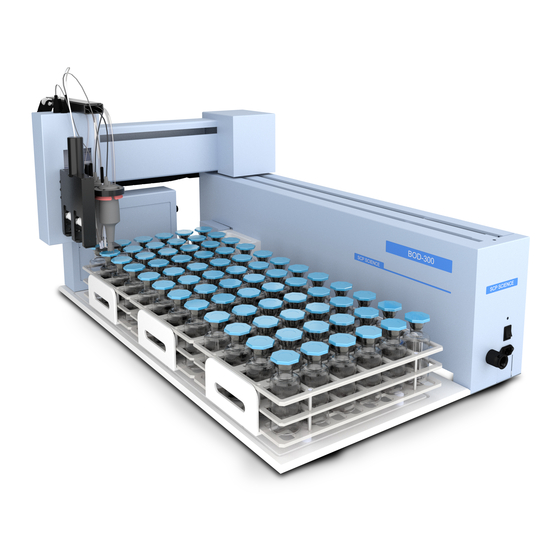
Introduction EasyPREP BOD-300 is an automated offline system for the sample preparation and analysis for Biochemical Oxygen Demand (BOD). With three liquid-handling peristaltic pumps, the EasyPREP BOD-300 adds seed and nitrification inhibitor as well as dilution water to perform sample dilutions. The low maintenance dissolved oxygen (DO) probe with either optical or membrane technology incorporates a blade stirrer, keeping the sample homogeneous and accelerating probe equilibration for DO measurement. -
Page 5: Cautions, Notes And Symbols
Cautions, Notes and Symbols SYMBOl DESCRIPTION SYMBOl DESCRIPTION Voltage Mains on Alternating current Mains off Current Attention, consult accompanying documents Frequency Protective conductor terminal Fast-acting fuse Watts Cautions, warnings and notes are included throughout this manual . CAUTION CAUTION A caution is used to emphasize information pertaining to procedures that, if not strictly followed, may result in damage or destruction to the instrument or improper instrument operation. -
Page 6: Warranty & Safety Information
The warranty is void if the instrument shows evidence of tampering or has been subjected to excessive moisture, heat, corrosion or other misuse. SCP SCIENCE shall not be responsible for any damage or losses, however caused, resulting from improper installation or misuse of this product. -
Page 7: Measures For Your Operational Safety
3 .2 MEASURES FOR YOUR OPERATIONAl SAFETY Make sure the EasyPREP BOD-300 is placed on a surface capable of supporting 200 pounds (100 kg). WARNING EasyPREP BOD-300 requires a clearance of five inches (12.7cm) on all sides. CAUTION If moving the system, always use 2 people and do not lift by the Kydex ®... -
Page 8: Specifications
Specifications Dimensions Electrical Width 120 cm (47 in) Model Number EasyPREP BOD-300 Depth (Total) 81.3 cm (32 in) Voltage 115~230V Depth (Base) Power 63.5 cm (25 in) 130W Height Frequency 64 cm (25 ¼ in) 50/60Hz Environmental Relative Humidity 30% to 80% Altitude up to 2000 m Installation... -
Page 9: Installation
Installation Figure 1. Rear View 5 .1 BEFORE INSTAllATION 5 .1 .1 Overview Figure 1. Front View lABEl DESCRIPTION lABEl DESCRIPTION X-arm Inhibitor Pump Y-arm Dilution Pump (Optional) Z-arm Inhibitor Pump (Optional) Dual Probe shown Seed Pump (Optional) Probe Holder Power in receptacle Table Power Indicator... -
Page 10: Unpacking
5 .1 .2 Unpacking EasyPREP BOD-300 may be attached to the packaging with bolts. Remove them prior to lifting the system out of the box. The system weighs approximately 100 kg. Use two people to lift by the bottom frame and place the system on a flat surface where it will be used. Save the packing material for further use. -
Page 11: Before Software Installation
| 11 5 .3 BEFORE SOFTWARE INSTAllATION 5.3.1 Computer System Requirements • PC Processor: 1GHz or superior. • RAM memory: 1 GB RAM. • Disk min. space: 1 GB free. • Ports: 1 USB port available. • Operating System: Windows 7 and 10. Version 1 .0... -
Page 12: Software Operation
Software Operation 6 .1 . OVERVIEW OF SOFTWARE 6 .1 .1 Software Tabs The User Interface has four tabs: Process results utilities Admin-tools Figure 3. Four tabs to navigate the software • tab: Where the sequence is programmed. Process • tab: Where results are displayed, in real-time. -
Page 13: Operational Buttons
| 13 6 .1 .2 Operational Buttons There are four (4) buttons on the title bar, as shown below. Figure 5. Four buttons to control the test progress • “Run” button is blue when enabled and grey when disabled. • “Pause”... -
Page 14: Process Tab
6 .2 PROCESS TAB tab is used to build sequences for automated BOD/cBOD analysis. Sequences can be saved by pressing the save icon Process or recalled by pressing the search file icon Figure 7.Process tabs for single and dual probe 6 .2 .1 Information Field Figure 8. -
Page 15: Process Sample Field
| 15 • Rack: There are 3 possible rack positions: A, B and C. Figure 10. Rack field • “Operator’s Name”: A field for the operator's name. This information is stored in the results file. This is only stored after the run button has been pressed. -
Page 16: Edit Sequence Tool
6.2.2.1 Edit sequence tool • Add task to input process table. • Makes a correction to selected line in input process table. • Delete last line or selected line in input process table. • Clears the entire process table. • Saves the current task list in the process table. -
Page 17: Results Tab
| 17 6 .3 RESUlTS TAB tab provides the user with a real-time view of their results. The results are saved automatically into a .csv file located in results BOD-300/Results folder. Figure 15. Screenshot of the Results tab. Results can be sorted by Probe Pair, by Individual Probe or by Bottle when two probes are used. •... -
Page 18: Utilities Tab
• "Method": BOD or cBOD method selected in the sequence and used in the test. • “Sample ID”: Unique ID of the sample in use. • “Sample volume”: Volume input into the sequence and used in the test. • “Seed volume”: Volume input into the sequence and used in the test. •... -
Page 19: Configuration Process
| 19 6.4.1 Configuration Process Select sequence test from Day 0, Day 5, Day 7 or Day 20 (figure 18). • "Day 0": Measurement of the initial dissolved oxygen concentration following the test sequence on day 0. • "Day 5": Measurement of the final dissolved oxygen concentration on Day 5. •... -
Page 20: Calibrate Pumps
6.4.3 Calibrate Pumps Figure 19. calibrate pumps. 6.4.3.1 Inhibitor and Seed pumps Calibration function of the pump for seed/ATU addition (Figure 19). • Move the robot arm to one of the bottle locations (e.g. A1) in “Position (robot) – Use Pump”. •... -
Page 21: Waste Pump
| 21 • Press " " and collect the dispensed water in a pre-weighed bottle. run PumP • Weigh the dispensed water, convert to volume and type the value in "Measure". • Press " ", the new pump flow rate will be reset under "Flow Rate". cAlibrAte NOTE Only press Calibrate ONCE. -
Page 22: Calibration Of The Bod Probe
Figure 21. Proodo probe. 6.4.5 Calibration of the BOD probe Calibrate the DO probe by one-point calibration in water-saturated air. When calibrating, the probe lowers into position A1. The probe should be sealing the opening to the bottle. After reaching 100% water-saturation in the air of the bottle (about 10 minutes), new calibration information is obtained. -
Page 23: Admin-Tools Tab
| 23 6 .5 ADMIN-TOOlS TAB is a tab where advanced parameters can be adjusted. This tab password proteced (password= scp123) Admin tools Figure 22. Screenshot of the admin-tools tab. 6.5.1 Robot • " ": Individually initializes the X axis. The robotic arm moves the X axis to the home position. init x •... -
Page 24: Rack Parameters
• “Speed X”: Allow speed adjustment on X axis (1-100-- 1 is the slowest and 100 is the fastest. The default factory setting is 100). • “Speed Y”: Allow speed adjustment on Y axis (1-100-- 1 is the slowest and 100 is the fastest. The default factory setting is 100). •... - Page 25 | 25 The depth at which the BOD probe enters the bottle to measure the dissolved oxygen is controlled within the racks themselves. ¨Pressing “Edit Rack” in Figure 23 allow access to further modification of the racks as seen in Figure 24. Figure 24.
-
Page 26: Calibration Of The Autofill Sensor(S)
: Depth Decapper Accessory uses to decap bottles “Z cAP/de-cAP” : Offset parameter to account for deviation in height in the Y direction “y correction” 6.5.3 Calibration of the X, Y and Z positioning for Autofill Sensor(s) The Autofill sensor can be controlled in the Y and Z by the user. To ensure that the sensor enters the bottle smoothly and is not in contact with the side of the bottle, the X and Y must be calibrated. -
Page 27: Instrument Memory Parameters
| 27 Figure 27. 6.5.4 Instrument Memory Parameters The Memory can be changed by altering an individual cell and pressing enter. The cell must turn yellow, The Memory parameters must then be updated. The Memory parameters must then be Written/Reload, which will turn red as it is rewriting. The BOD-300 software must then be restarted. 6.5.5 QC Controls None/EPA/ISO: Select input default QC criteria for method selected (EPA or ISO). -
Page 28: Parameters
Figure 28. Qc parameters. • “Blank (depletion)”: Sets the maximum allowed oxygen depletion in the blank. Blank depletions above this value will be flagged as invalid. • “Seed (depletion)”: Sets the minimum allowed oxygen depletion in the seed controls. Seed controls with depletion values below this will not be used to calculate the seed contribution factor. -
Page 29: Guidelines On Bod/Cbod Analysis
| 29 Guidelines on BOD/CBOD Analysis Using the BOD-300 Before using the instrument for the first time, proceed with the following steps: 7 .1 PRIMING Use the priming function of the software (“Utilities” tab) to fill the dilution water and seed water tubing lines, removing any air bubbles (section 6.4.4). -
Page 30: Dilution Water Preparation
• Remove any residual chlorine (by letting it evaporate or by titration after sodium thiosulfate addition). • Sample dilution: when diluting the sample, the sample volume should not be less than 1% the BOD bottle volume. Make serial dilutions if necessary 7.4.2 Dilution Water Preparation: Prepare dilution water according to established methods. -
Page 31: Sample Analysis
| 31 7 .7 SAMPlE ANAlYSIS When all the solutions are prepared, turn on the instrument and begin sample analysis. 7.7.1 Day 0 • In " ": Select one standard method. Admin-tools • In " ": Select Day 0; choose bottle capacity between 300 ml and 60 ml. utilities •... -
Page 32: Process Troubleshooting
The Rack A in the Process Status window will be populated and the Rack A Day 0 data loaded to the Results tab. Same for other racks. • In Process, select Rack # B. Press “ADD” and select the previous run result file from file location C:\Program Files (x86)\BOD300\ProcD0\ RackB. -
Page 33: Probe Operation And Maintenance
| 33 Guidelines on Probe Operation and Maintenance 8 .1 INITIAl SETUP Remove the ProOBOD cable/probe assembly from the shipping container and locate the instruction sheet that is included. This instruction sheet is important because it contains the calibration coefficients for your sensor cap. After using this sheet for general probe setup, be sure to store it in a safe place in case you need to reload these calibration coefficients in the unlikely event that they are ever deleted from the instrument and probe. -
Page 34: Maintenace And Storage
8 .2 MAINTENACE AND STORAGE This section describes the proper procedures for care, maintenance and storage of the ProOBOD probe. Do not attempt to access the probe motor assembly or open the probe body. Doing so will void any remaining warranty. The probe NOTE body should only be opened by a YSI Authorized Service Center. -
Page 35: Configuring For The New Sensor Cap
| 35 Figure 35. YSi Probe. Avoid touching the sensing end of the sensor cap during the following maintenance procedures. CAUTION • Remove the stir paddle from the probe by pulling it straight out. • Remove the old sensor cap from the probe by grasping the probe body with one hand and then rotating the sensor cap counterclockwise until it is completely free. -
Page 36: Rehydrating The Sensor Cap
8.2.1.4 Rehydrating the sensor CAP The Sensor Cap must remain in a moist environment. If you inadvertently leave your sensor exposed to ambient air for a period of more than approximately 8 hours it may dry out. If the sensor cap is allowed to dry out, it is likely to drift slightly at the beginning of your next study unless it is rehydrated. -
Page 37: Bod-300 Peristaltic Pump
| 37 BOD-300 Peristaltic Pump 9 .1 PERISTAlTIC PUMP REPlACEMENT • Empty line from liquid on the pump that needs to be serviced. • Disconnect inlet and outlet tubing. • Remove 2 screws that hold the peristaltic pump. • Replace tube that is inside of the plastic cover. •... -
Page 38: New Seed Pump Calibration
• Weigh 4 empty, clean BOD bottles. • Dispense water into the 4 empty, tared bottles for 5, 10, 15 and 18 seconds respectively. • Measure the weight of water in each bottle. Time Delay seconds Flow Rate 14.500 ml/s Water density applied: 1.00 g/ml. -
Page 39: Troubleshooting
QC sample was prepared according to the Glucose-Glutamic Acid (GGA) standard. The dissolved oxygen (DO) in the seed volume is according to the specifications. Then, restart the process. If the same case happens again, contact technical support at SCP SCIENCE. Version 1 .0... - Page 40 PETROlEUM AGRICUlTURE GEOlOGY CONSUMER PROTECTION ENVIRONMENT Providing Innovative Solutions to Analytical Chemists CANADA FRANCE GERMANY Phone: +1 (800) 361-6820 Phone: +1 (800) 361-6820 Phone: +33 (0) 1 69 18 71 17 Phone: +49 (0) 8342-89560-61 Phone: +0 (800) 368-6147 Fax: +1 (800) 253-5549 Fax: +1 (800) 253-5549...
Need help?
Do you have a question about the EasyPREP BOD 300 and is the answer not in the manual?
Questions and answers