Table of Contents
Advertisement
Quick Links
Advertisement
Table of Contents

Summary of Contents for Panlab LE 5002 NON
- Page 1 LE 5002 NON INVASIVE BLOOD PRESSURE METER V25/05/12 USER MANUAL...
-
Page 2: Equipment Installation
LE 5002 Non Invasive Blood Pressure Meter 1. EQUIPMENT INSTALLATION WARNING: Failure to follow the instructions in this section may cause equipment faults or injury to the user. A. Place the equipment on a flat surface and leave at least 10 cm of free space between the rear panel of the device and the wall. -
Page 3: Maintenance
LE 5002 Non Invasive Blood Pressure Meter 2. MAINTENANCE WARNING: Failure to follow the instructions in this section may cause equipment fault. • PRESS KEYS SOFTLY – Lightly pressing the keys is sufficient to activate them. • Equipments do not require being disinfected, but cleaned for removing urine, faeces and odour. - Page 4 LE 5002 Non Invasive Blood Pressure Meter 2 Open fuse-holder by pulling the flange with regular screwdriver. Figure 2. Open fuse-holder door. 3 Extract fuse holder using the screwdriver. Figure 3. Extract fuse-holder. 4 Replace fuses if necessary. Insert fuses in the fuse-holder in the correct position.
-
Page 5: Table Of Contents
LE 5002 Non Invasive Blood Pressure Meter 3. TABLE OF CONTENTS EQUIPMENT INSTALLATION MAINTENANCE TABLE OF CONTENTS INTRODUCTION EQUIPMENT DESCRIPTION 5.1. CONTROL UNIT FRONT PANEL 5.2. CONTROL UNIT REAR PANEL 5.3. DISPLAY 5.3.1. DATA ROW 5.3.2. MESSAGE ROW 5.3.3. LEVEL ROW EQUIPMENT CONNECTION 6.1. - Page 6 LE 5002 Non Invasive Blood Pressure Meter CHECKING OPERATION 12.1. PUMP CALIBRATION 12.2. SIMULATING SYSTOLIC PRESSURE 12.3. TROUBLESHOOTING 12.4. TRANSDUCER 12.5. PROCEDURE TO CLEAN PULSE TRANSDUCERS 12.6. REPLACING THE CUFF MEMBRANE. 12.7. CUFF AND TRANSDUCER MAINTENANCE TECHNICAL SPECIFICATIONS USER MANUAL...
-
Page 7: Introduction
(mice, rats or dogs). Figure 6. LE 5002 Non-Invasive Blood Pressure Meter. The system used for taking measurements is based on the sphygmomanometric technique (used to take pressure in human beings). Thus, the unit features a pressure cuff, whose function is to occlude the passage of blood in the animal’s tail, and a... -
Page 8: Equipment Description
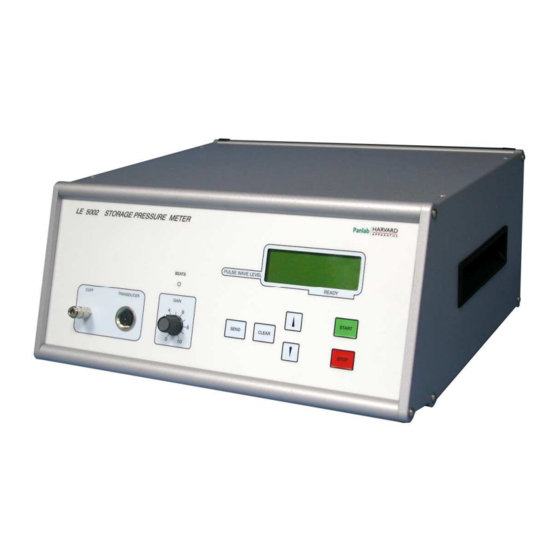
LE 5002 Non Invasive Blood Pressure Meter 5. EQUIPMENT DESCRIPTION 5.1. CONTROL UNIT FRONT PANEL CUFF TRANSDUCER BEATS DISPLAY START STOP GAIN SEND CLEAR ARROWS Figure 7. Control Unit Front Panel. • CUFF: Pneumatic connection for the tail cuff. It sends air from the internal pump to the cuff in order to occlude the caudal artery when taking measurements. - Page 9 LE 5002 Non Invasive Blood Pressure Meter • ARROWS: there are 2 buttons with UP and DOWN arrows to navigate through the menus and the stored data. • START: Button used to start measurement when the signal is appropriate. This button is also used to test the pump in technical service mode.
-
Page 10: Control Unit Rear Panel
LE 5002 Non Invasive Blood Pressure Meter 5.2. CONTROL UNIT REAR PANEL REMOTE CUFF PULSE UP/DOWN DOG/RAT/MOUSE PRESSURE WAVE RS-232 POWER Figure 8. Control unit rear panel. • REMOTE: 6,35mm mono jack plug for foot switch. It has the same function as the START button on the front panel. -
Page 11: Display
LE 5002 Non Invasive Blood Pressure Meter 5.3. DISPLAY BPM SYS DIA MED 305 167 145 152 DATA ROW <Insufficient level> MESSAGE ROW □□□□ LEVEL ROW Figure 9. Display. 5.3.1. DATA ROW The first two rows on the display show experiment data. The upper row contains the labels and the lower one features the numerical values. -
Page 12: Level Row
LE 5002 Non Invasive Blood Pressure Meter 5.3.2.3. Insufficient Level The pulse intensity reaching the instrument is insufficient to take a measurement. The bar row indicating the level will not reach the area marked READY on the front panel. GAIN should be increased by turning the potentiometer clockwise to increase the signal level reaching the instrument until the Pulse level ready message appears on the display. -
Page 13: Equipment Connection
LE 5002 Non Invasive Blood Pressure Meter 6. EQUIPMENT CONNECTION 6.1. LE 5002 Figure 10. Equipment connections. The necessary connections are detailed in the next table. FROM CABLE 1 LE 5002 Transducer Transducer DIN 6 cable 2 LE 5002 Cuff... -
Page 14: Working With Heater And Scanner
LE 5002 Non Invasive Blood Pressure Meter 6.2. WORKING WITH HEATER AND SCANNER Figure 11. Connection between LE 5002 and LE 5650. USER MANUAL... - Page 15 LE 5002 Non Invasive Blood Pressure Meter The LE 5002 can be connected to an LE 5650 Heater and Scanner to take manual readings from 6 animals, measuring one after another. The necessary connections are as follows. FROM CABLE LE 5002 Transducer...
-
Page 16: Working With Nibp Chart Usb
LE 5002 Non Invasive Blood Pressure Meter 6.3. WORKING WITH NIBP CHART USB Figure 12. Connection with NIBP Chart. The necessary connections are detailed in the next table. FROM CABLE 1 LE 5002 Transducer Transducer DIN 6 cable 2 LE 5002 Cuff... -
Page 17: Factors To Take Into Account
• To avoid minor tail movements that may cause artefacts, and improve transducer contact at the same time, it should be held using the guide on the accessory plate of the PANLAB traps (ref. LE 5095, in which case it is a good idea to work with the cuff/transducer jointly). -
Page 18: On The Proper Treatment Of The Animals And Their Environment
LE 5002 Non Invasive Blood Pressure Meter 7.2. ON THE PROPER TREATMENT OF THE ANIMALS AND THEIR ENVIRONMENT. • The room or laboratory where the measurements are to be taken should be free from environmental noises that may affect the animal’s tranquillity. -
Page 19: Recommended Methodology
Nevertheless, with these sources it is sometimes difficult to control the temperature the animal is submitted to; whereas ventilated heaters with thermostats offer greater possibilities (PANLAB offers various such devices in its catalogue). • IT IS VERY IMPORTANT to bear in mind that if the animal is overheated, as... -
Page 20: Anaesthetising The Animals
LE 5002 Non Invasive Blood Pressure Meter 7.5. ANAESTHETISING THE ANIMALS The experimenter may also anaesthetise the animals, if there are any doubts regarding the vasodilatation process. In any case, and if vasodilatation is not performed, the temperature around the animals must always be kept at a minimum of 25ºC. -
Page 21: Operating Principle
LE 5002 Non Invasive Blood Pressure Meter 8. OPERATING PRINCIPLE Figure 13. Waveforms in a measurement. Up (pressure) and down (pulses). Waveforms of Figure 13 have been obtained by connecting CUFF PRESSURE and PULSE WAVE analog outputs to a data logger. - Page 22 LE 5002 Non Invasive Blood Pressure Meter Figure 14. Unsuitable pulse. Figure 15. Correct pulses. The pulse wave (PULSE WAVE plug outlet) and the pressure variation (PRESSURE CUFF) of the cuff can be reproduced on paper with recorders, oscilloscopes or a data capture system such as PowerLab, BioPac or to the NIBP Chart software.
-
Page 23: Starting Up The Unit
LE 5002 Non Invasive Blood Pressure Meter 9. STARTING UP THE UNIT Before taking any measurements, wait 5 minutes to allow the instrument to reach its normal working temperature. • Connect the cuff to the CUFF plug. Following the direction of the yellow arrow, insert it until it locks into place (indicated with a click). - Page 24 LE 5002 Non Invasive Blood Pressure Meter Figure 18. Cuff and Transducer placing in the tail. • Adjust the instrument GAIN until a proper pulse signal level is achieved on the pulse level display, avoiding unnecessary amplification increases. Such increases should be avoided because if the graph were to remain on the outside area it might not inform on the presence of artefacts or important frequency instability (the graph would oscillate).
- Page 25 LE 5002 Non Invasive Blood Pressure Meter • After a short delay, a valve opens, slowly decreasing the cuff pressure. • The pressure value (the current value of which is shown under the DIA label on the digital display) will go down until the pulse level reaches its initial level again.
-
Page 26: Sending Data To A Computer (Sedacom)
LE 5002 Non Invasive Blood Pressure Meter 10. SENDING DATA TO A COMPUTER (SEDACOM) The purchase of the SEDACOM software option is needed for transferring the data to a computer please contact your local provider for more information). The SEDACOM software reference is composed a USB Flash key containing the software Installer, License for use and SEDACOM User’s Manual). -
Page 27: Delete Memory
LE 5002 Non Invasive Blood Pressure Meter 11. DELETE MEMORY The data stored in memory can be erased. To do so press the CLEAR button and a screen like this will appear: BPM SYS DIA MED --- --- --- --- █Clear active trial... -
Page 28: Checking Operation
LE 5002 Non Invasive Blood Pressure Meter 12. CHECKING OPERATION 12.1. PUMP CALIBRATION The procedure described below is for users to calibrate the pressure value on the display, which corresponds to the pressure in the cuff at all times. Proceed as follows: 1. -
Page 29: Simulating Systolic Pressure
LE 5002 Non Invasive Blood Pressure Meter To check the tail cuff, insert a solid element (i.e., a pencil) into it as a substitute for the animal’s tail and repeat the procedure described above. You can thus check for possible leaks in the membrane/cuff set. -
Page 30: Transducer
LE 5002 Non Invasive Blood Pressure Meter 12.4. TRANSDUCER A transducer in a good state of repair will NOT give pulses (BEAT), when left without vibrations and at maximum gain (GAIN on the right), although the odd intermittent impulse may be observed. -
Page 31: Replacing The Cuff Membrane
Generally, they should be changed when the first signs of loss of flexibility or drying are observed. The membrane must be an original PANLAB component. The use of parts made by other manufacturers is not recommended, as there is a major difference in the elasticity of the rubber between different makes, causing unpredictable cuff response. -
Page 32: Cuff And Transducer Maintenance
LE 5002 Non Invasive Blood Pressure Meter 2. Repeat the operation with the O-rings (black rubber rings) that affix the membrane. Remove the damaged membrane. Figure 26. Removing O rings and membrane. 3. Insert the new membrane into the cuff. Make sure that it is not taut to prevent additional strain on the cuff pressure. -
Page 33: Technical Specifications
LE 5002 Non Invasive Blood Pressure Meter 13. TECHNICAL SPECIFICATIONS POWER SUPPLY Input voltage: 115 /230 VAC Frequency: 50 /60 Hz Fuse: 2 fuses 5mm*20mm 250mA 250V Maximum power: 18 W Conducted noise: EN55011 /CISPR11 class B PULSE SENSOR Feeding voltage:... - Page 34 LE 5002 Non Invasive Blood Pressure Meter DECLARACIÓN DE CONFORMIDAD DECLARATION OF CONFORMITY DECLARATION DE CONFORMITÉ Nombre del fabricante: Panlab s.l.u. Manufacturer’s name: www.panlab.com Nom du fabricant: info@panlab.com Dirección del fabricante: Energía, 112 Manufacturer’s address: 08940 Cornellà de Llobregat Adresse du fabricant:...
Need help?
Do you have a question about the LE 5002 NON and is the answer not in the manual?
Questions and answers