
Summary of Contents for Flybrix Quad Starter Kit
- Page 1 < > Back Next Version 1.4.2 September 2017 Flybrix Building and Flying Instructions: Quad Starter Kit...
-
Page 2: Table Of Contents
Get inspired! 19. Building the “Angle Armed Quad” Learn the fundamentals of building and flight. It’s the how and why Flybrix works 28. Building the “Dual Sided Quad” the way it does! Plus, you’ll be ready to 36. Let’s get creative! Building fundamentals build and fly your own creations. -
Page 3: Introduction
Flybrix is designed for experimentation, creativity and learning. Trial and people even go to special piloting schools to learn how to do it! Flybrix is the error is the heart and soul of this kit. Why? That’s where the “a-ha” moments perfect platform to learn how to become an ace pilot because the drones you happen, that’s where the learning happens, that’s where the lines between... -
Page 4: Getting Started
< > Back Next Getting Started: know your kit Tweezer Binding Cord Angled Motor Boom Arms Dual-Sided Motor Boom Arms Straight Motor Boom Arms... - Page 5 Here are some additional resources so you can read up on battery safety: Battery Safety (A) Battery Safety (B) Battery Safety (C) Battery Safety (D) BEFORE YOU START BUILDING... Charge your battery! PRIOR TO FLYING: UPDATE YOUR FIRMWARE. We are constantly updating the software and firmware that improve the Flybrix experience.
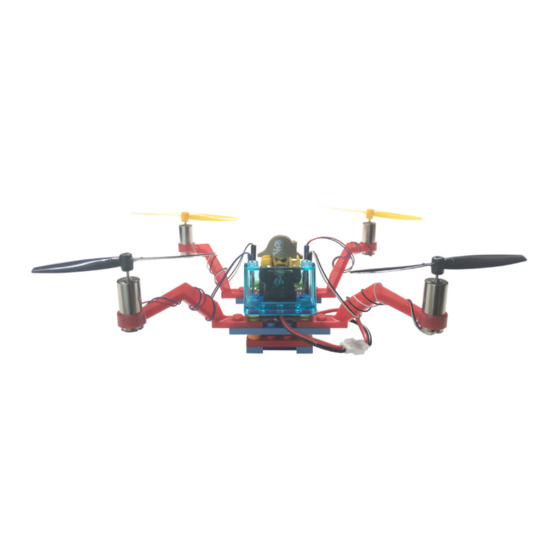
- Page 6 Back Next Let’s Build the “Flat X-Wing” Quad All Flybrix airframes have their strengths and weaknesses. The point is Attach (4) Boom-Arms to (2) 1x8 bricks. to have fun getting to understand where these strengths and weaknesses occur, why and how through building and flying.
- Page 7 < > Back Next Front Front Back Back Attach the flight control board. Attach (1) 1x4 brick to the back of your airframe below the battery con- nector cords, with one row of the brick sticking out past the 1x8 bricks. *The “front”...
- Page 8 < > Back Next Design check-In Front Front Back Back Attach (1) 1x4 brick to the top of the flight board.
- Page 9 < > Back Next Front Front Back Back Attach (1) tail fin. Colors and placement really matter in the next few steps! Take two Attach the flat brick that comes with your battery to the 1x4 brick. This motors that have black and white leads coming off the bottom. Gently tile has velcro on it, to hold the battery in place.
-
Page 10: Know Your Props
Back Now, get two more motors that have the red and blue cables coming Your Quad Starter Kit contains two sizes of props. (Orange/red props are off the bottom. Gently push the motors into the boom arms from the 60mm and the yellow/black props are 65 mm). - Page 11 < > Back Next Top view 60 MM props Top view of “A” and “B” propellers High (leading edge) Low (trailing edge) “B” props spin counterclockwise “A” props spin clockwise “B” shaped props spin counterclockwise to create lift. “A” shaped props spin clockwise to create lift. Propellers have a unique shape.
- Page 12 < > Back Next Underside view of “A” and “B” Props 65 MM prop markings (top view) On the underside of the 60mm props, you’ll see “A” and “B” markings. (On the On the larger, 65mm props, there are no “A” or “B” markings,. There are larger, 65mm props, there are no “A”...
- Page 13 < > Back Next Motor Design Check-In 8. This step takes attention to detail! Front Back Time to add the props! Take a look at your motor connectors. On the very ends you can see The “B” props attach to the black/white motors that spin counterclock- white marks.
- Page 14 < > Back Next Design Check-In: Motor Connection Front Back Let’s get the motors connected! One by one, wrap each motor cable around the In the next step, we’ll show you how to connect your motors. For right boom arm a few times so it stays out of the way of the spinning props and connect now, take a look at your airframe and find the 4 white marks on both the motor pins to the flight board.
- Page 15 Connect your battery to the cable attached to the flight control board. Remember battery safety! Plugging in the battery the wrong way can From there, follow the 1, 2, 3 steps on the Flybrix app to get airborne! heat up and short circuit your flight control board.
- Page 16 < > Back Next Before You Fly: Overview The app mimics the controls of an external joystick transmitter, so knowing how an external controller works, applies to how the app controls work. Learning how to fly starts with understanding how your controller works. Flying takes practice to master. There are many resources available online that help explain further how to fly.
-
Page 17: Flying
Flybrix drones are made using bricks rath- the joystick controller to fly: er than a rigid unibody frame, Flybrix is not designed to fly like a performance or acrobatic drone. Pairing (aka binding) This step connects the the flight control board to the app. - Page 18 BETA ZONE to compensate for the drift. If you select the Flybrix logo in the upper right hand of the flight control app you’ll be able to access the BETA ZONE features. In the BETA ZONE, we’re test-...
- Page 19 < > Back Next “The Angle Armed” Quad Instructions Start with the 2x4 brick and attach the flat tile with velcro. The steps The Angle Armed Quad is built from the bottom-up. A bit different- with black and white pictures indicate that the colors of your bricks ly than other quadcopters.
- Page 20 < > Back Next Attach (4) 1x1 knobs. Attach (2) 1x6 bricks.
- Page 21 < > Back Next Design Check-In Side View Attach your battery.
- Page 22 < > Back Next Attach (2) 1x4 bricks and (4) 1x1 knobs to the 1x4 bricks. Attach (2) 1x6 bricks.
- Page 23 < > Back Next Front Back Attach (4) angled boom-arms. * Notice there are two left angled boom Attach the flight control board. arms and two right angled boom arms.
- Page 24 < > Back Next Front Front Back Back Attach motors. Gently push the motors into the angled boom arms Wrap motor leads around the boom arms so the leads avoid hitting from the bottom-up. Follow the schematic for black/white, red/blue props.
- Page 25 < > Back Next Front Front Back Back Attach (2) 1x1 knobs (on both sides of the motor leads at the front of the Attach (1) 2x4 brick and your pilot. flight control board).
- Page 26 < > Back Next Front Front Back Back Attach your propellers. Either use the 60 MM props that are marked “A” Attach the windshield. and “B” on the underside of the props, or use the 65 MM props that are marked with arrows on the top of the propellers.
- Page 27 < > Back Next All set! Connect to the Flybrix App to get flying! Front Back Connect the battery to the flight control board.
- Page 28 Attach (4) 1x1 knobs. The Dual Sided Quad is named after the unique boom arm motor hold- ers. These are the only two-sided boom arms Flybrix offers. The idea behind the arms is to provide fewer bricks and more rigidity in the build.
- Page 29 < > Back Next Attach (2) 1x4 bricks to the underside of the boom arms on top of the 1x1 Attach (4) 1x1 knobs on the underside of the boom arms, in the same knobs. Then, set these pieces aside for the next few steps. positioning as the knobs on the top of the boom arms.
- Page 30 < > Back Next Attach the velcro tile to the 2x4 brick. Attach (2) 1x4 bricks.
- Page 31 < > Back Next Attach (2) 1x6 bricks to the top of the 1x4 bricks. Attach the battery to the velcro tile.
- Page 32 < > Back Next Design Check-In Underside view of the battery chamber. Attach the battery chamber to the underside of the boom arms.
- Page 33 < > Back Next Front Front Back Back Attach your flight control board to the 1x1 knobs on the top of the boom Insert the motors gently by pushing them from the bottom to the top arms. of the boom arms. Align the bottoms of the motors with the bottom of the boom arms.
- Page 34 < > Back Next Front Front Back Back Attach (1) 2x4 brick to the front of the airframe. Attach your pilot and windshield to the 2x4 brick. This brick will hold your pilot and windshield.
- Page 35 < > Back Next Front Front Back Back Attach your propellers. On this airframe we used the 65 MM propellers, Connect the battery and flight control board leads. As a reminder, the red/blue motors spin clockwise, and the black/white spin counter clockwise. The 65 MM props have the arrow markings on You’re set to fly.
- Page 36 At Flybrix we believe the most creative ideas are driven by constraint. When we’re forced to work within certain perameters, that’s when creative problem solving comes alive.
- Page 37 What happens when you take off from an angle and why? Check out the Flybrix Forum to visit www.flybrix.com to upgrade your kit. answer this queston!
- Page 38 (it’s possible to change the motor configurations in the advanced settings if you want to experiment with that spond to the direction the motor spins. When building Flybrix, red/blue motors always need an A shaped prop. The feature, however factory settings are standard red/blue port 0 etc).
- Page 39 Then we attach the motors, props etc. and give it a flight test. Through the process of elimination and thinking... we adjust our creations like adding or taking off bricks or moving parts around. That’s how we see what’s possible! Share your experiments and creations on Flybrix.com/forum. Happy Flying!
- Page 40 Flybrix Game Ideas Here are a few simple thought-starters for new ways to play and learn with Flybrix. These are games that are just silly, fun things that we’ve used to structure play with Flybrix — They’ve been tried with kids as young as 7 up to adults. You can play them with 2 people or more! Find more games at Flybrix.com.
- Page 41 < > Back Next “Battle Bricks” “Cross the Line” This is a relay game designed to test challengers piloting, building and problem solv- This is a game designed to practice controlled flying and ing skills. There are a range of variations of this game to accommodate fewer players strategic building.
Need help?
Do you have a question about the Quad Starter Kit and is the answer not in the manual?
Questions and answers