Table of Contents
Advertisement
Available languages
Available languages
Advertisement
Chapters
Table of Contents

Subscribe to Our Youtube Channel
Related Manuals for Waldbeck Azteca

Summary of Contents for Waldbeck Azteca
- Page 1 10033578 Azteca Metalldetektor Metal Detector...
-
Page 3: Table Of Contents
Sehr geehrter Kunde, wir gratulieren Ihnen zum Erwerb Ihres Gerätes. Lesen Sie die folgenden Hinweise sorgfältig durch und befolgen Sie diese, um möglichen Schäden vorzubeugen. Für Schäden, die durch Missachtung der Hinweise und unsachgemäßen Gebrauch entstehen, übernehmen wir keine Haftung. Scannen Sie den QR-Code, um Zugriff auf die aktuellste Bedienungsanleitung und weitere Informationen rund um das Produkt zu erhalten. -
Page 4: Sicherheitshinweise
SICHERHEITSHINWEISE Lesen Sie sich die Bedienungsanleitung vor der Installation und Inbetriebnahme des Geräts aufmerksam durch und bewahren Sie diese für den zukünftigen Gebrauch auf. • Tragen Sie in Bereichen mit starkem Verkehr keine Kopfhörer, um Unfälle zu vermeiden. • Holen Sie immer die Genehmigung des Eigentümers ein, bevor Sie einen bestimmten Bereich auf Metalle durchsuchen. -
Page 5: Geräteübersicht Und Funktionstasten
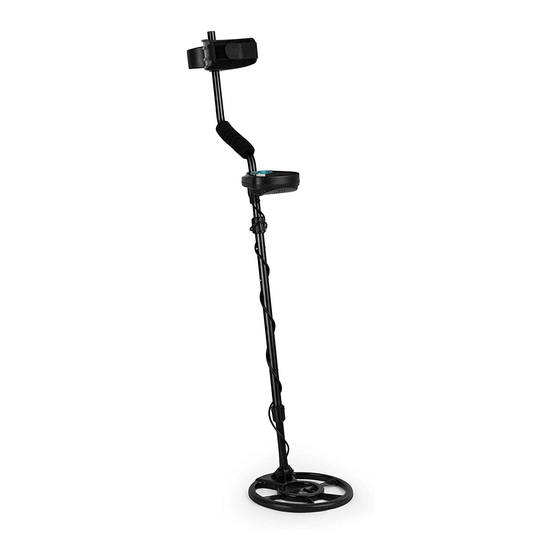
GERÄTEÜBERSICHT UND FUNKTIONSTASTEN Bedienelement Halterung Suchspule unterer Stab mittlerer Stab oberer Stab Kontermutter Verriegellungsknopf LCD-Anzeige Digitalanzeige/Lokalisierung Modusanzeige Zielerkennungsnummer Empfindlichkeit Münztiefe Lautstärke Batteriestatus Taste +/- Lautstärkeleistung MODE-SENS- Taste P-P-Taste... - Page 6 BENUTZUNG LCD-Bildschirm • Modusanzeige: Zeigt den aktuellen Betriebsmodus an. Es gibt insgesamt 4 verschiedene Modi. • Zielkennungsnummer: Ist in 6 Kategorien unterteilt und dient dazu, die Zielmetalle einzustellen. • Digitale Anzeige/ Lokalisierung: Zwei Ziffern zwischen 01 und 99 zeigen die Art des Metalls an. Zeitgleich dient diese Anzeige als Lokalisierungshilfe.
-
Page 7: Gerät Zusammensetzen
P-P Taste Wenn Sie diese Taste drücken, wechselt das Gerät in den Lokalisierungsmodus, um das Ziel genauestens zu lokalisieren. Wenn Sie diese Taste erneut drücken, verlässt das Gerät den Lokalisierungsmodus. GERÄT ZUSAMMENSETZEN 1. Entriegeln Sie den Verriegelungsknopf am unteren Stab und nehmen Sie den Bolzen ab. - Page 8 3. Lockern Sie die Verriegelungsmutter auf der anderen Seite des Verbindungsstabs. Drücken Sie den silbernen Knopf auf dem oberen Stab und schieben Sie diesen in das andere Ende des mittleren Stabs hinein. silberner Knopf 4. Passen Sie Länge des Stabs an, indem Sie den unteren Stab weiter in den mittleren Stab hineinschieben oder diesen weiter herausziehen.
-
Page 9: Inbetriebnahme Und Bedienung
INBETRIEBNAHME UND BEDIENUNG Der Metalldetektor ist ein Detektor mit ausgezeichneter Empfindlichkeit und Unterscheidungsfähigkeit, welcher in der Lage ist, sechs Arten von Metallen zu identifizieren und anzuzeigen. Des Weiteren kann er ebenfalls das Material des Metallobjekts, unter Verwendung eines zweistelligen Ziffernbereichs, anzeigen. Durch das neueste Patentdesign und die volldigitale Ortungsschaltung wird die Genauigkeit und Stabilität der Position verbessert. - Page 10 SCHNELLSTART Vorbereitung des Metallsuchgeräts 1. Ausrichten des Metalldetektors Legen Sie den Metalldetektor auf einen Holz- oder Plastiktisch und lassen Sie die Suchsonde circa 30 cm über die Tischkante herausragen. Achten Sie darauf, dass sich keine Wände, Decken und Fußböden in der Nähe des Geräts befinden und schalten Sie alle elektrischen Geräte, durch welche eine elektromagnetische Interferenz ausgelöst werden könnte, aus.
- Page 11 Probe Eisen- Nickel- Zink- Abzieh- Kup- Silber- nagel münze münze lasche fer-mün- münze tief mittel mittel mittel hoch hoch Zielanzeige Kennziffer 10-40 41-45 55-70 72-75 80-83 86-88 4. Ausschlusstest a. Wenn Sie erneut die Taste MODE drücken, leuchtet „DISC“ auf dem Bildschirm auf.
- Page 12 Erinnerungstestmodus a. Wenn Sie die Taste MODE erneut drücken, leuchten die Anzeige „MEMORY“ und die Zielanzeige auf dem Bildschirm auf. b. Wenn Sie möchten, dass das Gerät ausschließlich nach 25 Silbermünzen sucht und alle anderen Metalle nicht anzeigt, können Sie folgendermaßen vorgehen: Halten Sie die Silbermünze 7 –...
- Page 13 6. Schmuckmodustest Wenn Sie erneut die Taste MODE drücken, leuchtet die Anzeige „JEWELRY“ auf dem Bildschirm auf. Die erste Zielanzeige verschwindet, was bedeutet, dass Eisennägel nicht vom Gerät angezeigt werden und dass es nur auf andere Metalle reagiert. 7. Ortungstestmodust a.
- Page 14 GRUNDLEGENDE FUNKTIONEN Der Metalldetektor ist für die Verwendung im Außenbereich ausgelegt. In Innenräumen gibt es zu viele metallhaltige Gegenstände und allerlei elektrische Geräte, was zu elektrischen Interferenzen beim Gerät führen kann. Verwenden Sie den Metalldetektor deshalb nicht im Innenbereich. Das Suchen im Freien ist komplizierter, da viele Faktoren, wie beispielsweise die regionale Bodenbeschaffenheit, die Bestandteile, Größe, Form und der Oxidationsgrad des Metalls im Untergrund die Suchergebnisse beeinflussen können.
- Page 15 1,5 cm, parallel zum Boden befinden. Schwingen Sie das Gerät keinesfalls wie ein Pendel über den Boden. richtig falsch • Wenn sich im Boden wertvolle Metallobjekte befinden, werden die Signale an der entsprechenden Stelle wiederholt. • Wenn ein Signal sich nicht wiederholt, war es mit sehr hoher Wahrscheinlichkeit ein falsches Signal.
- Page 17 7. Tiefenanzeige • Die Tiefenanzeige ist für Gegenstände in Münzgröße akkurat. • Bei größeren und unregelmäßig geformten Objekten sind die Ergebnisse der Tiefenanzeige weniger zuverlässig. • Wenn Sie die Suchsonde mehrmals über die gleiche Stelle schwenken und jeweils die gleiche Tiefe angezeigt wird, können Sie von einer akkuraten Tiefenanzeige ausgehen.
- Page 18 die direkte Suche nach Metallen im Nicht-Bewegungsmodus ist möglich. In einigen Regionen, in denen der Boden zu schmal ist, um die Suchsonde hin und her zu bewegen, sollten Sie den Ortungsmodus auswählen. In Regionen mit Böden, welche eine starke Mineralisierung oder Versalzung aufweisen, sollten Sie versuchen, die Suchsonde direkt im Ortungsmodus hin und her zu bewegen.
- Page 19 FEHLERSUCHE UND FEHLERBEHEBUNG Problem Lösung Kein Strom, kein Startton, und keine 1. Vergewissern Sie sich, dass die Anzeige auf dem LCD-Bildschirm. Batterien korrekt eingelegt wurden. 2. Ersetzen Sie die Batterien. Ein wiederkehrendes Piepgeräusch 1. Stellen Sie sicher, dass in Ihrer Nähe ertönt kein anderer Metalldetektor verwendet wird.
- Page 20 Problem Lösung Das Signal ist instabil und die 3. Gegebenenfalls befindet sich Zielposition verändert sich. mehr als ein Metallobjekt innerhalb Ihres Suchradius. Versuchen Sie, die Empfindlichkeit zu erhöhen oder stellen Sie im Ausschlussmodus ein, dass das Gerät nur auf bestimmte Metalle reagiert. 4.
-
Page 21: Hinweise Zur Entsorgung
HINWEISE ZUR ENTSORGUNG Befindet sich die linke Abbildung (durchgestrichene Mülltonne auf Rädern) auf dem Produkt, gilt die Europäische Richtlinie 2012/19/EU. Diese Produkte dürfen nicht mit dem normalen Hausmüll entsorgt werden. Informieren Sie sich über die örtlichen Regelungen zur getrennten Sammlung elektrischer und elektronischer Gerätschaften. - Page 23 Dear Customer, Congratulations on purchasing this equipment. Please read this manual carefully and take care of the following hints to avoid damages. Any failure caused by ignoring the items and cautions mentioned in the instruction manual are not covered by our warranty and any liability. Scan the QR code to get access to the latest user manual and other information about the product.
-
Page 24: Safety Instructions
SAFETY INSTRUCTIONS Please read the manual carefully before installing and operating the device and keep it for future use. • In areas with heavy traffic, please not wear earphone, in case an accident occurs. • Always obtain permission before searching any site. •... -
Page 25: Device Description And Functon Keys
DEVICE DESCRIPTION AND FUNCTON KEYS Panel (LCD and controller) - Page 26 OPERATION • Mode Cursor: indicate the operation mode, altogether divided into four kinds. • Target ID Cursor: divided into 6 categories. It is used to indicate the target metals. • Digital ID Cursor/Pinpoint Cursor: two digits of 01 to 99 finely indicate the material of metal.
-
Page 27: Assembly
P-P button Touch the "P-P" button, and the detector will convert to PINPOINT mode, to locate the target accurately. Touch the "P-P" button once again, to exit the PINPOINT mode. ASSEMBLY 1. Relax the lock knob on the lower stem, take down the bolt. Install the lower stem on the search coil, and lock it tightly. - Page 28 3. Relax the LOCK NUT on the other end of the connecting stem. Press the silver button on the upper stem, and insert it into the other end of the middle stem . 4. Adjust the depth that the lower stem inserts to the middle stem. Also, you can adjust the total length of the stem, making you detect comfortable with your arm straight.
-
Page 29: Setup And Operation
SETUP AND OPERATION The metal detector is a detector, with excellent sensitivity and discrimination ability, it can identify and display six types of metals, it can also intensive indicate the material of the metal target using double digit. Through the latest patent design and the full digital location circuit, improve the accuracy and stability of the location. - Page 30 QUICK-START Preparation 1. Lay the detector Put the detector on a wooden or plastic table, and let the search coil stretch out of the table above 30cm, Keep away from walls, ceilings and floors, turn off all kinds of electrical appliances that will cause electromagnetic interference, remove watches and rings from hands.
- Page 31 Sample Iron nail Nickel Pull-tab Zinc coin Copper Silver coin coin coin Tone Low tone Low tone Middle tone Middle tone High tone High tone Identification cursor indication Digital cursor 10-40 41-45 55-70 72-75 80-83 86-88 indication 4. DISC mode test a.
- Page 32 5. MEMORY mode test a. Press the MODE button again, the MEMORY cursor is lighted. And the target discrimination cursor is all lighted. b. If the operator envisages to search silver coin and rejects the other metals, the following operations can be carried out: Let the silver coin scan above the search coil about 7-10cm,the...
- Page 33 6. JEWELRY mode test Press the MODE button again, the JEWELRY cursor is lighted. The first target cursor on the left extinguished shows that the iron nail is rejected. It only responds to other metals. (See Fig.15, take a zinc coin as an example). 7.
- Page 34 BASIC OPERATION Metal detector is used outdoors. There is too much metals indoors, and all kinds of electrical equipment that will bring interference signals. So it is not fit for using the detector indoors. Field detection is more complicated, the composition of the regional soil, the component, size, shape and the oxidation degree of the underground metals will all affect the detection results.
- Page 35 5. Make use of the sound, to help discrimination In the process of detection, you needn’t always watch the screen. And the sound identification system will sound four frequency tones to help you discriminate the targets. Low pitch——nickel coins Middle pitch——pull-tab, soda bottle and zinc coins High pitch——copper, aluminum and silver metal 6.
- Page 37 7. Depth indication The depth indication is accurate for coin-sized objects. Large objects or irregularly-shaped objects will yield less reliable depth readings. If sweeping at the same place for several times, but shows the same depth, and it is the more accurate detection.
- Page 38 9. Other modes You can choose other operation mode according to your needs and experience. If there are more scrap metals in the detection area, you can choose the DISC mode to reject the metals that do not need to be detected. Remind you once again, when detecting in the wild, due to the impact of the ground condition, the discrimination indication and depth indication will be all deviation.
- Page 39 TROUBLESHOOTING Symptom Solution No power, no boot sound, and the 1. Be sure that the batteries are installed LCD has no indication. correctly. 2. Replace the batteries. Sound a successive “DI” “DI” sound. 1. Make sure that there is no other metal detector operating around.
- Page 40 Symptom Solution Using PINPOINT, when the search 1. The ground is serious magnetic. In coil approach the ground, the unit the position near the ground, start will sound a sound. the PINPOINT mode, to reduce the sensitivity. 2. There is large metal under the ground.
-
Page 41: Disposal Considerations
DISPOSAL CONSIDERATIONS The image at left (crossed out waste bin on wheels) appears on this product, indicating that the European waste regulation 2012/19/EU applies. These products may not be disposed of with normal household waste. Check your local regulations for the separate collection of electronics and electronic equipment.
Need help?
Do you have a question about the Azteca and is the answer not in the manual?
Questions and answers