Table of Contents
Advertisement
Quick Links
Advertisement
Table of Contents

Related Manuals for Clear-Com trilogy Mercury


Summary of Contents for Clear-Com trilogy Mercury
- Page 1 Mercury Quick Start Guide...
-
Page 2: Table Of Contents
Mercury Quick Start Guide Contents Overview ..................3 Network plan and IP addresses ............4 Mercury Database ................5 Install Gateway Configuration Editor ..........6 Windows firewall ................6 Mercury Software Components ............. 7 MIU - Key Connections ..............8 MIU –... -
Page 3: Overview
Mercury Quick Start Guide Overview Thank you for purchasing this Mercury system from Trilogy Communications. Please check all the equipment supplied to ensure it matches both your purchase order and the delivery paperwork. Inspect the equipment for damage and immediately report any discrepancy or problem to your supplier or direct to Trilogy. -
Page 4: Network Plan And Ip Addresses
Mercury Quick Start Guide Network plan and IP addresses The Mercury Host will normally be connected to an IP network. This allows it to communicate with other Trilogy IP-based intercom products and to connect to the Gateway Configuration Editor software. However, once correctly configured, a single Host can operate in isolation. -
Page 5: Mercury Database
Mercury Quick Start Guide Mercury Database The Mercury Database holds the master configuration for all hosts of the Mercury system. Any changes to the configuration are saved to the database and these changes are then retrieved individually by each host in the Mercury system. The database operates in “served”... -
Page 6: Install Gateway Configuration Editor
Mercury Quick Start Guide Install Gateway Configuration Editor Gateway is the Windows application used to create or edit the configuration which governs how the panels are arranged, what type of keys are present and the membership of groups and conferences. Gateway also manages the deployment of your revised configuration to the entire Mercury system. -
Page 7: Mercury Software Components
Mercury Quick Start Guide Mercury Software Components Each Mercury Host is supplied with software pre-installed and ready to run. The main software components are: Talkback Controller (TBC) This Windows service manages all the audio traffic both within and (where needed) outside each Mercury Host. Data describing the system layout is provided to the TBC by the database. -
Page 8: Miu - Key Connections
Mercury Quick Start Guide MIU - Key Connections Full details of all connectors are provided in the Implementation Guide. At this stage please identify the following key connectors from the MIU rear panel: • 8,9 - Mains IEC inlet (optional second inlet) •... -
Page 9: Miu - Option Boards
Mercury Quick Start Guide MIU – Option Boards The following option boards are currently available and up to 4 may be fitted to each MIU. Option Description 700-11-01 Audio expansion board (AEB), 8 channel 700-15-03 Telephone Interface Board, FXO, 4 channel 700-15-04 Telephone Interface Board, FXS, 4 channel 700-16-03... -
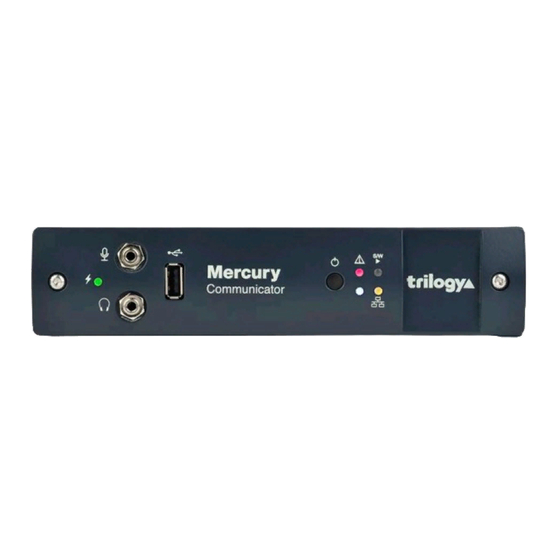
Page 10: Mcu - Key Connections -- Front
Mercury Quick Start Guide MCU – Key Connections -- Front Item Description System status LED Audio loudspeaker connector USB 2.0 (currently disabled) Shutdown / Restart button System operation/Input power status LED (green/red) Software status LED (green/red) Network link status LED (yellow) Indicator: not used Audio headphone connector... -
Page 11: Mcu - Key Connections -- Rear
Mercury Quick Start Guide MCU – Key Connections -- Rear Item Description Video output HDMI 2,3,4 Audio input channel Auxiliary PTT Customer Interface Adapter (CIA) Factory reset button Audio input channel Network connector Gigabit Network Power connector SPY Debug USB... -
Page 12: Mercury Host - Initial Setup
Mercury Quick Start Guide Mercury Host – Initial setup During the initial phase, a keyboard, mouse and monitor are required but may be removed later. The Host and your PC will normally be connected to an IP network. For initial setup, this may be as simple as a single Ethernet cable connected between the Host and your PC. - Page 13 Mercury Quick Start Guide 5. Check the status of the Database Supervisor by double clicking the icon in the System Tray. This shows that only one client is currently connected to the database: the TBC application, which is running locally on the MIU. 6.
- Page 14 Mercury Quick Start Guide 7. Use normal Windows techniques to change the IP settings of the Host Windows IP connection. 8. The configuration must always match. Any mistakes or inconsistencies in these values may lead to unpredictable audio behaviour. For example, if you declare a default gateway IP address for the Windows Host, this must also be declared within the configuration data.
-
Page 15: Gateway - The Configuration Editor
Mercury Quick Start Guide Gateway – the Configuration Editor • Start Gateway from Programs > Trilogy > Trilogy V5 > Configuration Editor. • On first run you will be prompted for a licence code. This is provided on a sticker attached to the original Trilogy CD supplied with your order. - Page 16 Mercury Quick Start Guide and selecting one of the four MIU choices, dependent on the number of option boards fitted in your MIU. • To post your edited values to the database, press the “tick” button, seen upper left in the image above, just below the text “Domain 1”.
- Page 17 Mercury Quick Start Guide The example illustrated is a fully-loaded MIU with 4 • option boards which have defaulted to the most common type, Audio Expansion Board (AEB). If necessary, change the board type by selecting from the list. As before, post your changes to the database by pressing •...
-
Page 18: Gateway - Upload And Restart
Mercury Quick Start Guide Gateway – upload and restart This is a two-stage process: 1. Upload, when data is transferred from the database to a “buffer” memory location on the MIU. This happens in the background and the running system is not disturbed. Depending on the size and complexity of the system, it can take up to 30 seconds. - Page 19 Mercury Quick Start Guide The progress bar will remain on screen until the system has fully restarted and is ready for operation. Now the sequence is complete, the MIU is back in service and the status drum indicator is green. Check the status of the TBC application running on the MIU: it should show a green icon and no errors on the status page of the TBC application.
-
Page 20: Next Steps
Mercury Quick Start Guide Next Steps • Within Gateway, define some Subscribers, ideally hardware control panels. Connect them to the corresponding MIU matrix ports. Initially the panel display will show “Not Yet In • service……” but after completing an upload and restart sequence, the displays will be blank. -
Page 21: Hints And Tips
Mercury Quick Start Guide Hints and Tips • Take small steps. Just make one or two changes to the configuration, then test. If it doesn’t work out as you hoped, it’s easy to backtrack. Take frequent backups. Establish a file naming plan and •... -
Page 22: Notes
Mercury Quick Start Guide Notes Trilogy Communications Ltd. Tel: +44 (0) 1223 815000 2000 Beach Drive Web: www.trilogycomms.com Cambridge Research Park Cambridge CB25 9TP United Kingdom Document 70090625 © Trilogy Communications Ltd.
Need help?
Do you have a question about the trilogy Mercury and is the answer not in the manual?
Questions and answers