Table of Contents
Advertisement
Quick Links
Advertisement
Table of Contents

Subscribe to Our Youtube Channel
Summary of Contents for cinetics AXIS360
- Page 1 Quick Start Guide Basic set-up for your Axis360 system...
-
Page 2: Table Of Contents
Table of Contents 1| Setting up Slide slider assembly attach belt to cart attach ballhead to cart connect motor to controller attach slider to tripod(s) 2| Setting up Pan option #1 for tripod mount option #2 for slider mount 3| Setting up Tilt 4| Setting up Pan and Tilt 5| Setting up Slide and Pan 6| Setting up Slide, Pan, and Tilt... - Page 3 Parts Optional: Shutter Release Cable...
-
Page 4: Setting Up Slide
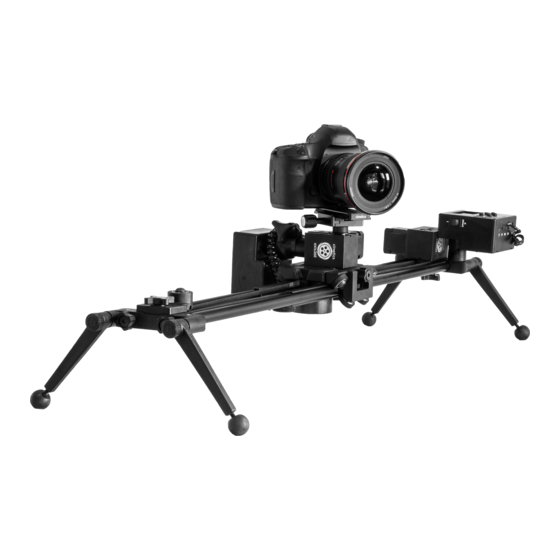
1 | Setup up Slide See it in video here: https://vimeo.com/90878151 Slider Assembly (The slider comes partially assembled) Step 1. First take your slider and un-fold the outrigger legs by loosening the knobs. Position the legs so your slider is standing. For ideal balance, you don’t want legs too narrow or too spread apart Step 2. -
Page 5: Attach Belt To Cart
1 | Setup up Slide cont. Cart Overview The side with the raised Cinetics lettering is the brake, tighten or loosen to engage or disengage brake. The other side is the tensioner, tighten to make sure it is tight enough to keep the weight of the camera level on the rails without tightening too much to restrict the slide. - Page 6 1 | Setup up Slide cont. Attach the motor drive belt cont. Step 11. Loop the belt around the pulley with the grooved side inward for grip (Figure 7) Step 12. Thread belt under the cart and loop belt around the motor on the other end of the slider (Figure 8) Step 13.
-
Page 7: Attach Ballhead To Cart
1 | Setup up Slide cont. Attach Ballhead to Cart Step 16. Attach ballhead, you can use the one we provide or your own (Figure 12) Step 17. Under cart use the silver screw to secure ballhead to cart, tighten with Hex Key (Figure 13) Step 18. -
Page 8: Attach Slider To Tripod(S)
Attach Slider to Tripod(s) You can mount the Axis360 on any tripod by connecting it to the rail brace or outrigger legs. The Rail Brace has a 3/8"-16 thread and the Outrigger Legs have 1/4”- 20 threads. The Slider can be mounted horizontally or vertically. -
Page 9: Setting Up Pan
Option 1. Attachment for Tripod Step 1. Attach Axis360 Motor to tripod (Figure 19 & 20) Step 2. Place ballhead on Axis360 Motor and attach the clamp to it (Figure 21) Step 3. Attach arca style plate to camera and slide into clamp TIP: Make sure clamp is securely tightened Step 4. -
Page 10: Option #2 For Slider Mount
Option 2. Attachment for Slider This set up is preferred for mounting on the slider for a SLIDE AND PAN though it also works on a tripod. Cinetics Quick Connect Pieces Male Quick Connect Threaded Male Quick Connect Female Quick Connect Step 1. - Page 11 2 | Setup up Pan cont. Option 2. Attachment for Slider cont. Step 3. Remove Female Quick Connect from controller (Figure 25) Step 4. Unscrew ballhead and remove ball. Screw ball into the back of the controller (Figure 26) Step 5. Take controller, now with ballhead ball, and mount controller into ballhead clamp (Figure 27) Step 6.
-
Page 12: Setting Up Tilt
3 | Setting up Tilt See it in video here: https://vimeo.com/97264416 Parts Needed: Motor L-Bracket (2) Clamp (2) Controller Hex Key Step 1. Mount motor on short side of L-Bracket, tighten with hex key (Figure 28) Step 2. Screw Threaded Male Quick Connect into bottom of L-Bracket (Figure 29) Step 3. - Page 13 Figure 31. Figure 32. When panning or tilting, balancing is a critical procedure in making sure that Axis360 works correctly. Balancing simply requires that the camera’s center of gravity is located as close as possible to the axis of rotation.
-
Page 14: Setting Up Pan And Tilt
4 | Setting up Pan and Tilt (2 Axis System) Parts Needed: Assembled Pan Setup Option # 1 (Page 8) Assembled Tilt setup (Page 11) Sturdy Tripod Step 1. Place Pan setup #1 on tripod, remove ballhead and attach clamp directly to motor (Figure 33) Step 2. -
Page 15: Setting Up Slide And Pan
Step 1. Assemble Slider setup (Figure 35) Step 2. Assemble Pan setup #2 and place directly onto the cart, motor down (Figure 36) Step 3. Screw in cart thread to bottom of Axis360 motor and tighten with Hex Key Figure 35. Assembled Slider setup Figure 36. -
Page 16: Setting Up Slide, Pan And Tilt
Step 2. Place Pan setup #2 directly onto the cart, motor down (Figure 38) Step 3. Screw in cart thread to bottom of Axis360 motor and tighten with Hex Key Step 4. Take assembled Tilt Setup and slide the long end of the L-Bracket supporting the controller into the motor clamp. -
Page 17: Quickstart Controller Settings
7 | Quickstart Controller Settings See it in video here: https://vimeo.com/127733270 1 AXIS PAN/TILT/SLIDE TIMELAPSE We recommended that you first read the CineMoco Instructional Manual for a more detailed breakdown of the controller menu functions. Menu Page Settings: There are four sections of the menu: GEN (General), CON (Controller), MTR (Motor), CAM (Camera). To scroll through each section just press the Menu button When shooting a timelapse, make sure your camera is set to Manual Mode. - Page 18 7 | Quickstart Controller Settings cont. Main Page Settings Press the Home/Play button. This is where you can customize your timelapse settings Step 1: First set your End Point Moving the right or left arrow will spin the motor right and left Find the place you want your timelapse to end To set End Point scroll down to Set End Point with the down arrow then hit the right arrow button...
- Page 19 7 | Quickstart Controller Settings cont. Main Page Settings cont. When you are ready press the play button. On the screen you will see how many photos are going to be shot, and as the Controller begins shooting, you will see how many photos it has shot so far. Pressing play will end the timelapse.
Need help?
Do you have a question about the AXIS360 and is the answer not in the manual?
Questions and answers