Table of Contents
Advertisement
Quick Links
Advertisement
Table of Contents

Related Manuals for Skriware Skriware 1

Summary of Contents for Skriware Skriware 1
- Page 1 User Manual...
-
Page 2: Table Of Contents
Table of contents Safety & Compliance Printing Materials Overview First Set Up Main Menu 3D Printing Changing A Filament Settings Setting Up A Network Connection 10. Levelling The Printing Platform 11. Maintenance 12. Specifications 13. Troubleshooting 14. Contact... - Page 3 Hopefully using it will be as fulfilling for you, as building it, was for us. To make it possible we packed your Skriware 3D Printer full of advanced features and functions. We also strived to make it as user-friendly as possible but in order for you to seamlessly enjoy all that your Skriware 3D Printer has to offer, we strongly advise that you acquaint yourself with this manual.
-
Page 4: Safety & Compliance
Skriware 3D Printer has been designed to print with PLA filaments which are considered safe. However, it is still advised to use your Skriware 3D Printer in a well ventilated area. Depending on a type of filament, some dangerous vapours can still be released during a print process. Use other than officially supported filaments at own risk. -
Page 5: Printing Materials
180°C (356°F) to 210°C (410°F). At this moment ABS filaments are not supported due to the non-heated magnetic bed of the Skriware 3D Printer so your results with this kind of material may vary. -
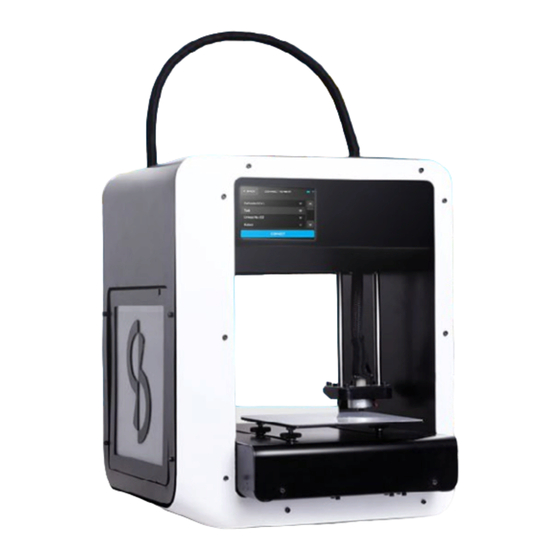
Page 6: Overview
3. Overview 1. Display 2. Side panel 3. Printing platform 4. USB port 5.Power button 6. Extruder’s gantry system 7. Hotend 8.Magnetic bed 1. Ethernet port 2. Printer’s power socket 3. Power cable 4. Filament spool 5. Spool holder 6. Side panel 7. -
Page 7: First Set Up
1 (ON) position. Press the power button on the Skriware 3D Printer’s front. Your Skriware 3D Printer will now turn on. Wait until the Skriware logo disappears from the display and you will see the main menu screen. - Page 8 Connect your Skriware 3D Printer to a network First thing you will want to do is to connect your Skriware 3D Printer to a network. You can do it by plugging ethernet cable in the ethernet port on the back of your Skriware 3D Printer or by joining a wireless network.
- Page 9 Run a test Your Skriware 3D Printer comes preloaded with a filament of your choice. Run a test print to ensure everything was set up correctly. To do it press PRINT in the main menu and then REPRINT LAST MODEL.
-
Page 10: Main Menu
5. Main menu DOCK Docks the printing platform in the front of the Skriware 3D Printer and extruder’s gantry system in the bottom right position. PRE-HEAT Preheats the extruder to 190°C / 374°F and maintains this temperature for about 5 min- utes unless you press CANCEL (be careful! Make sure the HOT! sign disappears before doing anything in the extruder’s vicinity). -
Page 11: D Printing
6. 3D printing If it has been a while since the last time you used your Skriware 3D Printer or you have moved it around, you may want to level the printing platform (follow the instructions in the section 10. Levelling The Printing Platform on page 17) and wipe the magnetic bed with a rubbing alcohol and a clean cloth. - Page 12 PRINTING FROM USB Insert a USB drive into the USB port in front of your Skriware 3D Printer and press PRINT in the main menu. Choose your desired model from the list of the files and confirm with the PRINT prompt on the bottom of the display (make sure the file is in the gcode format).
-
Page 13: Changing A Filament
7. Changing a filament UNLOADING A FILAMENT To unload a filament press CHANGE in the main menu. Confirm on the prompt. Wait until the extruder heats up. You can <CANCEL the process anytime. Filament loading tube Spool holder Filament spool Do not touch the extruder and its vicinities while HOT! warning is displayed! The filament will now unload. - Page 14 LOADING A FILAMENT Cut the end of a new filament at an angle. It will be easier to insert if it has a sharp tip. Press CONTINUE. Put a filament spool on the spool holder as shown on the diagram on the display and push the cut end into the filament loading tube for about 10 cm (4 in) until you feel it won’t go in anymore.
-
Page 15: Settings
Simply press SETTINGS -> UPDATE and if an update is available press YES to download and install it. Wait until the Skriware 3D Printer reboots and you are ready to resume your hassle-free 3D printing experience. -
Page 16: Setting Up A Network Connection
It offers both wired and wireless connection. Current type of connection is indicated by the icon in the top right of the display. To establish a wired connection simply plug an ethernet cable into the ethernet port on the back of your Skriware 3D Printer. -
Page 17: Levelling The Printing Platform
12. Levelling the printing platform In order for your models to turn out exactly the way you want them to, it is important that the printing platform is levelled. Before you follow the instruction of the levelling process you will need a standard piece of paper. Levelling dials are located under the printing platform. -
Page 18: Maintenance
13. Maintenance Action Frequency Detailed explanation Cleaning the magnetic bed Before every print Clean the top white side of the magnetic bed with a clean cloth and rubbing alcohol Every couple of prints Leveling the printing platform page 17 / each time you have moved the printer 14. -
Page 19: Troubleshooting
Possible solution I can’t find my Check if your router is working and your other Wi-Fi network devices can connect to it. Skriware 3D Printer does not support 5GHz networks My Skriware 3D Printer Make sure the power cable is connected, isn’t working... -
Page 20: Contact
If you need to contact us in regard to technical or any matter do not hesitate! You can reach us by mail on info@skriware.com or message us on Facebook facebook.com/skriware For all the technical issues write to support@skriware.com Enjoy your Skriware 3D Printer! Yours, Skriware Team...
Need help?
Do you have a question about the Skriware 1 and is the answer not in the manual?
Questions and answers