Table of Contents
Advertisement
Quick Links
1
PREPARATION
Make sure your iPad is connected to your wireless
network and that your wireless network supports the
2.4 GHz (IEEE802.11 b/g/n) frequency. Have your
WLAN password ready.
Install the OccluSense
www.occlusense.com/install
2
INITIAL SETUP
In the OccluSense
®
-iPad-App select
on
'Initial
setup'.
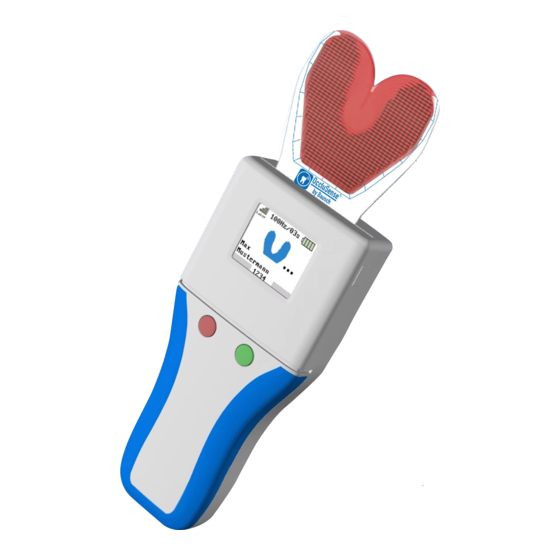
Switch on the handheld.
(press the pink operating button 1)
Your handheld first creates its own network (SSID)
which is shown with the password (WEP) in the
display.
Tap
'Start'
in the OccluSense
the setup process and type the WEP password into
the dialog box.
Confirm the following dialog with
®
-iPad-App
'Settings'
®
-iPad-App to initiate
' J
oin'.
3
WLAN SETUP
Confirm the following dialog with
and tap
OccluSense
A screen opens with three steps to be performed.
Tap on
'Next'
network name (the last selected SSID is suggested)
and your WLAN password.
Once the data has been entered, tap 'Next'.
The OccluSense
to the handheld via this network.
A successful connection between the handheld and
the wireless network is indicated by green signal bars
and the first 6 characters of the wireless network in
the upper left corner of the handheld display.
If the connection between the handheld and the
wireless network has failed, the connection status is
indicated on the handheld display by transparent
signal bars. In this case reset the handheld (manual
chapter 19.2) and start the initial setup again.
Quick Start Guide
®
handheld device with your WLAN.
to start the process. Now enter your
®
-iPad-App establishes a connection
'Yes'
to connect the
Advertisement
Table of Contents
Troubleshooting

Summary of Contents for Bausch OccluSense
- Page 1 Make sure your iPad is connected to your wireless network and that your wireless network supports the 2.4 GHz (IEEE802.11 b/g/n) frequency. Have your WLAN password ready. ® Install the OccluSense -iPad-App www.occlusense.com/install INITIAL SETUP WLAN SETUP Confirm the following dialog with ‘Yes’...
- Page 2 ® OccluSense is a network device - If you have any ® problems connecting the OccluSense to your ® To register your system, open the OccluSense -iPad- network, please contact your system administrator. App. Tap on ‘Settings’ in the menu.
- Page 3 Instructions for Use...
- Page 4 ® Bausch and OccluSense are trademarks of Dr. Jean Bausch GmbH & Co. KG, registered in the EU and other countries. Apple, Mac, iPad, iPad Air, iPad mini, AirDrop, iTunes are trademarks of Apple Inc., registered in the U.S. and other countries.
-
Page 6: Table Of Contents
10.2.1 Switch on the handheld................25 10.2.2 Start the initial setup................26-27 10.2.3 Integration into your own WLAN network.............28 10.2.4 Registration of the system...............29-30 10.3 Administration of OccluSense handheld devices...........31 10.3.1 Rename handheld..................31 10.3.2 Disconnect handheld..................31 10.3.3 Pairing of the handheld with the OccluSense-iPad-App........32... - Page 7 SAFETY 11 Safety Check......................34 12 Function test......................34-35 PATIENT MANAGEMENT 13 Manage patient data....................36 13.1 Overview......................36 13.2 Create patient....................37 13.3 Edit patient data..................38 13.4 Delete a patient’s data.................38 RECORDINGS 14 Start a recording....................39 14.1 General......................39 14.1.1 Switch off handheld..................40 14.1.2 Insert Sensor...................40-41 14.1.3 Switch on the handheld..................42 14.1.4 Check WLAN connection................42 14.1.5 Check if sensor is ready for recording.............43...
- Page 8 MANAGE RECORDINGS 16 Manage and export recordings................62 16.1 Play back recordings...................63 16.2 Compare recordings.................63-64 16.3 Export recordings and snapshots..............64 16.4 Export recordings as video................65 16.5 Export data via iTunes PC/Mac software............66 16.6 Export patient’s data via AirDrop..............67 16.7 Import......................67 SETTINGS 17 Menu ”Settings”......................68 17.1...
- Page 9 NOTICE 22 Transport & Storage....................78 23 Expected lifetime....................78 24 Disposal Instructions....................78 25 Electromagnetic Compatibility.................79 26 Warrenty.........................80 27 Customer Service....................80 28 Spare parts.......................81 29 Notification of incidents..................81 30 Declaration of Conformity....................82...
-
Page 10: Symbols
Do not use if package is broken! Do not expose to heat! Some chapters describe usage procedures. In order to see which action of the ® OccluSense -System is required, the following symbols are used: User interaction with the handheld User interaction with the iPad Interaction with the patient WEEE-Reg-No.: DE 11349707... -
Page 11: Terminology, Hardware Requirements Ipad
-System: Entire treatment unit according to chapter 4 "Device description". Handheld: ® The central electronic device of the OccluSense -System, which executes the collection of raw data as well as its intermediate storage and transmission to the iPad (chapter 4.1). - Page 12 CAUTION • Using the application on a not supported device is possible but at the user’s own risk. • It is possible to run the app on an unsupported iOS version at the user’s own risk. NOTE • A particular notification will pop up when the app is running on a not supported iOS or hardware.
-
Page 13: General Information
Bausch Articulating Papers, Inc. 12 Murphy Drive, Unit 4 Nashua, NH 03062 - United States of America Tel: (603) 883-2155 | Tel: 1-888-6-BAUSCH | Fax: (603) 883-0606 E-Mail: info@bauschdental.com | Web: www.bauschdental.com Bausch Articulating Papers (Australasia) Pty. Ltd G.P.O. Box 3733, Sydney NSW 2001, Australia Tel: +61-2-9345-1945 | Fax: +61-2-9345-1955 E-Mail: info@bauschdental.com.au | Web: www.bauschdental.com.au... -
Page 14: Intended Use
- iPad App available in the Apple AppStore BK 5100 (requires an Apple iPad [no medical device], not included) - 1 test sensor BK 5011 ® - 25 OccluSense -Sensors BK 5025 - Manual BK 5051 - 3 NiMH rechargable batteries... -
Page 15: Operating And Functional Elements Of The Occlusense-System
4.1 Operating and functional elements of the OccluSense ® System 4 5 6 7 8 9 10 1 – Charging station incl. 10 – Control button 3 (Reset) power supply 2 (accessory) 11 – Battery compartment 3 – Sensor (Applied Part type B) 12 –... -
Page 16: System Features
Subsequently the handheld transmits this data via wireless interface to the ® ® OccluSense -iPad-App. The OccluSense -iPad-App saves and displays the received data as a recording. Electrical OccluSense ®... -
Page 17: Contraindications
Several recordings can be compared, e.g. before and after dental treatment, and can be saved on the iPad for documentation purposes. Therapeutic measures must not be applied on the basis of the data of the OccluSense ® System only, further information is required, in order to achieve a comprehensive diag- nosis. -
Page 18: Precautions/ Safety Instructions
The OccluSense ® -System must be used with the supplied or prescribed accessories only. It is not allowed to connect any part of the OccluSense ® -System to an external DC power source. The power supply of the system has to be carried out exclusively with the supplied charging accessory. -
Page 19: Preparation
8 Installation of the OccluSense ® -iPad-App ® ® Before using the OccluSense -System for the first time, install the OccluSense -iPad- App on the iPad (www.occlusense.com/install). ® Before initial operation of the OccluSense -System or after reset to factory default, a network configuration of the handheld and the associated pairing with an iPad is required. -
Page 20: Battery Charging
8.1 Battery Charging 1. Loosen the screws of the battery 2. Insert the battery compartment cover compartment lid with the screwdriver and tighten the screws. supplied, remove the battery compart- ment cover and insert the supplied NiMH batteries into the battery compartment. 3. - Page 21 5. Charging is indicated by a permanently lit red LED located between the two buttons. NOTE • Both the permanently lit red LED in the handheld and the flashing red LED in the charger merely indicate the battery charging process and do not represent a warning! •...
- Page 22 Figure 1: Empty Battery Figure 2: Low Battery The rechargeable batteries must be charged at the latest when the battery icon shows only one bar in red (Figure 1). However, it is recommended to recharge them when two yellow bars of the battery symbol occur (Figure 2).
- Page 23 The handheld can be charged both when it is switched on and when it is switched off. As soon as the handheld is placed in the charging station, the handheld switches to a charging state in which the operation is disabled and a battery charging icon (Figure 3) is displayed.
-
Page 24: Occlusense ® -Ipad-App
® -iPad-App The OccluSense ® -iPad-App allows to record and manage data from the OccluSense ® Handheld-Device. During a recording, all occlusion data is transferred to the app, which enables to display the data two-dimensionally, three-dimensionally or in a combined view. The recorded data can be viewed and filtered. -
Page 25: User Manual
9.3 User manual The user manual can be accessed via the integrated PDF viewer (Figure Figure 6: User manual If you tap "MANUAL", the corresponding chapter in the PDF manual will automatically open according to the current action. (Example: You are in the patient management, tap on "MANUAL" and the PDF manual opens chapter 13.) At the bottom of the screen is the status bar (Figure... -
Page 26: Installation
INSTALLATION 10 First use 10.1 Demo Mode After installation the app starts in demo mode, indicated by “UNREGISTERED” in the top left corner (Figure Figure 8: “UNREGISTERED” label in the top left corner of the app. In the demo mode predefined patients and recordings are available to give a first im- pression of the app. -
Page 27: Initial Setup
At delivery, the handheld is not preconfigured for an existing WLAN. In the course of the ® initial setup your iPad will first connect to the OccluSense handheld. Subsequently, it is possible to integrate the handheld into your existing WLAN. -
Page 28: Start The Initial Setup
"Start". Figure 10: Initial setup Now enter the WEP password in the field (Figure 11) which is shown on the display of ® your OccluSense handheld device (Figure Figure 11: Input field for the WEP password... - Page 29 Allow access to the WLAN "Occlusense" by tapping on "Join". ® Figure 12: Connection to the integrated WLAN of the OccluSense handheld When the handheld has been successfully connected, the display shows Figure 13. This ® symbolizes "successful connection with the OccluSense iPad app", "no sensor inserted"...
-
Page 30: Integration Into Your Own Wlan Network
(Figure 16). The last WLAN network, the iPad has been connected to, will be suggested as the network SSID. Enter the password of your WLAN network and allow the OccluSense ® -iPad-App to access the network in order to write the data to the handheld. -
Page 31: Registration Of The System
10.2.4 Registration of the System After the initial pairing, please restart the app. To do this, press the home button twice (iPad without home button: swipe up from the bottom of the screen) and swipe up the preview of the app to close it. Now the full functionality of the app is available. In case you have not yet registered the app you have access to all functions for 14 days. - Page 32 Internet access to receive the confirmation of your registration data. If your registration was successful a green checkmark is being displayed: ® After the registration process, the OccluSense -iPad-App has to be restarted to exit the DEMO mode. To do this, press the home button twice (iPad without home button: swipe up from the bottom of the screen) and swipe up the preview of the app to close it.
-
Page 33: Administration Of Occlusense Handheld Devices
10.3 Administration of OccluSense ® handheld devices ® Beside the initial setup, the OccluSense -iPad-App provides other functions for the administration of handheld devices. 10.3.1 Rename handheld If you intend to use several handhelds with one app, you should immediately assign a name to the handheld to make identification of each individual handheld easier. -
Page 34: Pairing Of The Handheld With The Occlusense-Ipad-App
10.3.3 Pairing the handheld with the OccluSense ® -iPad-App The app shows unpaired handhelds in the "Devices" list (OccluSense ® -iPad-App -> Set- tings -> Handheld Registration -> Switch device) (Figure 18). To pair, select the handheld from the "Devices" list (Figure 19) (default name is "DEFAULT"). - Page 35 NOTE • The purpose of integrating the handheld and the evaluation unit into the IT-network is to enable the live mode. Minimum IT network requirements are the following: • WPA/WPA2 WLAN encryption • DHCP server in the IT network with at least two free IP addresses •...
-
Page 36: Safety Check
SAFETY 11 Safety check ® The function test described below ensures that the OccluSense -System works properly and that the masticatory pressure distribution is displayed correctly. It is therefore necessary that the function test is performed once a day. First of all, a visual inspection for external damages of the device must be made. - Page 37 In this case, see chapter 19.5 "Troubleshooting". 5. Remove the test sensor from the handheld and place it in the storage box. NOTE • If the sensor test fails permanently (Figure 23), please visit our support website: help.occlusense.com...
-
Page 38: Manage Patient Data
PATIENT MANAGEMENT 13 Manage patient data 13.1 Overview In the „Patients” section you can manage patients and their recordings (Figure 24). It is possible to create, edit, delete and export patient data as well as viewing and deleting old recordings of occlusion data and editing the attached notes. In this view you are also able to switch the active patient. -
Page 39: Create Patient
13.2 Create patient Tap the “Plus”-symbol at the top left of the screen to create a new patient. After that you will be asked to enter the patient data (Figure 25). All fields are mandatory and have to be filled in. As soon as you have entered all the data, confirm by tapping on “Done”. If you do not want to create a new patient, tap on “Cancel”. -
Page 40: Edit Patient Data
13.3 Edit patient data In order to edit a patient’s data, the patient’s name has to be selected first. Then tap on the “Edit Patient”-symbol at the top right of the screen. After that the data can be edited. The patient number can not be changed. If you want to save your changes, tap the “Done”... -
Page 41: Recordings
If this has not yet been performed, the initial setup has to be made first (see chapter 10). • The recording will be started and stopped by the control buttons of the ® OccluSense handheld only. • For recording, a permanent, wireless connection between the handheld and ®... -
Page 42: Switch Off Handheld
1 (pink) for more than 2 seconds. The handheld then turns off (display off). 14.1.2 Insert sensor The OccluSense ® -Sensor is a horseshoe shaped pressure sensor. The sensor consists of a printed electronic circuit inside featuring a sensibility of 256 pressure levels. -
Page 44: Switch On The Handheld
14.1.3 Switch on the handheld Figure 27: Display after switching on the handheld To switch on the handheld, briefly press operating button 1 (pink). During initialization, the device displays the product logo including the version number of the firmware. (Figure 27). -
Page 45: Check If Sensor Is Ready For Recording
® The graphic on the left (Figure 29) shows that the OccluSense -iPad-App is connected to the handheld and the sensor is inserted properly. If the sensor is defective or inserted improperly, the graphic on the right appears on the... -
Page 46: Patient Data
14.2.1 Patient data Figure 32: Patient set active (handheld) Figure 33: Patient set active (iPad) Create a new patient (chapter 13.2) and/or activate a patient (chapter 14.2). The patient's name is transferred to the handheld (Figure 32). Check if the patient’s data is correct. The currently active patient is always displayed in the upper left corner of the iPad screen (Figure... -
Page 47: Recording Modes
OccluSense ® -iPad-App. NOTE • The “Live mode” as well as the “Live + Recording” mode are only available if the OccluSense has been integrated in your WLAN network (Chapter 10.3) to ensure the best performance. -
Page 48: Recording And Live-Mode
14.3.1 Recording and Live-Mode To start a recording, a handheld with an inserted sensor has to be connected to the app (Chapter 14.1.2) and a patient has to be activated (Chapter 13). The currently active pa- tient is always shown at the top left of the screen (Figure 34). - Page 49 For the duration of the recording, a value between 1 and 99 seconds can be chosen. For the operation mode, one of the following options can be selected (Figure 36): Live Realtime mode (no recording) Recording 50Hz Recording 50 pictures/sec. (no live view) Recording 100Hz Recording 100 pictures/sec.
-
Page 50: Recording Of The Masticatory Pressure Distribution
14.4 Recording of the masticatory pressure distribution The practitioner must perform the following steps in order to record the masticatory pressure distribution of a patient: 14.4.1 Insert the sensor into the patient's mouth NOTE • Slightly squeezing the cardboard frame makes it easier to insert the sensor into the patient's mouth. -
Page 51: Recording
14.4.2 Recording • Start the recording on the handheld by pressing button 1 (pink). • The patient opens and closes the mouth according to the instructions of the practi- tioner. In recording mode, the recording does not begin until a minimum force is ex- ceeded or by pressing button 1 (pink). -
Page 52: Finish Recording
• The evaluation of the recorded raw data as well as the visualization of the ® masticatory pressure conditions are processed by the OccluSense -iPad-App. • Remove the sensor from the handheld and dispose of it properly after the desired recordings have been made. - Page 53 However, it is possible to save individual snapshots by pressing button 2 (green). • Recording mode / combined mode: After recording, the raw data is being stored ® in the patient’s file of the OccluSense -iPad-App and displayed automatically after the recording has been finished.
-
Page 54: Evaluation Of Recordings
EVALUATION OF RECORDINGS 15 Viewing recordings 15.1 Overview In the section “Recording“, you can start a recording or the live mode (Figure 38). A gra- phical representation of the data is arranged in the center of the screen. The recorded or live data can either be displayed two-dimensionally, three-dimensionally or in a com- bined view. - Page 55 2D View The recorded data can be displayed in three ways. The first view is called "2D" which shows the recorded data of the masticatory pressure by two dimensionally colored squares (Figure 39). Figure 39: 2D view of the occlusal pressure distribution 3D View The second option is the three dimensional view, called “3D”...
- Page 56 In addition to the markings on the occlusal surfaces, like with conventional occlusion ® test materials, OccluSense is able to record the temporal sequence of intercuspidation. During this dynamic process, the pressure points and surfaces change in their appea- rance.
-
Page 57: Resizing, Turning And Tilting The View
2D/3D View The third option is to combine the previous two views, called “2D/3D” (Figure 41) order to view both on one screen. Figure 41: Combined 2D/3D view 15.2 Resizing, turning and tilting the view The three dimensional view can be resized by a pinch gesture with two fingers. The view can also be rotated by swiping horizontally across the diagram and tilted by swiping vertically across the diagram. -
Page 58: Playing Recordings
15.3 Playing recordings If the recording is not a snapshot, it is possible to view all occlusion pressure changes over time, just like a video. The operative elements for this purpose can be found on the bottom of the screen (Figure 42). -
Page 59: Filtering
15.4 Filtering At the right edge of the screen you can find a vertical line with a white point. With this control you are able to filter out values which are lower than a specified threshold. The threshold can be adjusted by moving the white point along the line. The upper end of the line represents the threshold “0”... -
Page 60: Viewing Recorded Data
15.5 Viewing recorded data The recorded data is available in the section “Recordings”. It is also possible to load and view older recordings and snapshots. Tap on the “Load recording” button in the top left and select the recording that shall be viewed (Figure 45). -
Page 61: Additional Visualization Options
15.6 Additional visualization options At the top right edge of the screen are three buttons. A tap on the button in the middle, with the three dots opens a small menu with the options to activate or deactivate the vi- sualization of the occlusal force distribution (Figure 46). -
Page 62: Renaming Recordings And Adding Notes
15.7 Renaming recordings and adding notes Renaming recordings By using this button, you can edit the name of a recording. This option is available in the section “Recording” as well as in the “Patients” section. The search field in the list of recordings can be used to find a recording by the name. -
Page 63: Fullscreen
15.8 Fullscreen At the top right, the fullscreen-button is located. By using this you can maximize the diagram view and all controls, not necessary to interact with the diagram, are hidden. The fullscreen view also permits the export of recordings as pictures, PDF or video (chapter 16). -
Page 64: Manage Recordings
MANAGE RECORDINGS 16 Manage and export recordings You can manage your recordings from within the patient’s folder (Figure 49). When a pa- tient has been selected from the patients list, all recordings of this specific patient ap- pear. Recordings will be collected in folders sorted by date. Renamed recordings (chapter 15.7) can easily be found by using the search field. -
Page 65: Play Back Recordings
16.1 Play back recordings To play back a recording a patient has to be selected from the patient´s list. After se- lection, a list of recordings related to this patient will appear. Tapping on recording, all occlusion data will be displayed in a new diagram view, as described in chapter 13.3. When displaying a recording, you can easily switch between all recordings of the same patient using the list on the left. -
Page 66: Export Recordings And Snapshots
NOTE • This functionality only allows the comparison of recordings of the same patient. Hence, at least two recordings or snapshots need to be available. 16.3 Export recordings and snapshots Recordings can be exported as images in .png format, or as pdf files including the notes of the recording, or as videos. -
Page 67: Export Recordings As Video
16.4 Export recordings as videos Recordings can also be exported as MP4 videos by recording the playback. The videos include your interactions with the recording like the rotation, tilting, zooming, adapting the threshold or using the default controls to display the desired frame. Exporting a re- cording as video is also only available in the full screen mode. -
Page 68: Export Data Via Itunes Pc/Mac Software
16.5 Export data via iTunes PC/Mac software To export data to a PC or Mac, you have to connect the iPad to the PC/Mac. The cable is included with the iPad. The software "iTunes" has to be installed on the PC/Mac. (www.apple.com/itunes/download/). -
Page 69: Export Patient's Data Via Airdrop
Figure 54: Import button ® If the data has been sent via AirDrop to an iPad, the OccluSense -iPad-App will launch automatically. You will be asked if the received file should be saved for immediate or later import. If you decide to import the data later, the file can be imported by using the “Import”... -
Page 70: Menu "Settings
WLAN data might be lost as well. To reconnect the handheld device, refer to chapter 10.2. NOTE • The update for the OccluSense ® -iPad-App is provided by the Apple AppStore in the standard update process. -
Page 71: Troubleshooting
® indicator, switch the iPad’s wireless network to the network of the OccluSense handheld device. Then reconnect the handheld device to the local wireless network, for details refer to chapter 10.2. -
Page 72: Troubleshooting Table
-iPad-App is not • The user’s iPad is not compatible • See operating instructions, ® installed properly on the iPad. with the OccluSense -iPad-App "Hardware Requirements" • The iOS-version of the user is • Update the iOS not compatible with the Occlu- ®... - Page 73 Action A recording of the bite force distri- • Patient file has not been created • Create patient file in the Occlu- bution can not be started. or activated in the OccluSense ® Sense ® -iPad App (chapter 13.2) iPad-App •...
- Page 74 Error (symptom) Cause Action Battery compartment cannot be • Battery compartment cover is • Consult Bausch closed defective or missing (support@occlusense.com) • Screwdriver is damaged or missing The connection between Occlu- • Connect handheld with iPad App Sense ® iPad-App and handheld is (chapters 10) not possible.
- Page 75 • Check position of the test sensor ® the OccluSense -Sensor. properly inserted in the handheld and, if neces- ® • The used OccluSense -Sensor is sary, reposition the sensor defective or manipulated (chapter 14.1.2) • Replace unrecognized Occlu- ®...
-
Page 76: Cleaning
CLEANING 20 Cleaning and disinfection The components of the OccluSense ® -System (handheld, charging station and test sensor) must be cleaned and disinfected regularly after each treatment as part of general practice hygiene. In principle, the following must be observed: "Requirements for hygiene in reprocessing... -
Page 77: Charging Station
In particular, the concentrations to be used and the ap- plication times must be observed! CAUTION ® • The components of the OccluSense -System are not suitable for mechanical cleaning and thermal disinfection processes. • The battery compartment cover must be closed during cleaning and disinfection. -
Page 78: Maintenance
21 Batteries, electrical safety, software updates 21.1 General ® The OccluSense -System is basically maintenance-free. However, the system must be calibrated once a day (if used) in the form of a function test. If the function test runs successfully as described in chapters 11 and 12 "Safety test &... - Page 79 2. Remove the batteries to be replaced and dispose of in accordance with the official disposal regulati- ons (see chapter 24). 3. Insert new suitable AAA NiMh rechargeable batteries (with a capacity of at least 1000mAh each) in the correct arrangement (see markings in the battery compartment).
-
Page 80: Software-Updates
-System supports updating the handheld firmware and the OccluSense ® -iPad-App. As soon as an update of the handheld firmware or the OccluSense ® -iPad-App is available, a reminder for the update is automatically displayed and can be downloaded and installed by selecting: "Settings"... - Page 81 NOTICE 22 Transport & Storage In case of a longer storage of the OccluSense ® -System, it is recommended to remove the batteries from the handheld and store them together with the other system compo- nents in the system case (included). The same applies to the transport of the system.
- Page 82 Otherwise, the General Terms and Conditions of Dr. Jean Bausch GmbH & Co. KG apply. 27 Customer Service Please use our support system and our knowledge database under the menu item "Help".
- Page 83 29 Notification of incidents NOTE ® • Serious incidents in connection with the application of the OccluSense -System have to be reported to Dr. Jean Bausch GmbH & Co. KG [info@occlusense.com] and the respective authority of the EU member state! NOTE ® •...
- Page 84 Annex VII of the directive 93/42/ECC (MDD) Dr. Jean Bausch GmbH & Co. KG hereby declares that the products mentioned above, meet the require- ments of the Directive 93/42/ECC (MDD) and the Directive 2007/47/EC for medical devices as well as the Directive 2014/53/EU for radio equipment.
- Page 85 ® The OccluSense contains the wireless network transmitter module Microchip ATWINC1500-MR210PB, registered in: U.S.A. Contains FCC ID: 2ADHKATWINC1500 This equipment has been tested and found to comply with the limits for a Class B digital device, pursuant to part 15 of the FCC Rules. These limits are designed to provide reasonable protection against harmful interfe- rence in a residential installation.
- Page 86 Dr. Jean Bausch GmbH & Co. KG Oskar-Schindler-Straße 4 D-50769 Köln - Germany Tel: +49-221-70936-0 Fax: +49-221-70936-66 E-Mail: info@bauschdental.de Internet: www.bauschdental.de Bausch Articulating Papers, Inc. 12 Murphy Drive, Unit 4 Nashua, NH 03062, U.S.A. Tel: +1-603-883-2155 Tel: 888-6-BAUSCH Fax: +1-603-883-0606 E-Mail: info@bauschdental.com...
Need help?
Do you have a question about the OccluSense and is the answer not in the manual?
Questions and answers