Table of Contents
Advertisement
Quick Links
Advertisement
Table of Contents

Related Manuals for ONEUW ONE160x

Summary of Contents for ONEUW ONE160x
- Page 2 Please read this user guide carefully before using your ONE160x underwater strobe. Only in this way you will be able to use it to its full potential in absolute safety for yourself and for others.
-
Page 3: Table Of Contents
CONTENTS IMPORTANT INFORMATION CE Mark - Safety notes ............1 CE Mark ................... 1 Warnings and caution .............. 1 Warnings and informations in the chapters ......3 BASIC INFORMATION Key features overview ............4 Available versions ..............6 Nikon - Flash exposure modes ..........6 Canon - Flash exposure modes .......... - Page 4 CONTENTS Rotary control switch function ..........17 Display indications .............. 18 Inverted display mode - Check flash ........20 Power output reading ............20 FLASH EXPOSURE MODES - ADVANCED OPERATIONS 10.0 Flash exposure modes ............21 10.1 i-E-TTL - film-TTL auto mode ..........21 10.2 s-TTL auto mode ..............
- Page 5 CONTENTS PROBLEMS AND ERROR INDICATIONS - MAINTENANCE 15.0 Problem and error indications ..........36 15.1 Overheating protection ............36 15.2 Battery pack excessive discharge protection ......37 16.0 Overpressure safety valve ........... 38 17.0 Maintenance ............... 40 ACCESSORIES - SPECIFICATION 18.0 Accessories .................
-
Page 6: Important Information
IMPORTANT INFORMATION 1.0 Safety Notes 1.1 CE Mark The ONE160x strobe has been developed and manufactured with safety standards accordance with applicable Directives. 1.2 Warnings and caution • Use the product for its intended purpose – underwater photography – following the modes and instructions given by this user guide. - Page 7 IMPORTANT INFORMATION • Do not leave the strobe in overheated environments such as car interiors in summer or boat engine compartments. Do not expose the strobe in summer directly to the sun for prolonged periods, overheating can damage the unit and create dangerous situations. •...
-
Page 8: Warnings And Informations In The Chapters
IMPORTANT INFORMATION 1.3 Warnings and informations in the chapters The following chapters contain further notes in the form of "danger warnings" or "technical information notes". The type of annotation is easily recognizable by the icon that precedes it as indicated below. This icon indicates warnings concerning potentially dangerous situations that could result in property damage or personal injury. -
Page 9: Basic Information
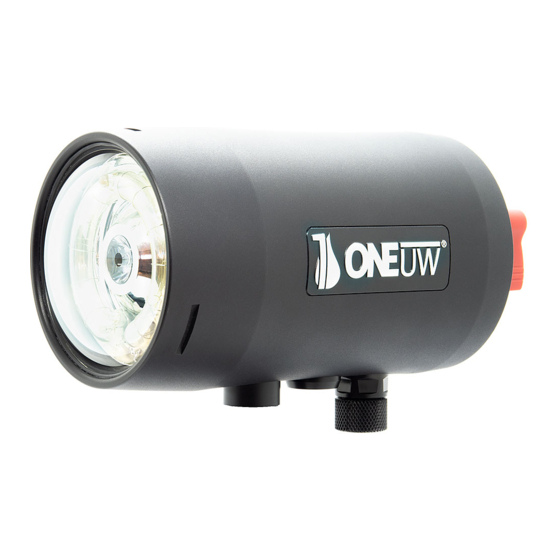
BASIC INFORMATION 2.0 Key features overview ONE160x is a professional underwater strobe with maximum energy of 157 Ws (J) and Guide Number 20 (ISO100-1m-full power). The beam angle is 130° (GN16). The body of strobe is machined from a solid block of anticorodal aluminium, protected by a hard anodizing treatment with nanotech quartz coating. - Page 10 BASIC INFORMATION The right INPUT lever selector allows us to select input and connection mode that we intend to use: synchro cable socket, fiber-optic cable socket, optical receiver on parabolic reflector for slave mode. The control lamps indicate the selected SYN-OPT-SLV input. The rotary control switch adjusts power output in manual mode or exposure compensation in TTL mode.
-
Page 11: Available Versions
BASIC INFORMATION 3.0 Available versions The ONE160x digital strobe is available for Nikon and Canon cameras. The choice of version is carried out in purchase moment. Depending on the version, the digital communication software between camera and strobe, managed by the first CPU, is compatible with Nikon's i-TTL or Canon's E-TTLII protocols. -
Page 12: Canon - Flash Exposure Modes
3.4 Firmware upgrade The unit's firmware is upgradable for future functionality. The upgrade has to be carried out at ONEUW's premises. It is also possible to change the firmware from Nikon to Canon, or vice versa, with the complete replacement of the operating software. -
Page 13: Strobe Parts And Controls
BASIC INFORMATION 4.0 Strobe parts and controls... - Page 14 BASIC INFORMATION...
-
Page 15: Getting Started - Power Supply Managment
GETTING STARTED - POWER SUPPLY MANAGMENT 5.0 Power supply managment Power is supplied by a removable NiMH battery pack made with the best professional high-energy cells from Panasonic. More than 250 flashes at full power are ensured with fully-charged battery pack. The recharge times, electronically managed by CPU, ranging from 0.1 to 1.8 seconds. -
Page 16: Battery Pack Installing And Removing
GETTING STARTED - POWER SUPPLY MANAGMENT 5.3 Battery pack installing and removing The battery pack inserting in a univocal way, due its semi-circle shape, the side to be inserted is the one that shows the positive + and - negative power pins. The battery pack is easily inserted or removed thanks to the tilting metal handle placed in the front. -
Page 17: Battery Pack State Of Charge Check
If the power pins into the battery compartment are oxidized they have to replaced. The repair must be carried out at ONEUW’s premises or authorized service centers. Do not charge the battery pack when it is placed in battery compartment - remove and charge it in a cool and ventilated place to avoid overheating. -
Page 18: Air Transport
GETTING STARTED - POWER SUPPLY MANAGMENT To improve the capacity and duration of battery packs some full discharge-charge cycles are recommended every three months. Do not discharge the battery pack by flashing. Use the pilot light only. The unit automatically switches off when the battery is discharged. -
Page 19: Strobe Switching On/Off
GETTING STARTED - POWER SUPPLY MANAGMENT 6.0 Strobe switching on/off The strobe is switched on and off by pressing the MAIN and INPUT lever selector simultaneously. Turning on the unit is indicated by the visual indications on the display and by a single beeping sound after which the lever selectors can be released. -
Page 20: Controls Functions - Display Indications
CONTROLS FUNCTIONS - DISPLAY INDICATIONS 7.0 Lever selectors function Using the lever selectors, we set the operating parameters of the flash. The red MAIN left lever selector operates the control of the pilot light and the TTL auto flash exposure mode. The black INPUT right lever selector selects the active input of the flash. -
Page 21: Storing Operating Parameters
CONTROLS FUNCTIONS - DISPLAY INDICATIONS When the strobe is connected to the digital camera by a synchro cable properly wiring in according to the specific i-TTL or E-TTL protocol, the SYN input is selected by default and it is automatically locked. Other input mode are not selectable. -
Page 22: Rotary Control Switch Function
CONTROLS FUNCTIONS - DISPLAY INDICATIONS 8.0 Rotary control switch function The rotary control switch sets the strobe power output both in manual mode or TTL mode. When the manual mode is selected, the rotary switch adjusts energy control in ½ f-stop increments over a range of - 6 f-stop, starting from the default value of Full - full power. -
Page 23: Display Indications
CONTROLS FUNCTIONS - DISPLAY INDICATIONS 9.0 Display indications The wide display located in center between the two lever selectors shows all the strobe operating mode and settings. Switched on the unit is signalled by the display visual indications and by a single beeping sound. The MAIN control lamps, on the left, are the following: 7 -PL-TTL. - Page 24 CONTROLS FUNCTIONS - DISPLAY INDICATIONS The selected values of energy level or exposure compensation are visualized on the display as follows: Manual TTL EV+/- f-stop f-stop (1/1) F u ll - 0. 5 (1/2) - 1. 0 - 1. 5 (1/4) - 2.
-
Page 25: Inverted Display Mode - Check Flash
CONTROLS FUNCTIONS - DISPLAY INDICATIONS 9.1 Inverted display mode - Check flash Depending on the configuration of use and the number of units, the position of the strobes may be reversed by 180°. With this setup, the control display is upside down, making it difficult to read. The simultaneous pressing of the left and right lever selectors for a long time (about one second), allows the numerical indication of the central display to be inverted. -
Page 26: Flash Exposure Modes - Advanced Operations
FLASH EXPOSURE MODES ADVANCED OPERATIONS 10.0 Flash exposure modes The flash exposure modes, according to connecting system used, are the following: § i-E-TTL auto flash exposure mode - digital camera connected strobe via synchro cable (wiring in according to the specific protocol - chapter 14.0) §... -
Page 27: S-Ttl Auto Mode
Attention, to operate in s-TTL auto flash exposure mode, digital camera and ONE160x strobe must be interfaced by an optical TTL- trigger dedicated to the ONE160x unit. This device has the function of converting the information received from the camera into optical pulses, which they will be decoded by the strobe CPU to managing the monitoring pre-flashes and and the final exposure flash. -
Page 28: Manual Mode
½ f-stop increments over a range of - 6 f-stop. When manual mode is selected, the default power value is Full - full power. If the digital camera is connected to the ONE160x strobe by a synchro cable with only two cabled wires (trigger+ground) and the TTL auto exposure mode is selected, the flash will be fired at full power. - Page 29 The ONE160x in manual exposure mode, OPT-input optical cable connection, is made to reply any pre-flash from camera, before the main exposure flash. To achieve this, ONE160x considers any very short lamp as a preflash and just reply them, waiting for the main exposure flash.
-
Page 30: Rear-Curtain Sync
FLASH EXPOSURE MODES ADVANCED OPERATIONS 11.0 Rear-curtain sync 11.1 Rear-curtain sync Nikon cameras This flash synchronization mode is activated via the camera and the unit does not need to be set. The display of the activated function is visible by the light up of the dedicated icon in the camera display. 11.2 Rear-curtain sync Canon cameras This flash synchronization mode is activated by the right INPUT control selector on the strobe. -
Page 31: Pilot Light
FLASH EXPOSURE MODES ADVANCED OPERATIONS 12.0 Pilot light A perfectly collimated LED coaxial pilot light facilitates flash pointing operations. The luminous flux level is 200 lumens with 10° beam angle. 12.1 Pilot light manual switching on/off The pilot light is activated by the left MAIN control selector on the strobe. -
Page 32: Connection - Synchro Cables - Fiber Optic
CONNECTIONS - SYNCHRO CABLES - FIBER OPTIC 13.0 Connectors - Synchro cables The connections used in the ONEUW system are are the following: § NikonosV (NV) - 5 pin connection (5 wires cable) § S6 - 6 pin connection (6 wires cable) -
Page 33: Fiber-Optic Cable Socket
CONNECTIONS - SYNCHRO CABLES - FIBER OPTIC 13.3 Fiber-optic cable socket The provided fiber-optic cable socket with the strobe, which also is positioned on the body back, is the Sea&Sea type. 13.4 Fiber-optic cables For a correct transmission of the optical impulses between the digital camera and the strobe, it is essential to use high quality multicore fiber optic cables with a large section. -
Page 34: Single-Strobe And Multi-Strobe Set-Up
14.1 Nikon cameras Nikon's TTL digital protocol provides for signal transmission by 5-pin cables. i-TTL auto exposure mode may be supported by both a single ONE160x and a pair of them (or more units) connected via synchro cable to digital camera. -
Page 35: Setting The One160'S Slave Mode
SINGLE-STROBE AND MULTI-STROBE SET-UP 14.2 Setting the ONE160's SLAVE mode ONE160's SLAVE mode is activated by the right INPUT control selector on the strobe. Pressing it for a long time the SLAVE mode is activated and it is signaled by the light up of both the SYN and SLV indicators light. By pressing the selector a beeping sound will be issued after about two seconds. -
Page 36: Nikon Connection Wiring
On the next page - pictures 1 and 2 - the correct wiring of NV and S6 connections for dual strobe setup can be viewed in detail. Warning: Only ONE160x strobes can be used in pairs (or more units) with connections that carry both all 5 wired wires. Do not use other strobes with connections so wired, you could seriously damage your Nikon digital camera and strobes. - Page 37 SINGLE-STROBE AND MULTI-STROBE SET-UP...
-
Page 38: Canon Cameras
To operate in E-TTL mode, the housing must be equipped with six-pin S6 connections. Single-Strobe set-up § Single S6 socket with all 6 wires connected ONE160x Selectable mode: E-TTL or manual Dual-Strobe set-up § 1st S6 socket with all 6 wires connected... -
Page 39: Canon Connection Wiring
On the next page - pictures 3 and 4 - the correct wiring of NV and S6 connections for dual strobe setup can be viewed in detail. Warning: do not couple the ONE160x with strobes of other brands particularly old, the high voltage used on these models, not compatible... - Page 40 SINGLE-STROBE AND MULTI-STROBE SET-UP...
-
Page 41: Problems And Error Indications - Maintenance
PROBLEMS - ERROR INDICATIONS - MAINTENANCE 15.0 Problem and error indications The unit is controlled by microprocessors that allow all operation functions to be managed intelligently, thus guaranteeing a very high level of reliability. The safety or protection alert of essential operational parameters as operating temperature and battery pack discharge are indicated as follow. -
Page 42: Battery Pack Excessive Discharge Protection
PROBLEMS - ERROR INDICATIONS - MAINTENANCE 15.2 Battery pack excessive discharge protection If the battery capacity is low, the display starts flashing and a beep is emitted every minute. When the battery pack reaches the maximum discharge value, which is considered correct to avoid damaging it, the status is indicated on the display by the following protection alert: §... -
Page 43: Overpressure Safety Valve
PROBLEMS - ERROR INDICATIONS - MAINTENANCE 16.0 Overpressure safety valve A battery pack malfunction can generate gas inside the battery compartment. The operational safety is guaranteed by the presence of a stainless steel over-pressure relief valve in the cap of the battery compartment. - Page 44 PROBLEMS - ERROR INDICATIONS - MAINTENANCE Should liquid leak from battery pack, avoid contact with skin; rinse and dry battery compartment and lid wearing gloves. If liquid leak from battery pack contacts skin or clothing, wash off the affected area repeatedly with soap and clean water.
-
Page 45: Maintenance
PROBLEMS - ERROR INDICATIONS - MAINTENANCE 17.0 Maintenance The strobe is made from a solid block of anticorodal aluminium protected by a hard anodizing treatment and nanotech quartz coating which makes surface hydrophobic. To preserve the look and maintain the functionality of the unit, a rinsing in fresh water and a careful drying is necessary after each dive in saltwater. -
Page 46: Accessories - Specification
§ O-ring Maintenance Set § Quick Start Guide § 2 years ONEUW Warranty on Strobe § 1 year ONEUW Warranty on Battery Pack and Charger 18.2 Optional accessories The following accessories may be supplied on request: § NiMH 4,8V 3050mAh Spare Battery Pack §... -
Page 47: Specification
ACCESSORIES - SPECIFICATION 19.0 Specification § CNC machined with high-quality anticorodal aluminium and hard anodized § Shooting modes Nikon i-TTL, Canon E-TTL, s-TTL, film TTL, manual § Special coating warm circular flash lamp with dome port § Input by S6 synchro cable socket, Sea&Sea fiber-optic cable socket, slave sensor §... -
Page 48: Reference Information - Supplement
20.0 Warranty terms ONEUW srl guarantees its products against manufacturing defects for a period of 24 months from date of sale by ONEUW. Warranty covers the repair or replacement, free of charge, of parts acknowledged to be faulty by ONEUW. -
Page 49: Environmental Protection - Information On Disposal
REFERENCE INFORMATION - SUPPLEMENT 21.0 Information on recycling and disposal 21.1 Electrical and electronic equipment disposal For private households: Information on Disposal for Users of WEEE The symbol with the crossed-out bin on our products and / or accompanying documents means that at the end of their life cicle, these used electrical and electronic equipment (WEEE) should not be mixed with general household... -
Page 50: Battery Disposal
REFERENCE INFORMATION - SUPPLEMENT 21.2 Battery disposal The crossed-out wheeled bin symbol on the battery and/or in the packaging and/or in the accompanying documentation indicates that used batteries must be collected in the appropriate waste containers. They cannot therefore be thrown into general collection bins and mixed with household waste. -
Page 51: General Information - Notices
It's strictly forbidden the reproduction or/and the diffusion even partial without the explicit written permission. ONEUW srl disclaims any liability for damages resulting either directly or indirectly to persons and devices from the use of this unit. No refund or compensation may be claimed by the Purchaser to ONEUW srl. -
Page 52: Trade Mark® Information
It’s a registered trademark of NIKON CORPORATION CANON It’s a registered trademark of Canon Inc. PANASONIC It’s a registered trademark of Panasonic Corporation SEA&SEA It’s a registered trademark of SEA&SEA SUNPAK Co., Ltd. ONEUW It’s a registered trademark of ONEUW S.r.l. -
Page 53: Annotations
REFERENCE INFORMATION - SUPPLEMENT 23.0 Annotations...
Need help?
Do you have a question about the ONE160x and is the answer not in the manual?
Questions and answers