
Summary of Contents for HAUSSLER 304016
- Page 1 Operating instructions Häussler barbecue accessories Original operating instructions...
-
Page 2: Table Of Contents
Contents 1 Welcome… ......................4 For your safety ....................5 2.1 Table of symbols ..................... 5 2.2 Intended use ....................5 2.3 Basic rules ....................... 5 2.4 Safety information ..................5 3 Grill grate ......................7 3.1 Product description ..................7 3.2 Technical data ....................7 3.3 Grill grate scope of delivery ................ - Page 3 6.5 Setting up the device ..................21 6.6 Cleaning the device for the first time ............21 6.7 Assembling the device .................. 22 6.8 Illustrated pizza stone instructions ............... 22 7 Transport dolly for the light pillar ..............24 7.1 Product description ..................24 7.2 Technical data ....................
-
Page 4: Welcome
Welcome… 1 Welcome… to the world of milling, kneading, baking, and pasta-making! Häussler stands for doing it yourself. With our devices, you can create wonderful delicacies with a second-to-none taste. Immerse yourself in the world of milling, kneading, baking, barbecuing, and pasta-making. Häussler stands for uncompromising quality –... -
Page 5: For Your Safety
For your safety 2 For your safety 2.1 Table of symbols Symbol description ⚠ Danger symbol Prompt to action Information Bullet point Tab. 1: Table of symbols 2.2 Intended use Häussler barbecue accessories meet the prescribed, product-specific safety regulations. - Page 6 For your safety ⚠ Risk of burns from heated components Do not leave the barbecue and/or accessories unattended during and after opera- tion. Set up the barbecue and accessories out of the reach of children under 14 and al- ways supervise children in the vicinity of the device.
-
Page 7: Grill Grate
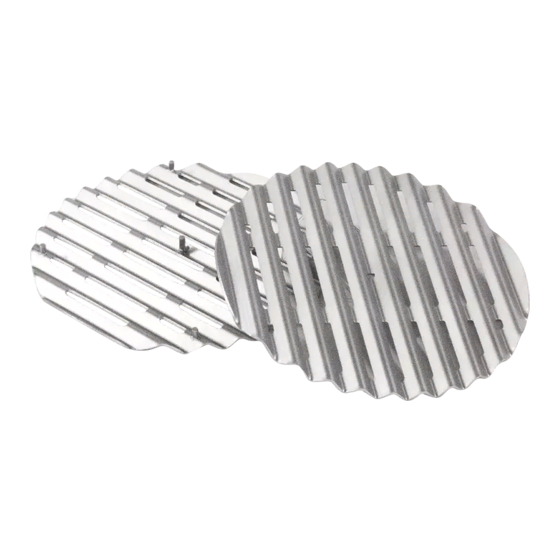
Grill grate 3 Grill grate 3.1 Product description You have purchased a grill grate, which is a wonderful enhancement for your griddle insert. With the grill grate, you can cook perfect steaks and other delicacies. The flames that dart through the grate give your food the delightful aroma of wood. The fluted form sears your food perfectly. -
Page 8: Grill Grate Scope Of Delivery
Grill grate 3.3 Grill grate scope of delivery Designation Designation Griddle insert 1 Griddle insert 2 Tab. 3: Scope of delivery 3.4 Required accessories To properly commission the grill grate, you will need the following accessories: bar- becue attachment and flame splitter. 3.5 Setting up the device ... -
Page 9: Illustrated Grill Grate Set-Up Instructions
Grill grate 3.8 Illustrated grill grate set-up instructions Insert the fluted inserts Insert the flame splitter Place the large fluted inserts in the Place the barbecue attachment on barbecue attachment. the light pillar. Place the flame splitter in the bar- becue attachment. -
Page 10: Plancha
Plancha 4 Plancha 4.1 Product description You have purchased a plancha for your Häussler barbecue and can now grill larger quantities of food at the same time. The plancha is made of stainless steel with a special alloy. Developed in collaboration with one of the leading steel manufacturers, the alloy unites the strengths of normal steel and stainless steel. -
Page 11: Plancha Scope Of Delivery
Plancha Name Value Weight approx. 18 kg Inner plancha temperature 300 - 400 °C Centre plancha temperature 200 - 250 °C Outer plancha temperature 80 - 130 °C Material Stainless steel Tab. 4: Plancha tech. data 4.3 Plancha scope of delivery Designation Grill grate support Plancha... -
Page 12: Setting Up The Device
Plancha 4.5 Setting up the device Use Table 5 “Plancha scope of delivery” on page 11 to help you check the delivery for completeness. Create enough room to work on the device. 4.6 Cleaning the device for the first time For reasons of hygiene, all parts that come into contact with the food to be barbe- cued must be removed and cleaned before initial commissioning. - Page 13 Plancha Disc bending direction Use of the wok* Let the plancha warm up for 5 min. Place the wok on the flame splitter, and observe the direction in which which is on the light pillar. it bends. When using the wok, you do not The plancha must bend upwards.
- Page 14 Plancha Position the insert* Position the edge strip* Instead of the grill grate, you can use When inserting the edge strip, make the small insert from the barbecue sure that all three guide pins are lo- attachment. cated above the relevant holes. ...
-
Page 15: Spit
Spit 5 Spit 5.1 Product description You have purchased a spit, a high-quality enhancement. The spit is simple to operate, easy-care, and requires virtually no maintenance. You can now prepare browned grilled chicken and other tasty delicacies. 5.2 Technical data Name Value Length... -
Page 16: Spit Scope Of Delivery
Spit 5.3 Spit scope of delivery Designation Designation Drip tray Fixing screw Spit with adjusting screw Motor Spit shaft Tab. 7: Scope of delivery 5.4 Required accessories To properly commission the spit, you will need the following accessories: barbecue attachment. barbecue cover, and intermediate ring. 5.5 Setting up the device ... -
Page 17: Assembling The Device
Spit Clean all parts, see Chapter 10 „Reinigen“ auf Seite 32. 5.7 Assembling the device Place the barbecue attachment on the light pillar. Place the drip tray on the centre of the barbecue attachment. Place the intermediate ring in the barbecue attachment. ... - Page 18 Spit Add the intermediate ring Suspend the motor Place the intermediate ring on the bar- Suspend the motor from the motor becue attachment. support on the intermediate ring. Ensure that the recess in the intermedi- ate ring is pointing to the rear. When the intermediate ring is turned, the opening through the barbecue attachment is almost completely co-...
- Page 19 Spit Position the cover Fix the spit in position Put on the cover. Use the fixing screw to prevent the spit from shifting. To do so, clamp the spit in the interme- diate ring. Use your thumb to press the shaft to- wards the motor and at the same time, release the fixing screw.
-
Page 20: Pizza Stone
Pizza stone 6 Pizza stone 6.1 Product description You have purchased a pizza stone, which is a wonderful enhancement. Now you can bake crispy pizza and delicious tarte flambee. A delicious change of pace for summer barbecues! 6.2 Technical data Name Value Width... -
Page 21: Pizza Stone Scope Of Delivery
Pizza stone 6.3 Pizza stone scope of delivery Designation Pizza stone Tab. 9: Scope of delivery 6.4 Required accessories To properly commission the pizza stone, you will need the following accessories: barbecue attachment, flame splitter, barbecue cover, and intermediate ring. 6.5 Setting up the device ... -
Page 22: Assembling The Device
Pizza stone 6.7 Assembling the device Remove the inserts from the barbecue attachment. Place the pizza stone on the barbecue attachment. Place the intermediate ring on the barbecue attachment. The intermediate ring opening must be pointing towards the front. ... - Page 23 Pizza stone Position the cover Put on the cover. Make sure that the thermometer is at the back and the air supply regu- lator is at the front. When baking with the pizza stone, use baking parchment approved for a minimum temperature of 300 °C.
-
Page 24: Transport Dolly For The Light Pillar
Transport dolly for the light pillar 7 Transport dolly for the light pillar 7.1 Product description You have made it easier to work with Häussler products by purchasing the transport dolly. The transport dolly is ergonomic, simple to operate, and requires no maintenance. -
Page 25: Transport Dolly Scope Of Delivery
Transport dolly for the light pillar 7.3 Transport dolly scope of delivery Designation Designation Handle Tyres Transport hook Transport dolly Tab. 11: Scope of delivery 7.4 Setting up the device Use Table 11 “Transport dolly scope of delivery” on page 25 to help you check the delivery for completeness. -
Page 26: Illustrated Transport Dolly Instructions
Transport dolly for the light pillar 7.5 Illustrated transport dolly instructions Tilt backwards and move Tilt forwards and hook in Use your foot to push the transport Tilt the transport dolly forwards un- dolly to the base of the light pillar til the hooks are beneath the hand- and now pull the transport dolly les and hook the transport hooks... - Page 27 Transport dolly for the light pillar Set down the transport dolly Set down the light pillar Move the transport dolly out from To set it down, use your foot to the light pillar handles and lift the push the transport dolly towards transport dolly.
-
Page 28: Wind Deflector
Wind deflector 8 Wind deflector 8.1 Product description You can use the wind deflector to prevent your barbecue flame from suddenly going out. 8.2 Technical data Name Value Width 295 mm Radius 147.5 mm Depth 1.5 mm Tab. 12: Dimensions... -
Page 29: Wind Deflector Scope Of Delivery
Wind deflector 8.3 Wind deflector scope of delivery Designation Wind deflector Tab. 13: Scope of delivery 8.4 Required accessories To properly commission the wind deflector, you will need the following accessory: Häussler light pillar. 8.5 Assembling the device Remove the wind deflector from the packaging and remove all film or packaging parts. -
Page 30: Illustrated Wind Deflector Instructions
Wind deflector 8.6 Illustrated wind deflector instructions Preparation Attach the wind deflector Lightly press the wind deflector to- Remove the wind deflector from gether on the outer edges. the packaging and remove all pa- ckaging parts. Push it between two of the light pillar's feet. -
Page 31: Good To Know: Helpful Hints Around Grilling
Good to know: Helpful hints around grilling 9 Good to know: Helpful hints around grilling Pizza on the barbecue: Ingredients for pizza dough (approx. 8 pizzas) 900 g wheat flour, 100 g semolina, 600 ml cold water, 20 g salt, 60 g olive oil, 10 g yeast. -
Page 32: Cleaning
Cleaning 10 Cleaning ⚠ CAUTION Risk of burns from heated components Severe burns on arms and legs Let the barbecue accessories cool down completely before cleaning them. Let the barbecue cool down completely before touching it. When removing the barbecue attachment or barbecue accessories, always remember to guide the barbecue at- tachment or barbecue accessories towards your body. -
Page 33: Maintenance
Maintenance 11 Maintenance Before each use, check the barbecue and all barbecue accessories for damage. In case of damage, replace the defective part(s). Do not use a defective barbecue or defective barbecue accessories. -
Page 34: Troubleshooting
Troubleshooting 12 Troubleshooting Problem Cause Resolution Spit Dense smoke No water in the drip tray Fill the drip tray with water. production Grill grate Grill grate is Flame splitter not in use Use the flame splitter. smouldering Grease/juice is ... -
Page 35: Disposal
Disposal 13 Disposal Do not remove the ashes until they have completely cooled down. Only use the intended containers made of metal or noncombustible materials to dispose of the residual waste or ashes. The local regulations for disposal apply. ... -
Page 36: Accessories
Grill grate With the grill grate, you can cook perfect steaks and other delica- cies. The fluted form sears your food beautifully. Item number: 304016 Flame splitter With the flame splitter, you attain the optimal heat distribution for the grill grate and pizza stone. - Page 37 Accessories Barbecue cover Barbecue cover with thermometer and air supply regulator. Item number: 304002 Barbecue attachment Barbecue attachment with flame splitter and inserts. Item number: 304001 Drip tray When you grill chicken on the spit, the drip tray prevents the meat from becoming too dry.
- Page 38 Accessories Edge strip The edge strip prevents food from rolling or slipping off the plancha. Item number: 304027 Wind deflector You can protect your barbecue from windy weather with the wind deflector. It prevents gusts of wind from extinguishing the fire. Item number: 303524 Häussler pellet starter Our pellet starter is made from 100% raw materials from plants.
-
Page 39: Warranty
Warranty 15 Warranty You will receive a 12-month factory warranty on your device, beginning on the date of the invoice. Karl-Heinz Häussler GmbH produced your device in accordance with the technological state of the art. All devices that leave our factory are made from high-quality materials and were thoroughly inspected. -
Page 40: For Your Notes
For your notes 16 For your notes... - Page 41 For your notes...
- Page 42 Visit our baking centre… Under the name of Häussler, we have devoted our work to the pleasure of doing it yourself for more than 40 years. We are a family-run company with around 100 employees and our headquarters is in Heiligkreuztal/Upper Swabia. We produce our devices there, including our wood- burning ovens, for example.
- Page 43 1.1 Our service for you Information on other destinations and places to stay in the area Cosy consulting rooms Children’s play area Guest toilets with changing tables Seating Loading service On-site service for your devices on our premises ...
- Page 44 Karl-Heinz Häussler GmbH Nussbaumweg 1 88499 Heiligkreuztal, Germany Telephone +49 73 71/93 77-0 Fax + 49 73 71/93 77-40 Email: info@backdorf.de Version: 28/05/2020...
Need help?
Do you have a question about the 304016 and is the answer not in the manual?
Questions and answers