Table of Contents
Advertisement
Quick Links
Advertisement
Table of Contents

Related Manuals for TREND AIRPRO MAX

Summary of Contents for TREND AIRPRO MAX
- Page 1 USER INSTRUCTIONS Document ref. number MANU/AIR/PRO/M V1.0...
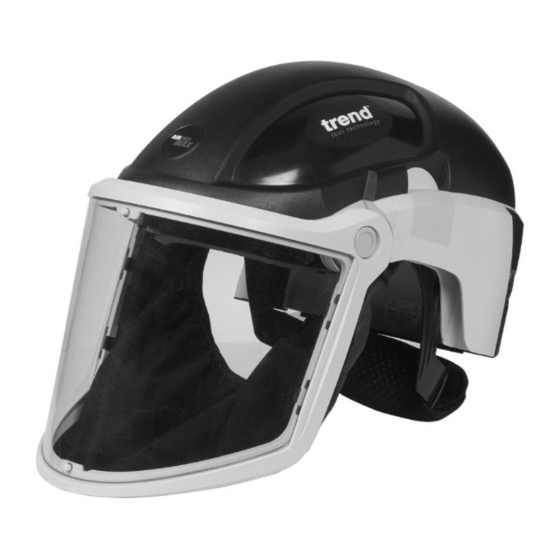
- Page 2 AIRPRO MAX Dear Customer, Thank you for purchasing this Trend product, we hope you enjoy many years of creative and productive use. Please remember to return your guarantee card within 28 days of purchase. INTRODUCTION The Airshield Pro Max is an innovative PAPR system that provides a unique all-in- one respiratory, head, face, eye and hearing protection solution.
-
Page 3: Table Of Contents
AIRPRO MAX Contents USER INSTRUCTIONS ....................... 5 CAUTIONS ........................5 WARNINGS ........................5 GENERAL DESCRIPTION ....................8 APPROVAL FOR USE ......................9 Special conditions for safe use ................... 9 SUITABILITY FOR USE ....................10 TRANSPORTATION ......................10 PREPARATION FOR USE ....................11 Battery charging...................... - Page 4 TECHNICAL SPECIFICATION ................... 35 Environmental range (storage and use, excluding battery) ........35 Power supply ......................35 Battery Charger ......................36 Filters ........................36 AIRPRO MAX DECONTAMINATION & RETURN PROCEDURE ........36 SPARE PARTS ......................... 37 ACCESSORIES ........................ 38 USER INSTRUCTIONSN...
-
Page 5: User Instructions
WARNINGS • REPAIR IS BY REPLACEMENT OF DEFECTIVE PARTS ONLY. • ONLY APPROVED AIRPRO MAX PARTS SHOULD BE USED. • ALTERATIONS AND AFTER-MARKET MODIFICATIONS TO HEADWEAR PRODUCTS MIGHT COMPROMISE THE PROTECTIVE FEATURES OF THE HEADWEAR. - Page 6 • HIGH SPEED PARTICLE IMPACT ON FACE SHIELD MAY TRANSMIT IMPACT ON STANDARD OPHTHALMIC SPECTACLES WORN UNDERNEATH. The AIRPRO MAX is equipped with a High Efficiency Particulate Air Filter (P3/HEPA) and is powered by a re-chargeable battery incorporated into the respirator.
- Page 7 AIRPRO MAX...
-
Page 8: General Description
GENERAL DESCRIPTION The respirator must be fitted and used in accordance with these instructions to obtain the approved level of performance. APPROVED AIRPRO MAX PARTS MUST BE USED. The AIRPRO MAX respirator box contains the following items: Item Description Part Number Powered Air Respirator module (TH3P)*. -
Page 9: Approval For Use
2. Only battery Part No AIR/PM/4 should be fitted to the respirators. 3. The battery should only be recharged in a safe area. 4. AIRPRO MAX respirators are only tested to be used within the limited ambient temperature range (+5°C to +40°C). -
Page 10: Suitability For Use
SUITABILITY FOR USE This respirator must be used strictly in accordance with these instructions. When using the approved AIRPRO MAX filter, the workplace concentrations of the vapour must not exceed the O.E.L. (Occupational Exposure Limit). Intended for use against dusts, mists and aerosols. -
Page 11: Preparation For Use
AIRPRO MAX PREPARATION FOR USE The following tasks must be performed prior to use: Battery charging Only charge the battery in a safe area free from sources of flame and sparks, temperature between +5°C and +40°C. NOTE: Do not use mains supply and 12V supply at the same time. - Page 12 AIRPRO MAX Insert the battery as shown in Figure 2. Ensure the battery fully ‘clicks’ into position. For more information check ‘TROUBLESHOOTING’ section on page 34. NOTE: It is normal for the battery and charger to get warm during use.
-
Page 13: Battery Charger Advisory Symbols' Legend
AIRPRO MAX When to recharge Do not force the PAPR/Unit to restart after auto-shut down following a low battery alarm. Doing so may ‘deep discharge’ the battery, which will permanently reduce available capacity. Battery charger advisory symbols’ legend European Conformity – product meets the requirements of applicable EU directives. -
Page 14: Battery Installation And Removal
AIRPRO MAX Battery installation and removal Remove battery by pushing lightly on the release area indicated. (Figure 4) Figure 4 Observing the orientation as shown in Figure 5 install a fully charged battery into the respirator until the battery fully clicks into position. -
Page 15: Hepa Filter Fitting And Checking The Respirator
AIRPRO MAX HEPA filter fitting and checking the respirator Ensure that the high efficiency particulate (HEPA) filter is installed correctly as shown in Figure 6 When fitting the filter element into the filter housing, observe that the filter label faces upwards as worn. - Page 16 AIRPRO MAX Check that the air inlet is clean and free from any obstructions. (Figure 8) Figure 8 Activate the respirator with the on/off switch as shown in Figure 9, noting the LED display. (Figure 10) Figure 9 If the respirator is working...
-
Page 17: Low Airflow Indicator Check
AIRPRO MAX Low airflow indicator check Before using the respirator perform a low airflow indicator check: 1. Ensure that the HEPA filter has been installed correctly as shown in Figure 7 on page 15. 2. Activate the respirator with the on/off switch as shown in Figure 9 and perform the following test, noting the LED indicator. - Page 18 AIRPRO MAX Remove the headband from the respirator. (Figure 12) Figure 12 Unfasten and remove the crown pad to access the adjustment straps. (Figure 13) Figure 13 Adjust the length of the strap as required ensuring that the four locations pegs are within the highlighted EN397 range of adjustment (Figure 14).
-
Page 19: Quick Release Headband Adjustment
AIRPRO MAX Reposition the crown pad on the headband strap. Re-attach headband in reverse order. Refer to ‘Brow infill removal and installation’ section on page 29. Re-attach face seal press fastener to the mating press fastener on the face seal. -
Page 20: Activating Respirator
AIRPRO MAX Activating respirator Switch the respirator on using the on/off switch. (Figure 17) Figure 17 WARNING: DO NOT USE THE RESPIRATOR if LED status indicator illuminates RED. Refer to ‘Troubleshooting’ section on page 34. Status indicator (LED) (All filter types) - Page 21 AIRPRO MAX Users must also consider whether the filter and battery have sufficient life for the planned time in the work environment. The following indications are given when switching on the respirator: LED light Condition Green Starting sequence – investigation required.
-
Page 22: Removing The Respirator
AIRPRO MAX Removing the respirator Do not remove the respirator until you have vacated the contaminated area. 1. Before taking the respirator off, loosen the quick release headband by pressing the ratchet button (Figure 15) and simultaneously rotating the ratchet counter- clockwise. - Page 23 AIRPRO MAX Air outlet cleaning plug. Figure 19 Air inlet cleaning plug. Figure 20 Battery cavity cleaning plug. Figure 21 SERVICING...
-
Page 24: Annual Servicing
Annual Servicing Please note that all AIRPRO MAX respirators should be serviced annually. For further details on your nearest AIRPRO MAX authorised servicing centre details, visit our website http://www.trend-uk.com. NOTE: Repair is only by replacement of defective parts in accordance with manufacturer instruction. -
Page 25: Face Shield Replacement
AIRPRO MAX Route the elastic from inside the headband to the front of the crown strap around the headband. Then route the elastic between the headband and the frame. Fasten the elastic onto the face seal (left and right). (Figure 23) - Page 26 AIRPRO MAX Insert a flat blade screwdriver (or similar) into the slot to disengage the clips from both sides of the face shield as shown. (Figure 25) Figure 25 Release the face shield retainer clips from each side of the frame...
-
Page 27: Helmet Shells
AIRPRO MAX Remove face shield from the frame. (Figure 28) Figure 28 Carefully reassemble, fitting the new face shield in reverse order. Tools are not required for reassembly. Helmet shells Helmet shells must only be replaced by an authorised service centre. If the hard hat has sustained an impact, it should be replaced immediately, even if the damage is not visible. -
Page 28: Replacing The Comfort Pads
AIRPRO MAX Refit new head band in reverse order as shown on pages 17 and 18 ‘Crown strap adjustment’. Figure 30 Replacing the comfort pads Brow pad Remove brow comfort pad by pulling away from the `hook and loop` retaining strip. -
Page 29: Brow Infill Removal And Installation
AIRPRO MAX Brow infill removal and installation The infill is positioned at the front of the respirator between the headband and the frame with the concussion straps (if fitted) located inside, relative to the infill. Remove the brow infill by turning respirator upside down to gain access to the headband. - Page 30 AIRPRO MAX Remove adhesive tape backing strip then place the infill inside the respirator frame and position under the headband and, if fitted, above the concussion straps. (Figure 33) Figure 33 Push the infill in between the headband and the frame ensuring the infill is pushed up to the edge of the headband and it sits onto the frame.
-
Page 31: High Efficiency Particulate Air Filter Replacement
AIRPRO MAX High efficiency particulate air filter replacement When the status indicator LED illuminates RED, further investigation is required regarding condition of a filter and a battery. If no fault on battery has been found, the high efficiency particulate (HEPA) filter must be replaced. - Page 32 AIRPRO MAX NOTE: Do not allow any dirt or elements, which may obstruct the air flow to enter the air inlet. (Figure 38) Figure 38 Make sure that the HEPA filter is fitted correctly into a filter cover housing with filter label facing upwards as fitted to the respirator.
-
Page 33: Disposal
AIRPRO MAX DISPOSAL Disposal of respirator This product should not be mixed with general household waste. For proper treatment, recovery and recycling, please take this product(s) to designated collection points where it may be accepted free of charge. Alternatively, in some countries you may be able to return your products to your local retailer upon purchase of an equivalent new product. -
Page 34: Troubleshooting
AIRPRO MAX TROUBLESHOOTING Problem Possible Reasons Corrective actions LED is RED when switched Low battery Remove battery and charge Air flow too low Remove HEPA filter and replace LED does not illuminate Battery is drained Remove battery and when switched on... -
Page 35: Technical Specification
AIRPRO MAX TECHNICAL SPECIFICATION Weight Nominal 1.5kg Weight may increase with certain accessories fitted. Head Size Range 53.5 cm – 63.5 cm Airflow Initial flowrate: >220 l/min Minimum flowrate: 190 l/min Environmental range (storage and use, excluding battery) Humidity 0-90% for storage and use (Store out of direct sunlight.) Temperature Range Use +5°C to +40°C... -
Page 36: Battery Charger
WARNING: Never use pressurised air on any part of the respirator. Please contact Customer Services to confirm decontamination and return procedures. Trend Machinery & Cutting Tools Ltd. Odhams Trading Estate St Albans Road Watford WD24 7TR England Tel: 0044(0)1923 249911 technical@trendm.co.uk www.trend-uk.com AIRPRO MAX DECONTAMINATION & RETURN PROCEDUREN... -
Page 37: Spare Parts
AIRPRO MAX SPARE PARTS SPARE PARTS... -
Page 38: Accessories
AIRPRO MAX Description Type Part Number Visor (Face Shield) Spare AIR/PM/01 Face Seal Spare AIR/PM/02 Complete Headband Assembly Spare AIR/PM/03 P3 HEPA Filter Spare AIR/PM/1 Rechargeable Battery Spare AIR/PM/4 Battery Charger UK Spare AIR/PM/5/UK Protective Carrier Bag Spare AIR/PM/8 Table 8...
Need help?
Do you have a question about the AIRPRO MAX and is the answer not in the manual?
Questions and answers