Advertisement
Available languages
Available languages
Table of Contents
- 1 STEP 1 - Installing Supports
- 2 STEP 2 - Splice Track if Necessary
- 3 STEP 3 - Installing Outside Posts
- 4 STEP 4 - Mount Rail Onto Supports
- 5 STEP 5A - Installing Carriers & Baton (Hand Draw System)
- 6 STEP 5B - Installing Ball-Bearing Carriers (Hand Draw System)
- 7 STEP 6A - Installing Regular Carriers (Corded System)
- 8 STEP 6B - Cord Draw Systems, Installing Pulley
- Download this manual
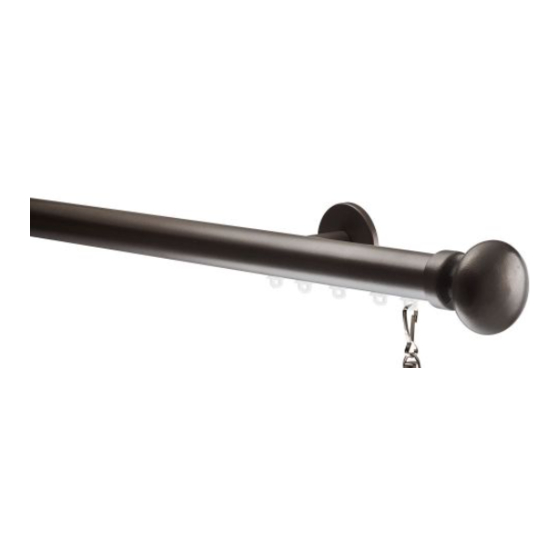
TEKNO 40 INSTALLATION
STEP 1 - Installing Supports
COVER PLATE
BACK PLATE
Height calculation for regular clips.
Add 1" to length of drapes, plus at least 1/2" clearence from
the fl oor. This measurement is the distance from fl oor to center
point of Back Plate.
Please note drapes should not touch rail,
install pin on hooks with this in consideration.
M-6 BOLT
COVER PLATE
1. Install Back Plate to wall. Make sure all M-6 bolts are level.
If you have a spliced track the Center Support must be
installed at the position of splice.
2. Cover Back Plate with Cover Plate.
3. Screw on Inside Post very securely. Do not leave any play.
INSTRUCTIONS
OUTSIDE POST
CARRIERS
INSIDE POST
INSIDE POST
STEP 2 - Splice track if necessary
SPLICE
SET SCREWS
CENTER
SUPPORT
STEP 3 - Installing Outside Posts
OUTSIDE POST
1. Loosen all screws on Outside Posts.
2. Slide Ouside Posts into back channel of Rail.
3. Align Outside Posts with Inside Posts from Step 1.
STEP 4 - Mount rail onto supports
1
2
4
5
1. Join the track sections
together.
2. Tighten set screws.
3. Screw Center Support
directly into center hole
of Splice.
3
1. Slide Outside Posts over
Inside Posts.
2. Once all Outside Posts
including Center Supports
are in place, tighten
posts securely by turning
clockwise.
3. Tighten set screws.
4. Finished result for
Center Supports.
5. Finished result for
side posts.
Advertisement
Table of Contents

Related Manuals for Claire Deco TEKNO 40

Summary of Contents for Claire Deco TEKNO 40
- Page 1 TEKNO 40 INSTALLATION INSTRUCTIONS STEP 1 - Installing Supports STEP 2 - Splice track if necessary OUTSIDE POST 1. Join the track sections SPLICE together. CARRIERS 2. Tighten set screws. SET SCREWS COVER PLATE BACK PLATE INSIDE POST 3. Screw Center Support directly into center hole of Splice.
- Page 2 STEP 5a - Installing carriers & baton STEP 6a - (hand draw system) Installing regular carriers (corded system) 1. Slide carriers into rail. 1. Remove plug next to control mechanism. 2. Attach fi nial onto rail. Do not over- tighten as thread can strip. 2.
- Page 3 INSTALLATION D’UNE MISE À JOUR EURO-SCOPE KONTUR, NEXGEN, TEKNO 25, TEKNO 40 ÉTAPE 1 - Assemblage du rail lorsque le splice est inclus ÉTAPE 3 - L’installation du rail ÉTAPE 2 - Installing mounting hardware 1. Installez les embouts et insérez suite les glissière dans le rail.
Need help?
Do you have a question about the TEKNO 40 and is the answer not in the manual?
Questions and answers