
Summary of Contents for MOVEK myMix
- Page 1 Networkable personal audio mixing and recording system OWNER’S MANUAL Complies with Firmware V1.45 Covers operation with IEX-16L English...
-
Page 2: Safety Instructions
9. Only use attachments and accessories specified by the manufacturer. 10. The myMix unit should only be used with a power supply as specified from the manufacturer. If the provided plug of the power supply does not fit in your outlet, consult your local dealer for the appropriate outlet. -
Page 3: Warnings
If you plan not to use myMix for a long period of time (such as when you are on vacation), remove the AC power supply from the AC outlet. Leaving myMix connected is a fire hazard. -
Page 4: Information On Sd/Sdhc Cards
If in doubt, check on www.myMixaudio.com recommended SD/SDHC media. Before you use an SD/SDHC card with myMix it needs to be formatted. Insert the card in myMix and use the FORMAT SD card function under the ADMINISTRATION menu (see page 22). -
Page 5: Information For Users On Collection And Disposal Of Old Equipment
MOVEK informs you otherwise in writing. During the warranty period of one year (or longer as required by law) MOVEK will provide warranty service During the warranty period of one year (or longer as required by law) MOVEK will provide warranty service without charge for parts and labor in case a defect in material or workmanship occurs. -
Page 6: Table Of Contents
Information for Users on Collection and Disposal of Old Equipment Information on Disposal in countries outside the European Union. Warranty Information TABLE OF CONTENTS INTRODUCTION HARDWARE QUICK START BOOTING UP NAVIGATING MYMIX Connections Inputs Setting Input Gain Outputs Power Network - Selecting and Configuring Ethernet Switches MAIN SCREEN... -
Page 7: Introduction
Please take the time and read it carefully. myMix is an audio mixing system that allows every user to create his or her own mix, whether monitoring with headphones, ear plugs, or a speaker system. Each unit has two combination mic/line inputs, balanced stereo outputs, and headphone jack. -
Page 8: Hardware
HARDWARE 1 & 2 Input signal LEDs for inputs 1 and 2 Master Mute button Jog wheel and encoder button Record button Soft keys, function displayed on screen Full color display screen 8 & 9 Balanced inputs 1 and 2 for mic or line levels 10 &... - Page 9 You should find the following items in the box: myMix unit Power supply for myMix with US and/or EU power plug myMix microphone stand adapter (pre-mounted to the unit) Owner's manual (this document) with warranty information If any of these items are missing, contact your myMix dealer.
-
Page 10: Quick Start
Connect the external power supply and connect to the Fast Ethernet switch, or use Power Over Ethernet from your switch- as soon as myMix has power it will boot up. Navigation on myMix: with the jog wheel [4] you can select an item (e.g. input channel, input type, …). -
Page 11: Booting Up
Note: when you use myMix for the first time the unit boots up in factory default mode: Volume is 0%, Tone is neutral, Effect send 0%, Pan center. The same applies to every unit that is detected for the first time. - Page 12 NAVIGATING MYMIX For instance, if you wanted to adjust the tone of the channel, you would rotate the jog wheel to highlight the channel and push the jog wheel to bring up the channel screen. The VOLUME edit window appears.
-
Page 13: Connections
Outputs The stereo mix you create on myMix is available on the headphone jack [16] and as a balanced line level signal on the two ¼” phone jacks on the rear panel. [10 & 11]. The balanced outputs will drive an external amplifier, a powered speaker or any other device that accepts a line level signal. -
Page 14: Power
15 watts, so choose a POE switch that has a POE budget that is capable of powering all units on the network. 60 Watts of POE will power 4 myMix units, to power 8 myMix units you need a minimum POE budget of 120 Watts. -
Page 15: Network - Selecting And Configuring Ethernet Switches
NOTE: Don't combine myMix units with other network able devices, the myMix system network needs to be exclusive. It is not possible to combine several myMix units in a network with other network able devices such as PCs, routers, modems or printers... -
Page 16: Main Screen
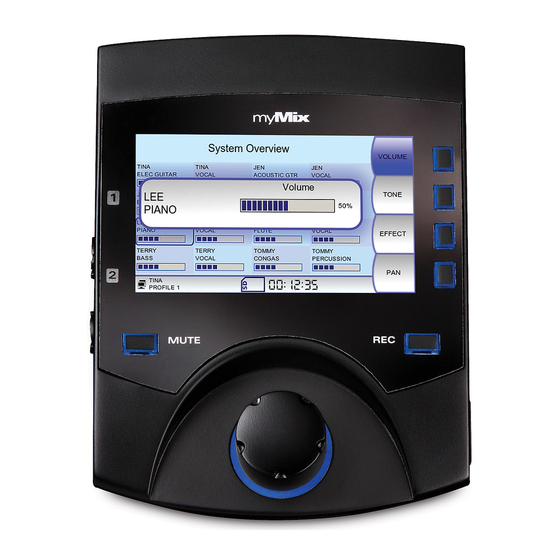
MAIN SCREEN The main screen shows you all the selected channels in the network that will contribute to your mix. The level indicator bar next to each channel name serves as a relative indicator towards the volume of each channel. Use the encoder [4] to scroll through the screen to select a channel. -
Page 17: Mute
[3]. If the master MUTE button is activated it will turn red. Pressing it again will un-MUTE the master output. „Send Mix to Network“ is not muted with this button. Status Bar The status bar provides information about several different aspects of myMix operation. The actual display depends on the situation. 6/12 Left to right: network connection with POE, unit name and active profile. -
Page 18: Volume
Volume The default view on the CHANNEL screen is the volume control. The jog wheel adjusts channel volume from 0% to 100%. The default volume is 0%. Tone While on the CHANNEL screen, push the soft key labeled TONE to adjust simple Bass and Treble controls with the jog wheel. -
Page 19: Settings
EQ. Profiles allow you to use your myMix in a variety of situations with different inputs, outputs and settings, eliminating the need to constantly reconfigure your unit. Especially when you use myMix in different scenarios - with different input sources and in-ear as well as monitor speakers we highly recommend to use dedicated profiles. -
Page 20: Local Inputs/Outputs
NONE – Select that input mode if you are not using any of your local myMix inputs at all. Because there are no inputs from your device on the network, your unit will not show up for others. -
Page 21: Effects
„Send Mix to Network“ on. If you stay in the same profile, they will be reassigned as soon as you turn your mix off. Note: when „Send Mix to Network“ is ON, it is not possible to select a mix from another myMix on the network, in order to prevent a possible fedback loop. - Page 22 Sessions - Recording With myMix you can initiate multi-track recording with the push of a button. You can record up to 18 channels (up to 16 individual tracks plus your stereo mix) of 24-bit, 48 kHz time-stamped .wav audio files. These files can be imported into any recording/studio software for further use and also played back on a myMix.
- Page 23 Sessions- Playback and Play Along Sessios that were recorded with myMix or created using the myMix Wave software tool can also be played back and remixed. The individual tracks, named as the channels during the recording are played through the mixer for a remix on the fly, including all functions of the mixer.
-
Page 24: Remote Channel Select
Besides input channels from other myMix or IEX-16L you can also select the mix of other myMix devices (if it‘s „Send to Network“ is turned on) as long as you don‘t send your mix to the network. -
Page 25: Preferences
Timeout, adjust screen brightness, set date and time and select between list view or grid view for the main mixing screen. The name of your myMix is the primary way in which you will be identified on the network, so choose something meaningful like your first name or your nickname. -
Page 26: Administration
2. Download the latest firmware from www.mymixaudio.com 3. Save the firmware files on the formatted SD card. 4. Insert the SD card in myMix while the unit is powered down and not connected to a network. 5. Hold down the MUTE [5] button and the jog wheel [4], then power up the unit using external psu. -
Page 27: Specifications
0,9 kg (2.0 lbs) Included Accessory myMix PSU (24V, 12W) myMix microphone stand adaptor E & OE. All specifications subject to change without prior notice. myMix is a trademark of MOVEK, LLC. Patent Pending, all rights reserved by MOVEK LLC, USA. - Page 28 Designed in U.S.A. Rev 1.45 - SEP2011...
Need help?
Do you have a question about the myMix and is the answer not in the manual?
Questions and answers