Table of Contents
Advertisement
Quick Links
Advertisement
Table of Contents

Summary of Contents for Datoptic RM12 1394B
- Page 1 RM12_1394B User Manual Ver 1.0 - Date: 02/2006 http://www.datoptic.com...
- Page 2 Copyright Notice The proprietary information contains in this document is protected by the copyright laws. All rights are reserved. It does not allow any non-authorization in copied, photocopied, translated or reduced to any electronic or machine readable in whole or in part form without prior written consent from the manufacturer except for copied by the purchaser for backup purposes.
- Page 3 Unpacking RM12_1394B: Open the DATOptic RM12_1394B box and carefully remove the RM12_1394B unit and accessories, the RM12_1394B and accessories including the following items: • RM12_1394B unit x1 • 1394B Cable x1 • 1394B PCI Card x1 (Optional) • Power Cable x1 •...
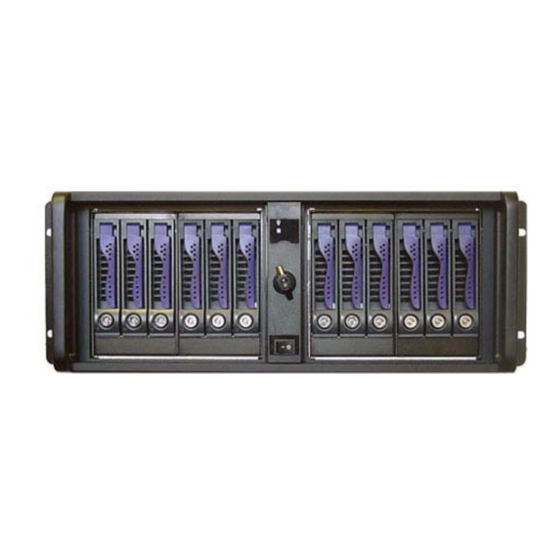
- Page 4 • Hot-swappable disk drive tray with special designed power-off and lock mechanism; • Monitor and alarm notification for temperature and fans 1.3 Specification Model DATOptic.com RM12_1394B Construction Heavy duty 1.2mm steel, meets FCC/CE Class Drive Bay 12 x hot-swappable IDE slim drive bays...
- Page 5 Chapter 2 Installation Introductions 1. Using included key unlock drive carrier, push the leveler to right and lift it up to release the handle, and then withdraw the drive carrier. 2. Set the jumpers of all the drives to the mode of “Master or Slave” When RM12_1394B is in RAID0 mode, we recommend using identical hard drives but mixed types and sizes will also work.
- Page 6 3.1.3.2 RAID0 NO: RAID0 Switch PLEASE TURN OFF THE POWER BEFORE CHANGE THE POSITION OF SWITCH Switch to “RAID0” (the left side of “RAID0 NO”), RM12_1394B is in the “RAID” mode. Switch to “NO” (the right side of “RAID0 NO”), RM12_1394B is in the JBOD mode. Special Notes: 1.
Need help?
Do you have a question about the RM12 1394B and is the answer not in the manual?
Questions and answers