Table of Contents
Advertisement
Quick Links
USER
MANUAL
Revision 3 – 4 March 2020
Training videos for this manual content including
additional tips and tricks can be found at
www.boomcam.us
The Boom Camera is designed and manufactured by Deep Analytics LLC in Montpelier, Vermont.
Visit the Boom Camera page for support documentation at
www.boomcam.us
Get live support at
support@boomcam.us
or (802) 345-2053
Advertisement
Table of Contents

Summary of Contents for Deep Analytics Boom Camera
- Page 1 Training videos for this manual content including additional tips and tricks can be found at www.boomcam.us The Boom Camera is designed and manufactured by Deep Analytics LLC in Montpelier, Vermont. Visit the Boom Camera page for support documentation at www.boomcam.us Get live support at support@boomcam.us...
- Page 2 Massachusetts State Police. For those new to the Boom Camera, we’re looking to make improvements based on real field usage so we can make Boom Camera a go-to tool for Bomb Squads and EOD teams. If something about the Boom Camera doesn’t work right, or needs...
-
Page 3: Table Of Contents
Capturing a 52 megapixel image ..........................15 Recording 4K video ..............................16 Transferring Video and Images..........................16 Best Practices ..................................17 Using the Boom Camera as a Screening Tool ......................17 Troubleshooting ................................17 Gimbal Balance and Vibration ........................... 17 Gimbal Strength ................................19... -
Page 4: Introduction To The Boom Camera
52 megapixel still images. The Boom Camera is mounted on a steerable gimbal, so users can tuck it into tight spaces and look around. Video and still pictures captured with the Boom Camera transfer to the grip mounted display (an Android smart device), and can be transferred via text, e-mail, SD, or USB cord. -
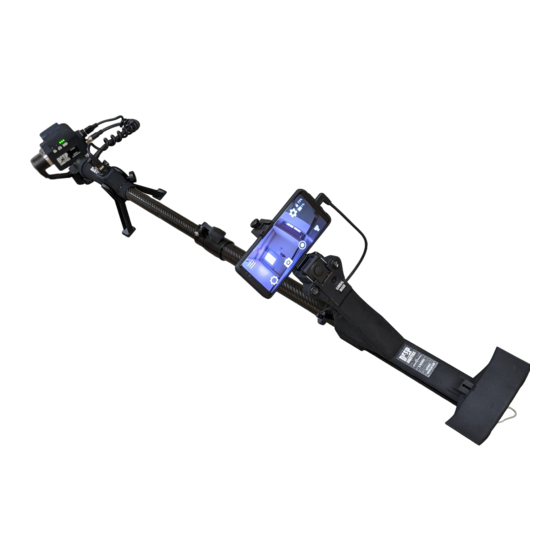
Page 5: System Nomenclature
System Nomenclature The system is comprised of six key components: the grip, the screen, the boom, the pole end, the gimbal, and the camera head. An assembled Boom Camera system labeled with these items is shown below. Android Application Features The Android Application has only two screens: Main and Options The main screen is presented below with a black background. - Page 6 – Copy the video and – Clear the files off the Boom DOWNLOAD FILES DELETE FILES pictures taken by the Boom Camera to the Camera (not the Android device) Android device’s Picture folder – Update the Boom Camera software UPDATE –...
-
Page 7: Grip Buttons
Grip Buttons The grip buttons have several functions that mirror the app. These buttons enable the user to, for the most part, have single-handed operation of the Boom Camera. The grip buttons have the following functions: Indicator LEDs Th e rear of the Camera Head case has five indicator LEDs. -
Page 8: Assembly
Assembly Assembly of the Boom Camera takes only a few seconds. It’s recommended the Android device and system batteries are fully charged before the first assembly. These steps will ensure the system is fully assembled. List of Parts When fully disassembled and stored, the user will assemble the following items found within the Boom Camera case: Please note the camera head is stored with the attachment pin already inside the mount. - Page 9 Finally, the camera head needs to be attached to the gimbal. Orient the camera so when facing forward, the gimbal is below and to the left. Align the holes in the camera mount with the gimbal, and pin them together, being sure to bottom out the pin.
-
Page 10: Connecting Cables
A correctly mounted camera will look like this: Connecting Cables There are three cables to connect before powering up the Boom Camera system: 1. The Android device connects to the USB 3.0 connector mounted on the front of the grip... - Page 11 2. Power and button press signals run through the circular cable from the pole to the camera head 3. Video and App control run through the coiled USB cable NOTE: The coiled USB 3.0 cable between the pole and the camera head must be coiled around the circular cable (as shown above).
-
Page 12: Pre-Operation
These sections include important steps to undertake prior to operation. Charging System Batteries The Boom Camera comes with 3x ‘26650’ LiFePo4 ‘lithium’ batteries, and a wall charger. To charge the batteries, simply slot each battery within the charger as shown below. Batteries can be charged all together, or individually. -
Page 13: Charging The Gimbal Remote
Charging the Gimbal Remote The Gimbal Remote is charged with the accompanying USB Micro B cable. It can be charged with any 5V source, including any standard USB port or phone charger. Loading and Changing System Batteries Batteries are loaded into the base of the grip. A ¼ turn plug at the base is removed, and the batteries are loaded positive-side first. -
Page 14: Starting The Android Application
Starting the Android Application Before operation can begin, the Android device must connect to the Boom Camera head, and the Boom Camera Android application. The connection between the Android device and the camera head is quickly ascertained by validating the presence of a key icon in the device task bar. -
Page 15: Connecting Bluetooth Remote To Gimbal
Follow the diagram below to toggle between Boom Camera Gimbal Modes. “Single Press” indicates pressing the mode button once. “Double Press” indicates pressing the mode button twice in rapid succession. Enter or leave standby mode at any time b holding the mode button. -
Page 16: Recording 4K Video
Options menu of the Boom Camera Application. The App will display the file download in real-time. Images and video are transferred to the screen in the Android ‘Pictures’ Folder. They can be accessed by selecting ‘Files’... -
Page 17: Best Practices
Using the Boom Camera as a Screening Tool In many scenarios, the Boom Camera will be used simply as a screening tool to help look around objects, illuminate dark spaces, and check in tight areas. Here are the key steps to using the Boom Camera: 1. - Page 18 To balance the gimbal: 1. Power the gimbal down 2. Ensure the Boom Camera head is attached in the normal way 3. Ensure the cables linking the camera head are attached to both the head and the pole end 4. Loosen one axis set screw at a time 5.
-
Page 19: Gimbal Strength
Note, a stronger setting may adversely affect battery life. Installed on each Boom Camera screen is the ZY Play Gimbal App. It’s found on the main screen. When the App starts, swipe to the screen until the screen banner displays “For Pro Cameras”. - Page 20 Most of these issues can be resolved by power cycling the Boom Camera and/or the screen. More detail on specific issues are provided below. A black screen in the app can be caused by the following failures: 1. The system isn’t tethered a.
Need help?
Do you have a question about the Boom Camera and is the answer not in the manual?
Questions and answers