
Summary of Contents for Retsch DustMon RD 100
- Page 1 Manual Dust Analyser DustMon RD 100 Translation © Retsch GmbH, 42781 Haan, Retsch-Allee 1-5, Germany | 08.07.2020 Version 0001...
- Page 2 Copyright © Copyright by Retsch GmbH Retsch-Allee 1-5 42781 Haan Germany...
-
Page 3: Table Of Contents
Results and information about the sample ..................35 Loading the results .......................... 36 Superimposing measurement results ....................37 Changing the graphics display ......................38 Calculating results as an average ....................39 DustMon RD 100 - Transfer of results to Excel (txt file) ..............40 Troubleshooting ..........................42... - Page 4 "Error clean" message on the on-board display ................42 White light source OFF – device is not functional ................42 Cleaning and maintenance ......................... 43 Checking the white light source ......................44 Calibration ............................46 12.1 Setup Kalibration ..........................46 12.2 Disable calibration function for Standalone mode ................
- Page 5 Notes on the manual...
-
Page 6: Notes On The Manual
This manual does not contain any repair instructions. Please contact your supplier or contact Retsch GmbH directly if anything is unclear or you have questions about these guidelines or the device, or in the case of any faults or necessary repairs. -
Page 7: Explanations Of The Safety Instructions
Notes on the manual 1.4 Explanations of the Safety Instructions DANGER D1.0000 Risk of fatal injuries Source of danger − Possible consequences if the danger is ignored. • Instructions and information on how to avoid the risk. Fatal or serious injuries may result if the “Danger” sign is disregarded. There is a very high risk of a life-threatening accident or lasting personal injury. -
Page 8: Safety
2.1 Intended use of the device As a laboratory device, the DustMon RD 100 may only be used for sample preparation and not as a production machine. The device has been designed for stationary operation in a dry and clean working environment. -
Page 9: Obligations Of The Operating Company
Safety 2.3 Obligations of the operating company 2.3.1 Provisions The user bears responsibility for ensuring that people working with the device and the corresponding equipment have taken note of and understood all relevant safety regulations. 2.3.2 Personnel • Ensure that only trained personnel are deployed whose training and experience enable them to recognise risks and avoid potential hazards. -
Page 10: Personal Protective Equipment (Ppe)
2.4 Repairs This manual does not contain any repair instructions. For safety reasons, repairs may only be carried out by Retsch GmbH or an authorised representative or by qualified service technicians. In case of repair, please inform… …the Retsch GmbH representative in your country, …your supplier, or... -
Page 11: Preventing Damage To Equipment
Safety • Only operate the device at a workstation of sufficient size that offers adequate stability. • Check the mains lead for damage before operating the device. • Never operate the device if damage is visible or suspected. • Only operate the device according to the technical application limits. •... - Page 12 Safety The managing operator should for legal protection have the user confirm the instruction about the operation of the device. I have read and taken note of the contents of all chapters in this manual as well as all safety instructions and warnings. User Surname, first name (block letters) Position in the company...
-
Page 13: The Dustmon Rd 100
The DustMon RD 100 is offered with a white light source (LED). The DustMon RD 100 can be used as a stand-alone measuring system or without PC and DustMon software. The measurement can be started using the integrated display, and this display also shows the results at the end of the measurement. -
Page 14: Technical Data
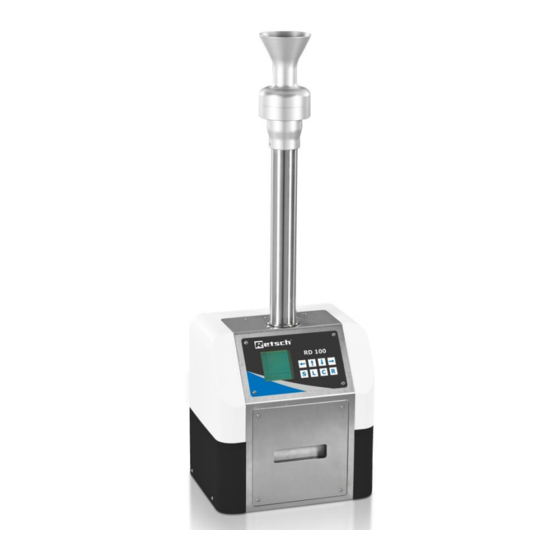
The DustMon RD 100 Fig. 1: The DustMon RD 100 3.1 Technical data General information Area of application Agriculture, biology, chemistry / plastics, building materials, engineering / electronics, environment / recycling, food, geology / metallurgy, glass / ceramics, medicine /... -
Page 15: Views Of The Device
Height of device 340 mm, height of tube 560 Weight, net 5 kg Conformity 3.2 Views of the device Fig. 2: Front view of the DustMon RD 100 Components Function Sample container For filling the sample Sample flap with tube... - Page 16 The DustMon RD 100 The connector panel is on the right-hand side of the DustMon RD 100: Fig. 3: View of the connector panel Components On/Off switch Mini-USB (PC connection) Opening for cleaning with compressed air Power supply unit connection (12 V / DC) Fig.
-
Page 17: Signs On The Device
The DustMon RD 100 3.3 Signs on the device Notice Meaning Read the Manual Safety notice: The device manual must be read before commissioning and operating the device. Caution – electric shock! The Electrical current warning housing may only be opened by trained personnel. - Page 18 The DustMon RD 100 10 Supply frequency 11 Power 12 Current 13 Number of fuses 14 Fuse type and fuse rating Please always specify the device name (1) or the article number (3) as well as the serial number (4) for the device if you have any questions.
-
Page 19: Packaging, Transport And Installation
DustMon RD 100 tube Power supply unit White light inspection glass USB cable to connect DustMon RD 100 to the PC 4.2 Packaging The packaging has been adapted to the mode of transport. It complies with the generally applicable packaging guidelines. -
Page 20: Transport
N4.0014 Complaints Incomplete delivery or transport damage − The forwarding agent and Retsch GmbH must be notified immediately in the event of transport damage. It is otherwise possible that subsequent complaints will not be recognised. • Please check the delivery on receipt of the device for its completeness and intactness. -
Page 21: Conditions For The Installation Site
Packaging, Transport and Installation 4.5 Conditions for the Installation Site CAUTION C4.0047 Risk of injury caused by the device falling down Incorrect installation of the device − Due to its weight, the device can cause injuries if it falls down. •... -
Page 22: Electrical Connection
Packaging, Transport and Installation 4.6 Electrical Connection WARNING W2.0015 Risk to life caused by an electric shock Connection to socket without a protective earth conductor − Connecting the device to sockets without a protective earth conductor can lead to life-threatening injuries caused by an electric shock. •... -
Page 23: First Commissioning
The sample collection box or chamber is a removable stainless steel assembly that slides in and out of the front of the DustMon RD 100 analyzer. It captures and contains each sample and subsequent dust cloud during the measurement cycle. It must be fully seated into the instrument... -
Page 24: Lab Valve
The lab valve (feeder tube or drop tube) is a removable stainless steel / aluminum assembly that fits into the 12 mm diameter port on the top of the DustMon RD 100. There is a push button on the top of the instrument that is used to uncouple the tube assembly from the instrument cabinet. -
Page 25: Operating The Device
Operating the Device Operating the Device WARNING W5.0002 Danger to life through electric shock Damaged power cable − Operating the device with a damaged power cable or plug can lead to life- threatening injuries caused by an electric shock. • Before operating the device, check the power cable and plug for damage. -
Page 26: Dustmon Rd 100 - Measurement Using The Internal Control Unit
DustMon RD 100 – Measurement using the internal control unit The DustMon RD 100 as a basic system (stand-alone unit) operates with an internal PC that controls the entire measurement and shows the results as values and as a graph on the display. - Page 27 DustMon RD 100 – Measurement using the internal control unit sample. This avoids “small clouds or poofs of dust” sent up when the new sample hits the old sample thus getting a combination of the two. • Samples should be stored in a desiccator to prevent humidity effects. Humidity and other agglomeration effects can affect the dust amount.
-
Page 28: Dustmon Rd 100 Display During The Measurement
DustMon RD 100 – Measurement using the internal control unit 7.2 DustMon RD 100 display during the measurement You can follow the progress of the measurement on the display of the DustMon RD 100. Fig. 11: Countdown before the measurement... - Page 29 DustMon RD 100 – Measurement using the internal control unit Fig. 13: Readings during the measurement in real time Fig. 14: Result of the measurement after 30 seconds Pressing the button once changes the "D Index" (DustIndex) in the top row to "D Area"...
-
Page 30: Dustmon Rd 100 Using Pc Control Unit / Software Installation
DustMon RD 100 using PC control unit / software installation DustMon RD 100 using PC control unit / software installation Any PC with the Microsoft Windows operating system and a USB interface can be used for installation. Software installation: Create a folder on your PC and copy DustMonL.exe, the licence file (.lic) and the Language.txt to this folder. -
Page 31: Description Of The Program Interface
Entry of the operator (or department) is possible. This information is saved with the measurement. 8.2 System settings before the first measurement Before the first measurement, the basic settings of the DustMon RD 100 may be changed or adapted according to your requirements. A password is needed to make changes. Proceed as follows:... - Page 32 DustMon RD 100 using PC control unit / software installation 1. Select "System" and then "Login" in the menu bar. Fig. 18: Software login 2. The “Password dialog" window opens. Enter the password here and confirm by clicking "OK". Fig. 19: Password entry 3.
- Page 33 DustMon RD 100 using PC control unit / software installation 4. The "Setup" dialog box opens: Fig. 21: "Setup" dialog box Function Save data at x seconds: Up to 10 measurement points can be freely selected and inserted here, i.e. the dust value is, for example, recorded and specified after 5 seconds, 10 seconds etc.
-
Page 34: Starting The Measurement Using The Dustmon Rd 100 Software
8.3 Starting the measurement using the DustMon RD 100 software 1. Place the material in the sample container of the DustMon RD 100 (typically 30 g). 2. Check and where necessary change the folder in which the results are to be stored (1). -
Page 35: Results And Information About The Sample
5 seconds before every measurement. “AutoZero” is shown on the on-board display of the DustMon RD 100. Once the zero measurement has been completed, the flap opens and closes audibly. The sample falls into the collecting box and the dust measurement begins. -
Page 36: Loading The Results
Explanation File name Consisting of: File name – Sample ID – Date – Time File ending: dur; dur-files can only be opened using the DustMon RD 100 software. Assignment of the colour to the curve(s) shown. Sample ID Description/comment on the sample. -
Page 37: Superimposing Measurement Results
Fig. 28: Loading the results 8.6 Superimposing measurement results In order to be able to compare measurements, the DustMon RD 100 software offers the option of superimposing data from up to ten measurements. Proceed as follows: Click Load (1) and select the results (keep the CTRL button pressed + left click = selection of multiple data) that you want to superimpose (2). -
Page 38: Changing The Graphics Display
DustMon RD 100 using PC control unit / software installation The following figure shows three results superimposed in one graph: Fig. 30: Display of multiple results 8.7 Changing the graphics display It can be difficult to view a single graph if a number of measurement results are portrayed together. -
Page 39: Calculating Results As An Average
DustMon RD 100 using PC control unit / software installation 8.8 Calculating results as an average The DustMon RD 100 software enables you to calculate the average from results that have already been loaded. Example: initial situation as shown below – 3 results have been superimposed. -
Page 40: Dustmon Rd 100 - Transfer Of Results To Excel (Txt File)
8.9 DustMon RD 100 - Transfer of results to Excel (txt file) Every measurement is fundamentally saved as a dur-file. Parallel to this the DustMon RD 100 software creates a TXT file with all measurement data. This TXT file can, for example, be imported to Excel for further evaluation. - Page 41 DustMon RD 100 using PC control unit / software installation Remove the tick on the "Use system separators" option (3) Enter a dot in the "Decimal separator" (4): Enter a comma in the "Thousands separator" (5) Confirm changes by clicking OK (6)
-
Page 42: Troubleshooting
9.2 White light source OFF – device is not functional It is possible to start a measurement – using both the DustMon RD 100 software from your PC and directly on the device (“R” button on the on-board display) – however no measurement will be conducted. -
Page 43: Cleaning And Maintenance
Depending on the sample material, it may be necessary to clean the tube after every measurement. The DustMon RD 100 should be cleaned at least once a day depending on use. Press the button right down to release the tube locking system. The tube can now be removed. -
Page 44: Checking The White Light Source
Checking the white light source 11 Checking the white light source A calibration filter is supplied to check the DustMon RD 100. This is used to calibrate and check the system. The DustMon RD 100 system must be switched on in order to carry out such an inspection. - Page 45 Checking the white light source 3 lens test (glass test) results. The increase at the start of measurements results from inserting the sample collection receptacle. Fig. 41: 3 lens test results Fig. 42: Print view of the 3 lens test measurements...
-
Page 46: Calibration
Two reference standard samples 12.1 Setup Kalibration Prior to performing calibration the DustMon RD 100 unit must be connected to a PC which has the DustMon RD 100software installed. The following calibration option parameters should be modified as desired using the Terminal mode of the software:... -
Page 47: Disable Calibration Function For Standalone Mode
Calibration Abb. 43: Set Calibration Values Or the settings can be changed by using terminal mode: LED_low_cal_ref = "Standard 1 reference value" LED_high_cal_ref = "Standard 2 reference value" (If using 2 point calibration) LED_cal_N = "Number of measurements for each ref sample that is required" LED_ref_enable = 1 (Functionality ON ➔... -
Page 48: Calibration Using Reference Glass (Filter Lens) In Standalone Mode
$logout 12.3 Calibration using reference glass (filter lens) in standalone mode The following procedure applies to DustMon RD 100 units with a firmware rev of 0185 or newer: 1. Turn off the DustMon RD 100 2. Keep the C button depressed while turning the DustMon RD 100 on, and keep it depressed for one more second. - Page 49 Calibration b. While turning the DustMon RD 100on, keep the L button depressed until the DustMon RD 100 signifies that it is in “Ref cal mode” on the LCD screen. Ref Samp Cal: 5 R1= 5 R2= 10 DustMon L 0191...
-
Page 50: User Defined Calibration Value
Once run is complete verify results match COA. 12.5 User defined calibration value Beginning with DustMon RD 100 firmware version 0185, calibration can be made to a reference glass filter lens using terminal mode and establising a user defined calibration value for that reference standard. -
Page 51: Repairs
When returning a device, attach the return form to the outside of the packaging. In order to eliminate any health risk to the service technicians, Retsch GmbH reserves the right to refuse the acceptance and to return the respective delivery at the expense of the sender. -
Page 52: Accessories
Accessories 14 Accessories Information about available accessories and the corresponding manuals can be found directly on the Retsch GmbH website (https://www.retsch.com) under "Downloads" for the device. Accessories include the following: • Collection receptacle (Art. No. 22.069.0001) • Tube (Art. No. 22.069.0002) •... -
Page 53: Disposal
Disposal 15 Disposal In the case of a disposal, the respective statutory requirements must be observed. In the following, information on the disposal of electrical and electronic devices in the European Community are given. Within the European Community the disposal of electrically operated devices is regulated by national provisions that are based on the EU Directive 2012/19/EU on Waste Electrical and Electronic Equipment (WEEE). - Page 54 Disposal...
-
Page 55: Index
Dust Area ............36 Ambient temperature .......... 21 Dust Index ............36 Amendment status ..........6 DustMon RD 100 housing and electronics ..19 Area of application ..........14 Article number ............. 17 Electrical connection ........22, 23 Electrical current warning ........17 Barcode............... - Page 56 Temperature range ..........21 Protection rating ..........14 Temporary storage ..........20 Provisions ............. 9 The DustMon RD 100 ........13 Time ..............36 Qualification of personnel ........9 Transfer of results to Excel (txt file) ....40 Transport ............19, 20 Transport damage ..........
- Page 57 White light inspection glass ........ 19 White light source OFF ........42 Zero measurement ..........28 Year of manufacture ........... 17...
- Page 59 Copyright © Copyright by Retsch GmbH Retsch-Allee 1-5 42781 Haan Germany...
Need help?
Do you have a question about the DustMon RD 100 and is the answer not in the manual?
Questions and answers