Table of Contents
Advertisement
Quick Links
The frame of this product is manufactured from mild steel coated with a weather resistant paint.
Steel has a natural tendency to rust over time and, whilst we expect you to be able to enjoy your
furniture for many years to come, we recommend that you check the product from time to time for
signs of paint damage and/ or rust. If the paint should become damaged, or if rust begins to form,
you should clean the affected area and apply a suitable "thinners based" touch-up paint.
Such paints are readily available from all good hardware and DIY stores."
IMPORTANT, RETAIN FOR FUTURE REFERENCE
Produced in China for A. Mir & Co., Ltd.
© A. Mir & Co., Ltd.
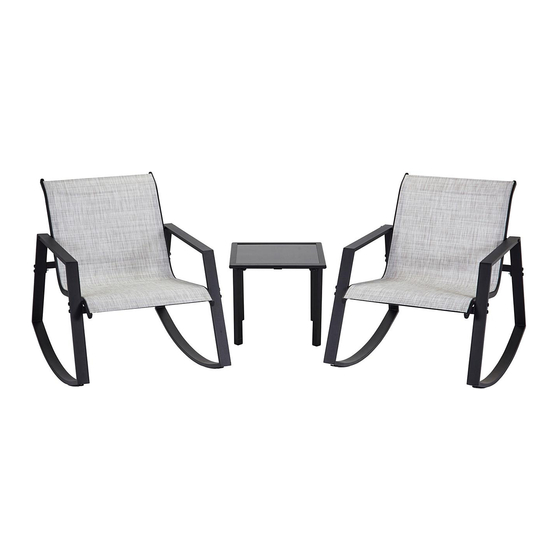
Aruba 3 Piece Bistro Rocker Set
Assembly Instructions
Coffee Table: L45*W45*H40 cm
Rocker: W65*D94*H79.5 cm
This product is for Domestic Use only
READ CAREFULLY
Product size:
www.royalcraft.co.uk
1 / 8
Advertisement
Table of Contents

Related Manuals for Royalcraft Aruba 3 Piece Bistro Rocker Set


Summary of Contents for Royalcraft Aruba 3 Piece Bistro Rocker Set
- Page 1 Aruba 3 Piece Bistro Rocker Set Assembly Instructions Product size: Coffee Table: L45*W45*H40 cm Rocker: W65*D94*H79.5 cm The frame of this product is manufactured from mild steel coated with a weather resistant paint. Steel has a natural tendency to rust over time and, whilst we expect you to be able to enjoy your furniture for many years to come, we recommend that you check the product from time to time for signs of paint damage and/ or rust.
- Page 2 Aruba 3 Piece Bistro Rocker Set Assembly Instructions Before you start Warnings Don’ts IMPORTANT, RETAIN FOR FUTURE REFERENCE Do not use scourers, abrasives, washing powders, chemical cleaners or any other substances containing abrasives since these substances READ CAREFULLY can damage the product, including the glass panel.
- Page 3 Aruba 3 Piece Bistro Rocker Set Assembly Instructions This Set is a combination set of 3 pieces. Please find the combination part. Member Part Combination Diagram Name Part No. 1 PC Table 2 PCS Rocker www.royalcraft.co.uk Produced in China for A. Mir & Co., Ltd. © A. Mir & Co., Ltd.
- Page 4 Aruba 3 Piece Bistro Rocker Set Assembly Instructions Components, fixtures & fittings (not actual size) Parts List Part Part Diagram Diagram 1 PC 4 PCS Table Top Table Legs 4 PCS 2 PCS Rocker Armrest/Leg Rocker Seat/Backrest 4 PCS 4 PCS...
- Page 5 Aruba 3 Piece Bistro Rocker Set Assembly Instructions 4 PCS M6 Nut M6 Bolt Head Cap 4 PCS 2 PCS Allen Key M6 Nut Cap Step by step assembly instructions Note: All Bolt Head Caps and Nut Caps should not be attached before finally tightening all Bolts with Spanner &...
- Page 6 Aruba 3 Piece Bistro Rocker Set Assembly Instructions MP1 – Coffee Table Step One Place the Table Top (A) upside down on a flat, non-abrasive surface to avoid scratching the table surface or rim. Step Two Loosely attach the Table Legs (B) onto the Table Top (A) using Washers (DP) and Bolts (N15).
- Page 7 Aruba 3 Piece Bistro Rocker Set Assembly Instructions MP2 - Armchair Step One Assemble the Rocker Armrest/Legs (C) to the Rocker Connecting Bars (E) using Washers (DP), Bolts (N65), Bolt Head Caps (F10), Nuts (F4) and Nut Caps (F6). Step Two...
- Page 8 Aruba 3 Piece Bistro Rocker Set Assembly Instructions Step Three Assemble the Part (F) to the Rocker Seat/Backrest (D) using Washers (DP), Bolts (N15), and Bolt Head Caps (F10). Step Four Use L-Shaped Tool (G) to tighten the Part (F).
Need help?
Do you have a question about the Aruba 3 Piece Bistro Rocker Set and is the answer not in the manual?
Questions and answers