Advertisement
Quick Links
Advertisement

Related Manuals for Certa POWERPLUS CT20VGRNDRA

Summary of Contents for Certa POWERPLUS CT20VGRNDRA
- Page 1 POWERPLUS 20V ANGLE GRINDER (SKIN ONLY) CT20VGRNDRA...
-
Page 3: Safety And Warnings
SAFETY & WARNINGS Save all warnings and instructions for future reference. The term “power tool” refers to your mains operated (corded) power tool or battery-operated (cordless) power tool. Work area • Keep your work area clean and well lit. Cluttered benches and dark areas invite accidents. - Page 4 Personal safety Stay alert, watch what you are doing and use common sense when operating a power tool. Do not use tool while tired or under the influence of drugs, alcohol, or medication. A moment of inattention while operating power tools may result in serious personal injury.
- Page 5 Battery use and care Ensure the switch is in the off position before inserting the battery pack. Inserting the battery pack into power tools that have the switch on invites accidents. Recharge only with the charger specified by the manufacturer. A charger that is suitable for one type of battery pack may create a risk of fire when used with another battery pack.
- Page 6 part of a broken accessory may fly away and cause injury beyond the immediate area of operation. • Never lay the power tool down until the accessory has come to a complete stop. The spinning accessory may grab the surface and pull the power tool out of your control.
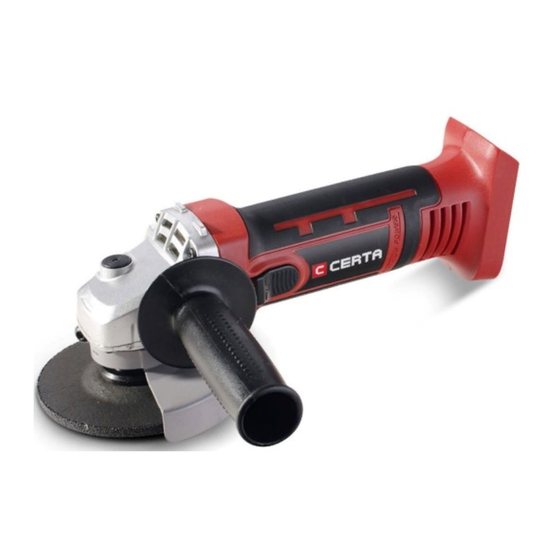
- Page 7 OVERVIEW Spindle Lock Adjustable Safety Guard Auxiliary Handle Switch Main Handle Battery Pack (Not Included) Battery Charger (Not Included) Push Lock Button...
-
Page 8: Operation
OPERATION Charging the battery pack (not included) Remove the battery pack (6) from the handle, pressing the push lock button (8) downwards to unlock it. Check that your mains voltage is the same as that marked on the rating plate of the battery charger. - Page 9 Adjusting the grinding guard Loosen the screw on the guard with a suitable screwdriver. Do not undo until the screw is removed completely. Adjust the guard to a position that still protects you from flying sparks. Fasten the screw. Installing the grinding disc Make sure the guard is securely in place.
- Page 10 Removing the grinding disc Press the spindle lock button (1). Loosen the spindle lock nut (a) by turning the nut counter clockwise with the wrench. Remove the threaded outer flange. Remove the grinding disc from the spindle. Switch To turn the grinder on, hold the rear of the switch, then push forward until the switch won't move any further.
- Page 11 Grinding Grip the grinder securely with two hands so that you always have full control. Starting the grinder will create a sudden jerk in your hands due to the torque. After starting the tool, apply the grinding wheel to the workpiece. Note: Do not turn the switch on or off while the grinder is in contact with the workpiece.
- Page 12 Symbols The following symbols or initials may be used on the tool. Please see below to learn their meaning. Proper interpretation of these symbols will allow you to operate the tool better and safer. Symbol Name Designation/explanation Volts Voltage Amperes Current Hertz Frequency (cycles per second)
-
Page 13: Care And Maintenance
CARE & MAINTENANCE Cleaning Keep all safety devices, air vents and the motor housing free of dirt and dust as much as possible. Wipe the equipment down with a clean cloth or blow it clean with compressed air at low pressure. It is recommended that you clean the product immediately after each use. - Page 14 NOTES...
- Page 16 Need more information? We hope that this guide has given you the assistance needed for a simple set-up. For the most up-to-date guide for your product, as well as any additional assistance you may require, head online to help.kogan.com...
Need help?
Do you have a question about the POWERPLUS CT20VGRNDRA and is the answer not in the manual?
Questions and answers