Table of Contents
Advertisement
Quick Links
Advertisement
Table of Contents

Summary of Contents for 3D Systems ProJet Cart Station
- Page 1 User Guide ProJet ® Cart Station...
-
Page 2: Table Of Contents
TABLE OF CONTENT INTRODUCTION ....................................3 ABOUT THIS GUIDE ..................................3 COPYRIGHT ....................................4 IMPORTANT SAFETY INFORMATION ............................5 SPECIFICATIONS and REQUIREMENTS ............................6 FAMILIARIZATION ................................... 7 FACILITY REQUIREMENTS ................................8 PREPARATION FOR WALL-MOUNT ............................8-9 WALL-MOUNT INSTALLATION ..............................10 TABLE-MOUNT INSTALLATION ..............................11 OPERATION ....................................12-15 MAINTENANCE .................................... -
Page 3: Introduction
INTRODUCTION Thank you for purchasing “ProJet® Cart Station. We pride ourselves in our ability to offer customers three dimensional printing solutions. The 3D System team is confident your system will provide many years of service. ABOUT THIS GUIDE • Safety: Read prior to handling VisiJet® Materials or operating the printer. The safety sections inform you of handling the material properly and avoid damage and injury when operating the printer. -
Page 4: Copyright
(the “Licensed User”) does not have the right to copy, reproduce, or translate this document in any way or to any media without the prior written consent of 3D Systems, Inc. No copies of the document may be sold or given to any person or other entity. -
Page 5: Important Safety Information
Provide information about hazards of equipment and materials in the form of Material Safety Data Sheets or Safety Data Sheet (MSDS / SDS). The MSDS / SDS are provided with all materials supplied by 3D Systems. Follow these safety guidelines when operating the station: •... -
Page 6: Specifications And Requirements
SPECIFICATIONS and REQUIREMENTS Cart Station Properties Cart compatibility ProJet ™ 6000, ProJet ™ 7000 Mounting Configuration Wall Mount / Table Mount Screen Display 4 lines of text, 20 characters per line, Backlit Screen Language English User Interface 4 Momentary Push buttons User Safety Emergency Stop (E-stop) provided Screen Size (W x H) -
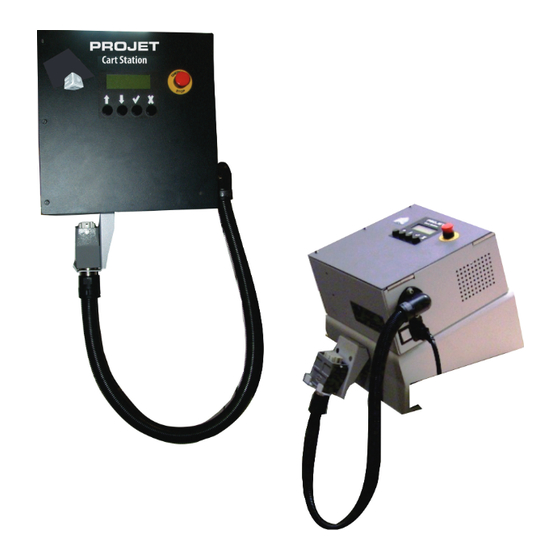
Page 7: Familiarization
Stir the material at fixed time intervals to keep the material homogeneous. Each Cart Station will maintain one material cart. 3D Systems recommends proper material storage, as this is an important factor of achieving the fine details and reliable material properties that the ProJet 6000/7000 can provide. -
Page 8: Facility Requirements
FACILITY REQUIREMENTS Electrical Requirements Facility Electrical Requirements 100-240 VAC, 50 / 60 Hz w / 15 amp. grounded receptacle Temperature Ranges Ambient Room Temperature 20-26 degrees C (68 – 79 degree F) Ambient Relative Humidity 20 – 50% PREPARATION FOR WALL-MOUNT Thumbscrews Remove Table Mount Bracket If you choose to mount your station to the wall, the table mount... - Page 9 • Using a 5mm Allen wrench, remove the two M6 screws from the bottom left corner of cart. • Orient holder as shown and align holder holes to the screw holes at the bottom left corner of station. Install umbilical holder using the two M6 screws that were removed to secure umbilical holder to the cart station.
-
Page 10: Wall-Mount Installation
WALL MOUNT INSTALLATION Required Tools & Fasteners (not supplied): Phillips Screwdriver; Four (4) 6mm or 1/4” screws Anchors (anchors depend on the wall type). Anchors should be flush to the wall • Install four anchors into the marked hole locations; the anchors should be flush to the wall. - Page 11 TABLE MOUNT INSTALLATION If you choose to mount the cart station to a table, it is important that the table height is at least 37” to prevent the umbilical from hitting the floor. The Cart Station should be mounted so that a grounded wall 100-240 VAC / 50-60 Hertz, 15 amp receptacle is within reach of the power cord.
-
Page 12: Operation
OPERATION Powering ON the Cart Station NOTE: Use only the UL listed IEC type power cord that is supplied with the Cart Station. NOTE: The material requires 24 hours to heat prior to use. Avoid heating material over 72 hours; doing so will cause the material to age. - Page 13 NOTE: Before every use, verify the umbilical plug and connector are clean before connecting. Caution: Never disconnect the station from the cart while it is stirring or pumping. First, cancel the operation in the User Screen or turn off the power switch before disconnecting from cart. Main Menu Screen System Check After the System Check, the “Main Menu Screen”...
- Page 14 When you select “RUN,” the following sequence will begin: • Material will be transferred to the cart until: • Fluid’s Valve Motor will be ON for 15 seconds and • Cart is full, or is waiting to detect end of the travel. •...
- Page 15 Errors System will periodically check the hardware and con- nections to the cart and could result in the following errors: • 24V power supply out of range. • Material level sensor is disconnected or non-operational. • Emergency Stop Button is pressed. •...
-
Page 16: Maintenance
MAINTENANCE Before attempting to clean away any liquids or debris that may come into contact with the cart station, turn off the power, unplug the Umbilical, and unplug the station’s power cord. The Cart Station housing may be cleaned with a towel that has been dampened with detergent and water. How- ever, the station is not water or air tight, so care must be taken to ensure no water or other fluids enter through the ventilation holes. -
Page 17: Service And Support
Refurbished parts and systems, are parts or systems that have been returned to 3D Systems, some of which were never used by a customer. All parts and systems are inspected and tested for quality. Replacement parts and systems are covered for the remaining period of the limited warranty for the product you bought. -
Page 18: Spare Parts
SPARE PARTS VIEW 1 Part Number Description Qty. 19816-107-00 Scr, M6x1.0x20, Soc, Ss 2850-00511-100 Washer,M6 284667-00 Cbl Assy, Umbilical 284668-001 Umbilical Holder... - Page 19 SPARE PARTS VIEW 2 Part Number Description Qty. 284382-00 Front Panel Label 20819-106-00 Switch,Emerg Stop,16Mm 283246-00 Label, Ring, E-Stop Button, 16MM ID, 43MM OD 284352-00 Push button, 18mm, SPDT, Momentary, Black 284661-00 Enclosure Cover 284670-00 Screen Shield 284351-00 LCD Kit, 4 X 20, Backlit, Ribbon Cable 282949-00 SCR, PHPH, M2.5 X 8, SS 284397-00...
- Page 20 SPARE PARTS VIEW 3 Part Number Description Qty. 284366-00 EC Inlet C20, Front Side, QC Terminal, 16A, 250V 18115-101-00 Scr, M3x0.5x10, Flt, S, Zc 284367-00 Circuit Breaker, Thermal, 2P, 240V, 5A 284350-00 201989-00 M4 Nut W/Tooth 19816-136-00 Scr,M3x.5X8,Soc,Ss 284664-00 Thermal Pad 284358-00 Interface PCB Assembly 284663-00...
- Page 21 3D Systems, Inc. 333 Three D Systems Circle | Rock Hill, SC | 29730 www.3dsystems.com pn: 283455-00, Rev. A...
Need help?
Do you have a question about the ProJet Cart Station and is the answer not in the manual?
Questions and answers