
Subscribe to Our Youtube Channel
Related Manuals for Directed SIRIUS FM-SC 1

Summary of Contents for Directed SIRIUS FM-SC 1
- Page 1 FM-SC 1 Universal Vehicle Interface SIRIUS Satellite Radio User’s/Installation Guide...
-
Page 2: Fcc Notice
Changes or modifications not expressly approved by the party responsible for compliance could void the user’s authority to operate this device. Directed Electronics is not responsible for any radio or TV interference caused by unauthorized modifica- tions to this equipment. Such modifications could void the User’s authority to operate the equipment. -
Page 3: Table Of Contents
Basic Operation .............. 17 Troubleshooting ............. 37 General notes before beginning: ......17 Specifications ..............38 Changing Channels or Categories ......18 Limited One Year Consumer Warranty ......39 Display Button (DISP)..........18 © 2008 Directed Electronics. All rights reserved. -
Page 4: Warning And Safety Information
© 2008 Directed Electronics. All rights reserved. -
Page 5: Caution
© 2008 Directed Electronics. All rights reserved. -
Page 6: Congratulations
Congratulations on the Purchase of your new FM-SC1 Universal Vehicle Interface for SIRIUS Satellite Radio! Your FM-SC1 system is designed to be compatible with most vehicles. For the latest information about this and other SIRIUS products and accessories from Directed Electronics, please visit http://www.directedsirius.com. Package Contents... - Page 7 Universal Vehicle Interface © 2008 Directed Electronics. All rights reserved.
-
Page 8: Important Pre-Installation Notes
FM-SC1 wires or cables, or any of the vehicle’s exist- ing wires/cables during the installation. © 2008 Directed Electronics. All rights reserved. -
Page 9: Fm-Sc1 Installation Notes
Failure to do so can result in the battery power of the vehicle being drained while the vehicle is not running. © 2008 Directed Electronics. All rights reserved. -
Page 10: Display Control Unit Installation Notes
Blue Remote out +12V or mounted using a mobile phone type mounting system by using the included mobile phone mounting clip which attaches to the DCU. © 2008 Directed Electronics. All rights reserved. -
Page 11: System Wiring Diagrams
94.9 FM-SC1 Interface Power harness AUX IN - connect to audio out from other sources FM Relay Power Harness Yellow Battery +12V Wiring Diagram Accessory +12V Blue Remote out +12V Black Chassis Ground © 2008 Directed Electronics. All rights reserved. - Page 12 Using Vehicle SiriusConnect Tuner SCC1 Aux In Jack (sold separately) Factory Car Radio 11:53 FM-SC1 Interface Power harness AUX IN - connect to audio out from other sources © 2008 Directed Electronics. All rights reserved.
- Page 13 Dock & Play Radio or Portable Radio SiriusConnect Vehicle Dock AUX IN - connect to audio out from other sources Power harness Connect to factory radio via FM-SC1 FM Relay or vehicle Aux In jack. Interface © 2008 Directed Electronics. All rights reserved.
-
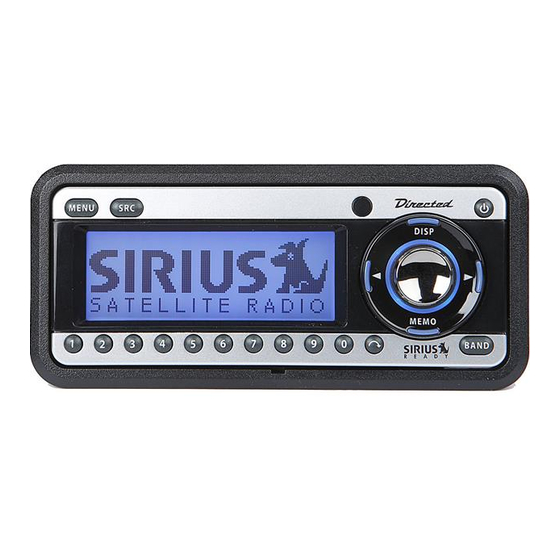
Page 14: Display Control Unit (Dcu)
10. Remote Control Receiver: Receives signals from the wireless remote control. 11. DISPLAY (DISP) Button: Toggles display between category/channel name and time/date. Holding this button down switches the display to the channel list mode. © 2008 Directed Electronics. All rights reserved. -
Page 15: Remote Control
2. Install the CR2025 battery (+ (positive) side is up) by first inserting the rim under the protruding lip on the left side of the battery compartment. 3. Push down gently to seat flush then replace the battery cover. © 2008 Directed Electronics. All rights reserved. -
Page 16: Activating Your Sirius Subscription
3. Once updated and the SIRIUS channels are received, the display changes to “Call 1-888-539-SIRIUS to Subscribe” 1-888-539-SIRIUS (1-888-539-7474). and places you in The Preview Channel. Channel 184 is SIRIUS’ preview channel. Tuning to any other channels is © 2008 Directed Electronics. All rights reserved. -
Page 17: Basic Operation
Song Title the DCU automatically reverts to default, without saving Signal any of the new settings pertaining to that screen. strenght Music Clock Band/Preset Category Bank Number © 2008 Directed Electronics. All rights reserved. -
Page 18: Changing Channels Or Categories
The DCU has several ways to search for and select music: Press one of the buttons to enter List mode again by channel, by category, by artist, and by song title. and then press to enter the category list. © 2008 Directed Electronics. All rights reserved. -
Page 19: Direct Tuning
0-9 keys to enter the desired channel number. Once the desired number has been entered, the chan- nel changes and the display reverts to the default screen for the new channel. The display changes immediately if © 2008 Directed Electronics. All rights reserved. -
Page 20: Advanced Features
Presets are grouped and displayed by preset bank first nel. and then number (e.g. ) looping back to the beginning when complete. © 2008 Directed Electronics. All rights reserved. - Page 21 2. Press and hold the DISP button for 1½ seconds which Preset Tune Song Title List Display brings up the Preset Tune Mode displaying up to 4 preset channel names. Pressing the DISP button while in this © 2008 Directed Electronics. All rights reserved.
-
Page 22: Memory (Memo) And Artist Seek Functions
” cancels this com- one using the rotary knob and press Select to save cur- Memory mand. Selecting either one returns you to the “ ” rent choice. Once saved the screen returns the prompt screen. © 2008 Directed Electronics. All rights reserved. - Page 23 Select button to confirm or “ ” to Updates ” sounds an alert when the team you have retain information. chosen is playing a game, and also when the scores are updated for the team. © 2008 Directed Electronics. All rights reserved.
- Page 24 After highlighting the Selected title in the list, press the Select button to delete the stored Artist/ Song Title or sports team and replace it with the updated Song Stored information. The display returns a “ ” prompt. © 2008 Directed Electronics. All rights reserved.
-
Page 25: Menu Options
FM relay, you must turn the FM-SC1 vice. To exit this option, press the Select or MENU button. system off using the power switch in order to listen to AM/ © 2008 Directed Electronics. All rights reserved. -
Page 26: Game Alert
Select button. All Score team you have chosen is playing a game. “ Updates ” does the same but also sounds an alert when the scores are updated for the chosen team. © 2008 Directed Electronics. All rights reserved. -
Page 27: Settings
Select to enter. Using rotary knob highlight your city button again to return to your previous channel. of choice from the list and press Select to set which Jump Settings returns you to the “ ” menu with the © 2008 Directed Electronics. All rights reserved. - Page 28 The bar graph moves accordingly to indicate the To exit, press the MENU button. change. Press Select to set and return to “ Display Options ” menu. © 2008 Directed Electronics. All rights reserved.
- Page 29 ” or PreAMP mode “ ”, Press Select to enter. PreAMP Mode: This mode is designed to allow the FM-SC1 system to be used as the primary sound source in a vehicle. It allows © 2008 Directed Electronics. All rights reserved.
- Page 30 Select button down for 2 seconds. The rotary without your permission. The locked channel does not knob will then work in its normal tuning or content appear in the channel list. © 2008 Directed Electronics. All rights reserved.
- Page 31 0000 to 9999. If you should you will be prompted to set a code next time you enter exit this prompt without entering a code, you will be © 2008 Directed Electronics. All rights reserved.
-
Page 32: Time Based Features
Clock: You can configure the unit for the time zone in which you reside. The time data for the unit’s clock is provided via the SIRIUS signal, and updates based on the data © 2008 Directed Electronics. All rights reserved. - Page 33 Rotary knob to highlight “on” and press Select to set 2. Use the rotary knob to highlight whether DST is alarm. DST observed DST not observed or not (“ ” or “ © 2008 Directed Electronics. All rights reserved.
- Page 34 4. Use the rotary knob to highlight “ ” then press Select to enter “ ” menu. Use the rotary knob to highlight a specific day or period, press Select again to set. © 2008 Directed Electronics. All rights reserved.
-
Page 35: Signal Indicator
“ ” to Signal 1. Use the rotary knob to highlight “ leave them as-is and return to the Menu Options list Indicator ”. Press the Select button. © 2008 Directed Electronics. All rights reserved. - Page 36 Call 1- 888-539-SIRIUS The DCU then displays “ to Subscribe ” and places you in Channel 184, the SIRIUS preview channel. Your unit is still subscribed to the SIRIUS service. © 2008 Directed Electronics. All rights reserved.
-
Page 37: Troubleshooting
Check the audio cables at the FM-SC1 and the vehicle radio. Tune the vehicle FM radio to the same FM frequency the FM-SC1 is set to. Check the audio output levels using the Settings/Audio Control menu. © 2008 Directed Electronics. All rights reserved. -
Page 38: Specifications
Remote Control Battery Requirements ..................CR2025 Copyrights & Trademarks 2008 SIRIUS Satellite Radio Inc. All Rights Reserved “SIRIUS”, the SIRIUS dog logo, channel names and logos are trademarks of SIRIUS Satellite Radio Inc. All Rights Reserved © 2008 Directed Electronics. All rights reserved. -
Page 39: Limited One Year Consumer Warranty
Some states do not allow limitations on how long an implied warranty lasts, so the above limitation may not apply to you. Unit must be returned to DIRECTED, postage prepaid, with bill of sale or other dated proof of purchase bearing the following information: consumer’s name, telephone number, and address, authorized dealer’s name and address,... - Page 40 NFM-SC1 2008-07 www.directedsirius.com © 2008 Directed Electronics, all rights reserved...
Need help?
Do you have a question about the SIRIUS FM-SC 1 and is the answer not in the manual?
Questions and answers