
Summary of Contents for VOCOlinc VAP1
- Page 1 PureFlow Smart Air Purifier Hello! Service Enquiries: support@vocolinc.com Visit us at: www.vocolinc.com...
- Page 2 You deserve clean air! This is why we created PureFlow, an ultra smart and efficient air purifying powerhouse to protect you and your family from allergens and pollutants that exist, but are not visible around you. Installation is hassle-free. Please be sure to explore all of its features in this manual.
- Page 3 READ AND SAVE THESE INSTRUCTIONS Caution: When using electrical appliances, observe the following basic precautions to reduce the risk of fire, electric shock, and injury: • Please read all tips and warnings before using your PureFlow air purifier. • Use only as directed by the Owner’s Manual. •...
- Page 4 • The PureFlow air purifier is designed for use in a 120V outlet (North America, Type A), or 220-240V (EU, Type C). • Turn off your PureFlow air purifier before unplugging it from the power outlet. • Unplug the PureFlow air purifier from the power outlet when not in use and before servicing or cleaning the unit.
- Page 5 • Avoid putting the PureFlow air purifier in a place where the air intake or air outlet could become clogged with dirt. • Leave at least two feet of space between the air purifier’s intake, outlet, and the wall. • Do not block the air intake or air outlet. •...
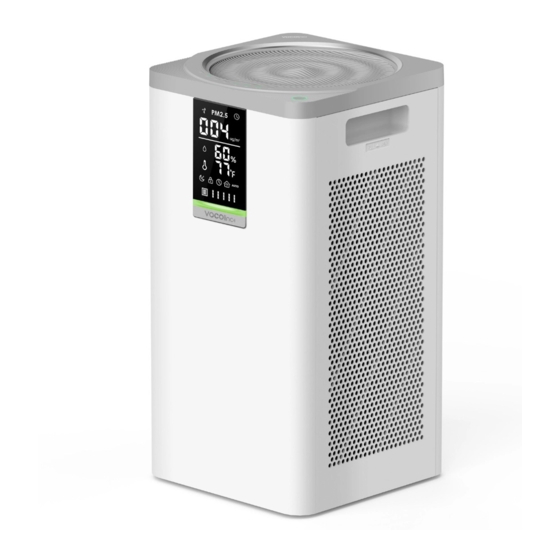
- Page 7 1. Filter covers 2. Composite filters (Pre-filter+HEPAfilter+Carbon filter) 3. Ripple Air outlet 4. Touch control panel 5. Information display 6. High-precision sensors (Air quality/humidity/temperature)
- Page 8 1. Place your hand on the 2. Lift the filter covers slightly to handle of the covers and completely remove the covers. pull towards you. 3. Remove both filters located on both sides of the PureFlow.
- Page 9 4. Remove the new filters from their protective film/cover. 5. Place the new filters inside the recess for the filters. 6. Replace the filter covers as per instruc- tion #1, but in reverse.
- Page 10 1. Plug in the PureFlow and you will hear three ascending tones. 2. Tap the power button, and you will hear the same three ascending tones. 3. Once powered up, the screen will light up. The VAP1 will then take a few moments to initialize.
- Page 11 Power Switch Temperature Unit Switch Auto Mode Switch Fan Mode Switch When Auto Mode is selected, the fan speed of the air purifier Sleep Mode Switch changes automatically depending on the readings of the air quality When Sleep Mode is selected, the sensors.
- Page 12 Timer Switch When the PureFlow is in Standby mode, press to set the timer function and activate it; When on, press again to turn off the timer function. The timer can be set between 0-24 hours. By selecting 0, the timer will be canceled. Kid Lock Switch Press and hold for 3 seconds to activate the Kid Lock function (green light turns on) which disables all other touch controls.
- Page 13 2. Humidity Value 3. Temperature Value 4. Auto Mode On 5. Wi-Fi Mode On • Stays present when the PureFlow is connected to Wi-Fi. • Flashes when the PureFlow loses connection or enters pairing mode. • Disappears when the PureFlow exits Wi-Fi mode. In order to connect to Wi-Fi network, use Pairing Mode Switch to set up connection.
- Page 14 Timer Settings Fan Speed Adjustment The timer can be set between The fan speed can be set 0-24 hours. By selecting 0, the between 1-5 levels. timer will be canceled. Sleep Mode On The icon dims automatically after 10 seconds.
- Page 15 1. Remove the module cover at 4. Clean the module with a dry the rear of the PureFlow. cloth or a soft brush. 2. Take out the module cover 5. Reconnect the data cable, then and clean with a dry cloth or return the unit to its housing, and a soft brush.
- Page 16 The PureFlow surface should be cleaned depending on the air quality of the room. Use a clean, dry cloth to wipe the external surfaces of the PureFlow, or use a damp cloth to remove stubborn stains and dirty buildup if necessary. Avoid commercial cleaning products which may damage the unit's surface.
- Page 17 We’re here to help! We have summarized some issues which you might encounter. If you are not able to resolve your issues according to this guide, please feel free to contact us: support@vocolinc.com...
- Page 19 This device complies with part 15 of the FCC Rules. Operation is subject to the following two conditions: (1) This device may not cause harmful interfer- ence, and (2) this device must accept any interference received, including interference that may cause undesired operation. Note: This equipment has been tested and found to comply with the limits for a Class B digital device, pursuant to part 15 of the FCC Rules.
- Page 20 The simplified EU declaration of conformity referred to in Article 10(9) shall be provided as follows: Hereby, VOCOlinc declares that the radio equipment type [designation of type of radio equipment] is in compliance with Directive 2014/53/EU. The full text of the EU declaration of conformity is available at the following...
- Page 21 VOCOlin APP Setup code Code de Configuration...
Need help?
Do you have a question about the VAP1 and is the answer not in the manual?
Questions and answers
WiFi lights keep flashing?