Table of Contents
Advertisement
Advertisement
Table of Contents

Summary of Contents for Navig8r NAV-GMBL3AXIS
- Page 1 User Manual 3-AXIS GIMBAL STABILIZER...
-
Page 2: Table Of Contents
PACKAGE LIST CONTENTS The product should be packed with following items (including this user manual), if you are missing any items or components please contact us ● Package List ............1 immediately. ● Disclaimer and Warning........2 ● Safety Operation Guideline....... 4 ●... -
Page 3: Disclaimer And Warning
DISCLAIMER AND WARNING DISCLAIMER AND WARNING Thank you for purchasing our Stabilizer before you start PLEASE read this manual and become WARNING: familiar with Stabilizer’s components and operating modes to ensure proper operation. The information contains herein affects your safety and your legal rights and responsibility. Failure to read and follow the instructions and warnings may result in serious injury to you or damage Read the ENTIRE user guide to become familiar with the features of our Stabilizer before operating. -
Page 4: Safety Operation Guideline
SAFETY OPERATION GUIDELINE SAFETY OPERATION GUIDELINE The Stabilizer should be used in temperatures from 0℃ to 40℃. ■ CAUTION: Use of the battery in environments above 40℃ can lead to a fire or explosion. Use of battery below 0℃ can lead to serious damage. 1. -
Page 5: Get To Know The Stabilizer
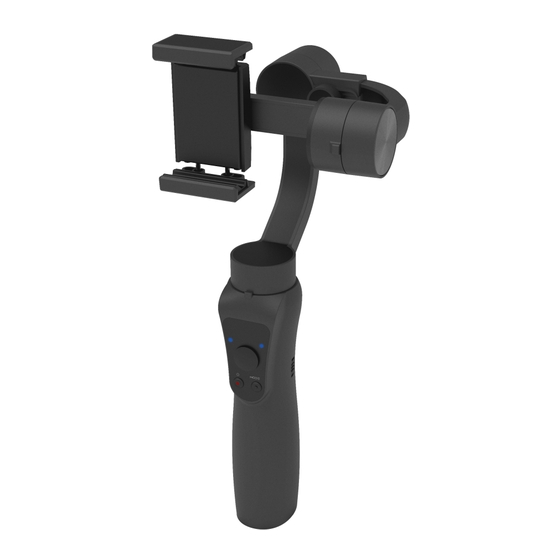
USB CONNECTION GET TO KNOW THE STABILIZER The stabilizer is high-precision control device. When connected to the APP it has more face tracking, time-lapse function, etc. which can offer a more professional grade video. IN-USE CHARGING Connect the Micro USB Port on the side of stabilizer's handle to a power source such as a power pack (not included) to extend run-times. - Page 6 MOUNTING CAMERA OPERATING To Power On Place Smartphone to mounting clip, as show. Slide the Smartphone all the way to right until it touches Tilt Step 2: Press & Hold the Power/Shooting button for 3-4 seconds until the Status Motor. Indicator light flashes blue, and then finally turns green.
-
Page 7: Panel Introduction
OPERATING MODES PANEL INTRODUCTION Please make a note of each motor/operating mode Pan& Tilt details (showing on this page), as stabilizer comes Follow pre-programmed with 3 different modes. Single Mode Single Press Press POWER Indicator Light Status Indicator Light SWITCHING STABLIZER MODES Micro USB Charging Port Joystick Power Output Port... - Page 8 CHANGE ORIENTATION APP OPERATION & CONNECT TO BLUETOOTH The Stabilizer comes with 2 different ways for Change Orientation Connect to Stabilizer APP Switching from Horizontal to Vertical Step 1: Scan QR Code (For Andriod +iOS) and Download below APP for access. - Keep the phone facing yourself and rotate the Stabilizer handle over 70 degrees in counterclockwise direction, Stabilizer will enter vertical shooting Mode.
-
Page 9: Product Specifications
Warranty Against Defects PRODUCT SPECIFICATIONS Laser Corporation Pty Ltd (“Laser”) warrants your new product to be free from defects in materials and workmanship for 12 months from the date of Min. Standard Max. Remarks purchase provided that the product is used in accordance with accompanying Input Vol. - Page 10 Warranty Against Defects Step 2b): If your place of purchase cannot be contacted then you can contact Laser Customer Service with details of your defective Laser Product: Phone: (02) 9870 3388; or Email: support@laserco.com.au or online www.laserco.com.au/warranty (click on “Consumers (End Users)”). Our business address is at 1/6-8 Byfield Street, North Ryde, NSW 2113 Step 3: Laser will issue you with a Return Authorisation (RA) number within 48 hours.
Need help?
Do you have a question about the NAV-GMBL3AXIS and is the answer not in the manual?
Questions and answers