Table of Contents
Advertisement
Quick Links
Instruction Manual
MANSECURE06 REV A 11/08/2016
V60 MOTION ACTIVATED SECURITY CAMERA
SECURE06
SILVAN AUSTRALIA PTY. LTD.
ABN 48 099 851 144
VICTORIA (HEAD OFFICE)
NEW ZEALAND
Telephone: +61 (03) 9215 2700
Hamilton, New Zealand
Fax: +61 (03) 9215 2701
Telephone: +64 (07) 8496 033
www.silvan.com.au
Fax: +64 (07) 8496070
www.silvannz.co.nz
Advertisement
Table of Contents

Subscribe to Our Youtube Channel
Summary of Contents for Selecta SECURE06
- Page 1 Instruction Manual MANSECURE06 REV A 11/08/2016 V60 MOTION ACTIVATED SECURITY CAMERA SECURE06 SILVAN AUSTRALIA PTY. LTD. ABN 48 099 851 144 VICTORIA (HEAD OFFICE) NEW ZEALAND Telephone: +61 (03) 9215 2700 Hamilton, New Zealand Fax: +61 (03) 9215 2701 Telephone: +64 (07) 8496 033 www.silvan.com.au...
-
Page 2: Table Of Contents
Contents Page Product Warranty Product Warnings Product Information Setting Up And Connecting Functions Explained Activating Live Mode Reviewing Recordings On Camera Managing Recordings Reviewing Recordings Using External Equipment Technical Specifications Understanding Your Application Express Setup Guide Trouble Shooting... -
Page 3: Product Warranty
Warranty Silvan Warranty Our goods come with guarantees that cannot be excluded under the Australian Consumer Law. You are entitled to a replacement or refund for a major failure and for compensation for any other reasonably foreseeable loss or damage. You are also entitled to have the goods repaired or replaced if the goods fail to be of acceptable quality and the failure does not amount to a major failure. -
Page 4: Product Warnings
Safety Instructions Ensure you have read and understood this manual and all other support documentation in its entirety before attempting to operate or install. Read and take note of all following safety warnings and notices. Failure to comply with these warnings may result in serious injury or death. Warning! This product requires batteries to operate. -
Page 5: Product Information
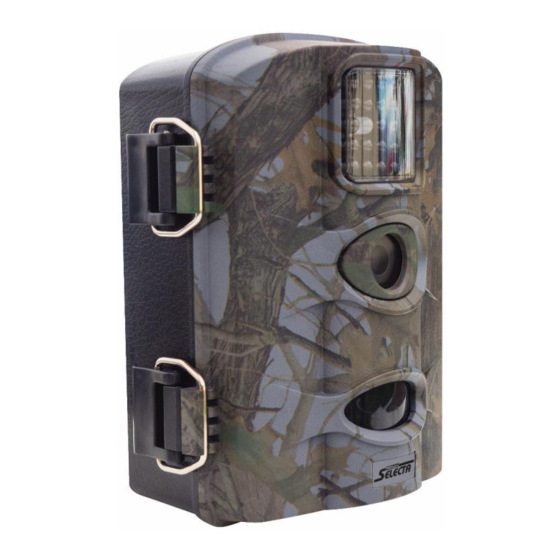
General Information The V60 Motion activated security camera is a self-contained camera system that operates automatically according to the parameters as set. Using a PIR motion sensor the V60 activates when motion is detected to record activity in the area. Main Features: •... - Page 6 General Information (cont.) Interior View Hook hanging mount point Hook hanging mount point Bottom View Rear View Package Contents: 1x V60 Motion Activated Camera 1x USB Cable 1x Mounting Strap 1x 8GB SD memory card 1x Express set-up guide (with link to this operator’s manual)
-
Page 7: Setting Up And Connecting
Setting Up And Connecting If you are not familiar with the operation of this camera, the following instructions will help you get a quick overview. Before doing any operation, please make sure you have loaded batteries and plugged the SD card correctly. Power Supply: ◆... -
Page 8: Functions Explained
Functions Explained Interface Overview: The camera contains an LCD screen and keypad allowing settings to be adjusted or images reviewed. After connecting a power supply, move the power switch to the "TEST" position which turns on the LCD screen to allow test and setup functions. Press the MENU button to enter/exit the main menu, navigate menu options through , , . - Page 9 Functions Explained (cont.) Press the MENU button to open the settings menu. 1) Press the buttons to select the desired menu entry which you can then activate with the OK button. If you change settings, you must always confirm your changes with "OK". Use the MENU button to navigate one menu level backwards.
- Page 10 Functions Explained (cont.) Interval: Use the buttons to select the minimum time period that the camera should wait before reacting to subsequent activation of the main sensor after the initial recording. During the selected interval, the camera will not record any images or videos. Longer interval times preserve battery life and prevent the memory card from being filled up with too many recordings of the same event.
- Page 11 Functions Explained (cont.) Timer: Select "On" if the camera should only be active during a certain time period. In the screen menu that subsequently appears, you can then set the start and end time for the active phase: Press the buttons to set the hour for the start of the active phase.
- Page 12 Functions Explained (cont.) Password Reset: If you forget the number combination, proceed as follows to unlock the camera and to reset it to its factory default settings: ⚫ Keep the RIGHT BUTTON pressed while moving the operating mode selector switch to the TEST position.
-
Page 13: Activating Live Mode
Activating Live Mode The normal operating mode of the camera is so-called live mode. In this mode, recordings are triggered via the motion sensors. To set live mode, slide the operating mode selector switch to the "ON" position, and at this time, the display screen will count down from 10 before switching off to save batteries. -
Page 14: Managing Recordings
Managing Recordings If you now press the MENU button, the settings menu opens: Press the / buttons to select the desired menu entry which you can then activate with the OK button. Use the MENU button to navigate one menu level backwards. Delete One: You can use this function to delete individual recordings from the memory card. -
Page 15: Technical Specifications
Technical Specifications Category Parameters 12 Mega Pixels Color CMOS Image Sensor Maximum 4000 x 3000 Pixel Lens Angle 60° Camera Lens, Auto IR-Cut Up to 65ft/20m IR LED 48x35mm(2.36") LCD Screen Operation 6 Button Keypad Keypad Storage SD card (8MB ~32GB) Support 12MP=4000 x 3000;... -
Page 16: Understanding Your Application
Understanding Your Application Before you add your batteries and strap a camera to a tree it is important to understand what you will be trying to achieve in order to identify the type of settings to adjust, where to position a camera and how to tailor the environment to suit use with a camera. - Page 17 Understanding Your Application • Does the area have much movement/activity normally? o The camera can only respond to 1 activity at a time. If there is multiple movement at once or 2 motion events in close succession it is possible that the camera could photograph a non-event like a tree in the wind right before an important event.
-
Page 18: Express Setup Guide
The full operators manual can be found at www.silvan.com 1280×720, Video Size Select video resolution (pixels per frame). Higher resolution entering SECURE06 to the search prompt or alternatively you 720×480, (affects video produces better quality videos, but creates larger files that can scan the QR code. -
Page 19: Trouble Shooting
Understanding Your Application Defect Possible Cause Solution No batteries inserted. Insert 8 x 1.5 V batteries into the battery slots The camera does not power on (When Battery Polarity 1 or more batteries fitted with wrong polarity (remove immediately) Power switch set to TEST). The batteries are low or dead.
Need help?
Do you have a question about the SECURE06 and is the answer not in the manual?
Questions and answers