Advertisement
Quick Links
OLD CODE
NEW CODE
AA1690
09 107 6801
AA1694
09 107 6850
AA1697
09 107 6884
Intended uses
• To compensate for a disability by providing a seat
for a person taking a shower.
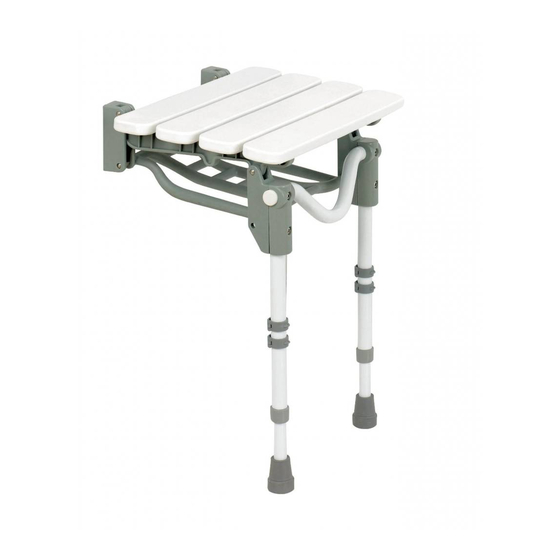
Instructions for use
1. The seat can be folded up out of the way when
not in use. Be sure the latch holds the seat
securely up.
2. To lower the seat, hold onto the cross bar
between screws D, and pull out from the wall.
Cautions
• DO NOT PULL ON THE LEGS TO LOWER
OR RAISE THE SEAT.
• Shower seats should be installed by a qualified
professional.
• Shower seats should not be attached to plastic
shower walls, stud partitioning, plasterboard-
type cavity walls, or any similar type of shower
surround or wall.
• The shower seats are not to be used to support
more than 158kg / 348lb. / 24¾ st.
• The seats are not to be used with water that
is colder than 5°C / 40°F or hotter than 50°C /
120°F.
• Be sure the seat is securely in place before
putting weight on it.
• Use of a slip-resistant bath mat is strongly
recommended.
• Cover the seat with a towel to help reduce
slipperiness.
These user instructions are available in large print, please contact Performance Health Customer Services for a copy.
Manufactured for
Performance Health International Ltd.
Nunn Brook Road, Huthwaite,
Sutton-in-Ashfield, Nottinghamshire,
NG17 2HU, UK.
UK:
Tel: 03448 730 035
Fax: 03448 730 100
www.performancehealth.co.uk
International:
Tel: +44 1623 448 706
Fax: +44 1623 448 784
70058 Is14 © Performance Health International Ltd. 2017
70058 Is14 Tooting Shower Seat.indd 1
Tooting Shower Seat
US CODE
08 130 5382
08 130 5390
Instructions for installation
1. These seats should be installed by a qualified
professional, who will choose hardware
appropriate for the specific installation. Note that
each individual fixing should resist a shear
force of 60 kg / 130 lb. and a pull-out force of
20 kg / 45 lb.
2. Remove the screws that are labelled C in the
drawing from each block (B) and loosen the
screws that are labelled D.
3. Slide the legs into the blocks and tighten screws
D. Screws C can be left out at this stage.
4. Establish the height of the seat, which can be
adjusted from 460 to 590 mm / 18 to 23 inches
as follows:
a. With the seat in the horizontal position, position
the rear brackets (E) against the shower wall.
b. To adjust leg length, remove the four pin clips
(A) from the legs, determine the appropriate
length, and replace the pin clips.
c. Be sure both legs are adjusted to the same
height. A gap up to 5 mm /
leg is acceptable. However, if the angle of the
shower tray results in a greater gap, the seat
must be installed at an angle to compensate
for it.
Please retain these instructions for future reference.
Performance Health Supply, Inc.
28100 Torch Parkway Suite 700,
Warrenville, IL 60555-3938, USA.
Tel: 1-800-323-5547
Telefax: 1-800-547-4333
Performance Health Australia
Unit 3, 3 Basalt Road,
Pemulwuy NSW, Australia 2145.
Tel: 1300 473 422
Fax: 1300 766 473
5. Mark the lower securing holes through the rear
brackets. All fixing holes in the rear bracket must
be used. Remove the seat from the wall and drill
and plug the wall.
6. Loosen the screws D and remove the legs
from the seat.
7. With the seat locked in the vertical position,
position the rear brackets over the holes and
fasten the seat to the wall.
8. Slide the legs back into the blocks and line up the
leg securing holes. Replace and tighten screws
C, and tighten screws D in the blocks.
Care and Cleaning
The seat can be cleaned with mild detergent
and water.
3
/
˝ under one
16
Performance Health France
Zone Industrielle de Montjoly,
11 Avenue de I'Industrie - CS 40712
08013 Charleville-Mézières Cedex, France.
Tel: 03 24 52 61 15
Fax: 03 24 52 90 34
21/03/2017 10:00
Advertisement

Summary of Contents for Performance Health homecraft 09 107 6801
- Page 1 • Cover the seat with a towel to help reduce slipperiness. These user instructions are available in large print, please contact Performance Health Customer Services for a copy. Please retain these instructions for future reference. Manufactured for Performance Health Supply, Inc.
- Page 2 NEDERLANDS - Tooting Shower Seat (klapzitting voor de douche) Bestemd Gebruik Installatie-Instructies 5. Markeer de onderste bevestigingsgaten door de achtersteunen. Alle bevestigingsgaten in de • Hulpmiddel ter compensatie voor personen met 1. Deze stoelen dienen te worden geïnstalleerd door achtersteun moeten worden gebruikt. Verwijder een handicap, waarmee wordt gezorgd dat zij een erkend vakman, die de juiste uitrusting zal de zitting van de muur en boor de gaten in de...
- Page 3 DEUTSCH - Tooting Duschsitz Verwendungszweck Montageanleitung 5. Markieren Sie die unteren Befestigungslöcher durch die hinteren Stützen. Es müssen sämtliche • Sitzfläche als Hilfe für behinderte Personen beim 1. Diese Duschsitze sind von einem Befestigungslöcher in der hinteren Stütze Duschen Fachhandwerker zu installieren, der die für diese verwendet werden.
- Page 4 ESPAÑOL - Asiento de ducha Tooting Usos Instrucciones de Instalación 5. Marque los orificios de sujeción inferiores a través de los soportes posteriores. Deben usarse todos • Proporcionar a las personas incapacitadas un 1. Estos asientos deberán ser instalados por un los orificios de fijación del soporte posterior.
Need help?
Do you have a question about the homecraft 09 107 6801 and is the answer not in the manual?
Questions and answers