Advertisement
Quick Links
Advertisement

Subscribe to Our Youtube Channel
Related Manuals for Faderfox Micromodul SC4

Summary of Contents for Faderfox Micromodul SC4
- Page 1 SC4 User manual...
- Page 2 Provision of guarantee and product liability The seller warrants for faultless material and proper manufacture for a period of 24 months from the date of sale to the end user. Excluded from the stated guarantee are defects on parts as the result of normal wear-and-tear. These parts are mostly faders (sliding guides), potentiometers, encoders, buttons, switches and touchpads.
- Page 3 Package contents - Device - USB cable (with angle plug) - Midi adapter cable (with angled 3.5mm jack plug) - Manual / Quick start guide...
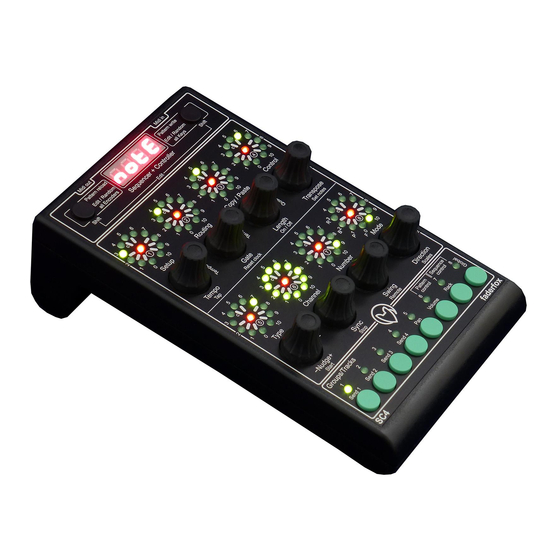
- Page 4 Introduction Thank you for choosing a Faderfox controller. These probably world’s smallest controllers are designed for live use on stage. All Faderfox controllers are professionally hand crafted in Germany ensuring high quality. The 4th generation brings a lot of new features like additional MIDI connections, black faceplates with laser engraving and updatable firmware.
- Page 5 Features Universal controller and sequencer for all kinds of midi controllable hard- and software iPad compatible with camera connection kit Control surface script for Live 8/9 is shipped with the controller (no manual mapping necessary) USB interface with bus powering - class compliant / no driver necessary (consumption < 500mW) MIDI in and out ports with routing and merge functionality 8 push encoders with detents (resolution about 30 pulses) 8 LED crowns to show current values of all encoders and push buttons...
- Page 6 Controller mode Controller mode is the basic mode of the SC4. Here the encoders are used to control any parameters in your soft- or/and hardware by standard midi commands like CC and notes. First choose the group by the green buttons. The display shows the group name: GrP1..GrP8 Turning and pushing of the encoders can send different commands which you can program in edit mode.
- Page 7 Setup 29 and 30 are recommended to control parameters of 8 tracks simultaneously (setup 29 = tracks 1 to 8, setup 30 = tracks 9 to 16): Snd1 (group 1) controls parameter send 1(A) for 8 tracks Snd2 (group 2) controls parameter send 2(B) for 8 tracks Snd3 (group 3) controls parameter send 3(C) for 8 tracks Snd4...
- Page 8 Sequence mode In sequence mode the encoders are used to control different stage parameters depending of the track type. First choose the track by the green buttons. The display shows the track name/type (see below). Turning and pushing the encoders changes track parameter in the 8 stages of a pattern. LED crowns and red LEDs in the center of the crowns show the current value and stages’...
- Page 9 Track description There are 7 different track types available. All types except the CC type can be work only once in the same setup. Track types: notE Note track contains the notes for each stage encoders: notes F3 to H4 (two leds lit for black key notes), push buttons: note on/off To send other note below or above use octave track.
- Page 10 Pattern control In pattern control mode the encoders are used to control the 8 available patterns of the selected setup. Start pattern control by pressing the green buttons 6 and 7 shortly. Both LEDs 6 and 7 are lit and the display shows PAt1..PAt8 .
- Page 11 Sequence control Start sequence control by pressing the green buttons 7 and 8 shortly. Both LEDs 7 and 8 are lit and the display shows SEqU . You can also hold both buttons (longer than 1 second) while you make any modifications.
- Page 12 Sync / Stop (Encoder 6) intern clock is used extern clock synchronization (Midiclock) via USB port nnId extern clock synchronization (Midiclock) via Midi in port Push the encoder to stop the sequencer. Red LED is lit when the sequencer is stopped. Push encoder when LED is lit to reset the pattern counter (LED will be off).
- Page 13 Direction / Scales (Encoder 8) pattern runs forwards PEnd pattern runs back and forth (pendulum) pattern runs backwards rAnd pattern stages will be triggered randomized Changed direction effects on next pattern begin or pattern reset. Push the encoder to activate one of the following note scales: red LED is off = no scale (chromatic) red LED is lit = C major scale red LED blinks = C minor scale...
- Page 14 Edit mode The edit mode allows the programming of the controls (encoders and push buttons) and the handling of setups and routings. Start and leave edit mode by pressing both shift keys at the same time. The activated mode is indicated by display EdIt and/or blinking group LEDs. To edit any control choose the group by the green buttons, select the control by encoder 4 and then set preferences for type, channel, command number and mode by encoders 5 to 8.
- Page 15 Type (Encoder 5) Encoder types: CCr1 control change command in relative mode 1 (values 1/127) CCr2 control change command in relative mode 2 (values 63/65) CCAb control change command in absolute mode (values 0 to 127) standard mode mostly used PrGC program change command (values 0 to 127) CCAh...
- Page 16 Factory reset rESc Reset selected setup by holding down both encoders 1 & 2 while running bar lines shown. rESA Reset all setups by holding down both encoders 3 & 4 while running bar lines shown. Send / Receive setup data Sndc Send selected setup by holding down both encoders 5 &...
- Page 17 Factory settings Commands for setups 1 to 16, 17 to 30, 17 to 27 Encoder 1-8: absolute 7 bit, channel number = setup number, acceleration mode = 3 group: 1 000-007 008-015 016-023 024-031 032-039 040-047 048-055 056-063 000-007 008-015 016-023 024-031 032-039...
- Page 20 User manual SC4 version 2 Mathias Fuchß Software-Entwicklung Op’n Idenkamp 13a 22397 Hamburg Germany info@faderfox.de www.faderfox.de...
Need help?
Do you have a question about the Micromodul SC4 and is the answer not in the manual?
Questions and answers