Table of Contents
Advertisement
Advertisement
Table of Contents

Subscribe to Our Youtube Channel
Summary of Contents for Variis SOULCYCLE
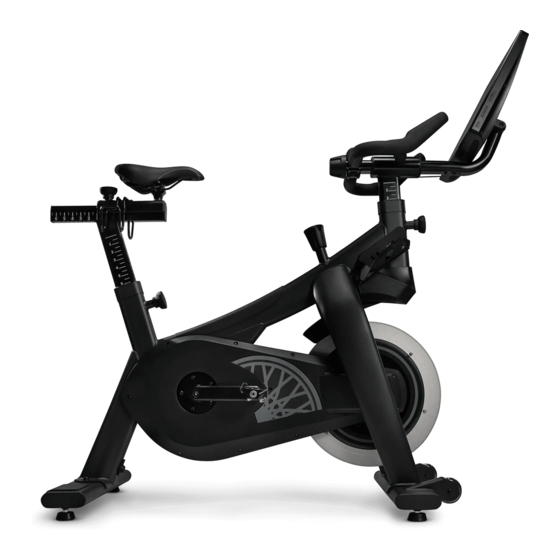
- Page 1 At-Home Bike Manual _POWERED BY...
- Page 2 Welcome to our newest studio: your home. SoulCycle is more than a workout, it’s an experience. And now, you can enjoy all the things you love about it—your favorite SoulCycle instructors, the best playlists, and unparalleled energy—from the comfort of your home.
- Page 3 Table of Contents Safety Information Specifications Setup Getting Connected Personalizing Your Ride Getting Ready to Ride Maintenance and Care Warranty Information Support Notices...
- Page 4 The bike is solely for indoor use. To avoid risk of knobs are properly configured for your body before operating the SoulCycle at-home bike shock, overheating or product damage, do not and properly secured according to this user...
- Page 5 Focus on form, posture, and making smooth, controlled transitions between movements. Always keep your back straight while riding; do not arch your back. Stop the bike gradually: The pedals will continue to turn until the weighted flywheel stops. To stop, you must gradually slow your pedal strokes.
- Page 6 FOOTPRINT 62.2” L x 22.2” W x 53.5” H Specifications / Bike WEIGHT WITH TABLET 128 lbs + 14 lbs : 142 lbs total (BIKE) (TOUCHSCREEN) USER HEIGHT RANGE 4’10” – 6’10” WEIGHT LIMIIT 350 lbs PEDAL Dual sided pedal for Delta or SPD style cleats POWER MAX RATING 19v, 4.8A TOUCHSCREEN...
- Page 7 SCREEN SIZE 21.5” Touchscreen RESOLUTION 1920* 1080 FHD WI-FI 802. 1 1 a/b/g/n/ac RAM/MEMORY 4GB/32GB BLUETOOTH BT 5.0 SENSOR G-Sensor, NFC SPEAKER 2X8W Speaker with 15W Woofer VOLUME POWER BUTTON SPEAKERS CHARGING PORT AUDIO JACK...
- Page 8 _SETUP BIKE PLACEMENT Place the bike on a solid, level, and firm surface to 24” prevent risk of tipping. 24” Use mat to help keep the bike in place and protect floor. Allow a clearance of 24” on all sides of the bike for safety.
- Page 9 MOVING THE BIKE Moving the bike requires two people for safety. Ensure power cables are disconnected. Using only handlebars, tilt the bike forward onto its wheels. While holding on to handlebars, have a second person lift the rear stabilizer. Carefully roll the bike to the new location, avoiding uneven surfaces.
- Page 10 CONNECTING THE POWER CABLES Plug the power cable (A) into the power adapter (B). Plug the power adapter into the bike (C) under the seat post, near the rear stabilizer. Secure the power cable by using either front facing or rear facing cable routing. CABLE ROUTING The power cable routing system helps avoid damage to the power cable itself and is designed to create a clean, neat display in your home.
- Page 11 FRONT FACING CABLE ROUTING If your wall outlet is located in front of the bike, follow these steps to secure the power cable: Thread the cable down through the left-hand channel and then loop it up through the center channel of the cable holder on the rear stabilizer. Run the cable to the front stabilizer and thread it through the center channel of the cable holder.
- Page 12 _GETTING CONNECTED POWERING ON AND OFF Hold the power button for up to three seconds to power on the bike. If asleep due to inactivity, press and release power button quickly to wake. To restart, hold the power button for up to three seconds, then select “Restart.”...
- Page 13 CONNECTING TO WI-FI To manage your Wi-Fi connection, tap “More” then “Settings” then “Wi-Fi.” Select your network from the list. Enter network password and select “Join.” If the network requires advanced settings or a manual connection, select “Advanced” and enter details.
- Page 14 If you don’t see your device, select “Refresh list.” ACCOUNT SIGN IN Sign in to Variis and follow onscreen directions. If you have a SoulCycle account, you may link it to your Variis account.
- Page 15 ADDING A RIDER PROFILE Tap “+” to add a new rider profile on the Profile screen. Enter new rider details and follow onscreen directions.
- Page 17 _PERSONALIZING YOUR RIDE SEAT AND HANDLEBAR TUTORIALS Select “More.” Select “Tutorials.” Browse and select videos to familiarize yourself with seat and handlebar adjustment settings. Because your bike was designed for optimal at-home use, your settings may be slightly different than in-studio.
- Page 18 SEAT HEIGHT The top of the seat should be level with the height of your hip bone. Turn the knob on the seat height adjustment pin counterclockwise to loosen. Pull seat adjustment pin out, raise or lower seat as desired, then lock back in. Turn the knob clockwise to securely tighten and fuly lock in place.
- Page 19 SEAT DEPTH Ensuring your handlebar depth is first set to 0, place your elbow at the front of the seat and extend your fingers toward the handlebars. With your other hand, place your fist between the Should be equal to the length of your elbow to fingertips tip of your extended fingers and the from the front of the seat, plus your fist.
- Page 20 RECOMMENDED BODY POSITIONING Your hands should rest comfortably on the handlebars without reaching. Your arms should be slightly bent at the elbows. Your leg should be slightly bent at the bottom of the stroke. _GETTING READY TO RIDE WARNING: To reduce risk of serious injury, read all safety information and instructions in this manual before using this equipment.
- Page 21 CLIPPING IN Point your toes down to fit the cleat into the pedal, then firmly push down through your heel until it locks in. Always ensure you’re clipped in securely before each ride. CLIPPING OUT While pushing the resistance knob down, kick your heels away from the bike.
- Page 22 CLEAT TENSION ADJUSTMENT Sometimes, you may notice it feels either too Front 3mm Back 3mm easy or too difficult to clip in and out of the hex screw hex screw pedals. The tension should be strong enough to keep your feet locked into the pedals at high RPMs, but loose enough that you can unclip and dismount the bike without difficulty.
- Page 23 STATISTICS VOLUME TOUCHSCREEN NAVIGATION When taking a class, tap the center of the touchscreen to reveal navigation options for ride stats, volume, ride progress, form rider view, and to pause your ride. Swipe your desired function toward the center of the screen to view/adjust.
- Page 24 Maintenance and Care TOUCHSCREEN SEAT CLAMP HANDLEBAR SLIDING TUBES PEDAL TOUCHSCREEN MOUNT CRANK ARM power meter located on left crank arm BOTTOM BRACKET FLYWHEEL CRANK BOLTS FRONT AND REAR STABILIZER FEET...
- Page 25 Daily Weekly BIKE ALL HARDWARE COMPONENTS With a soft, slightly damp cloth, wipe down the bike using a mild soap Visually inspect all hardware components. and water solution or a mild cleaner. Do not use products containing SLIDING TUBES ammonium chloride. Clean weekly with a mild soap and water solution.
- Page 26 POWER METER BATTERY REPLACEMENT Gen. 2 Stages indoor Power meter Your bike comes equipped with either a gen. 2 or gen. 3 Stages Power meter. Both use (2) AA batteries, good for around 2000 hours of riding time. Identify which one you have, and follow the corresponding directions to replace batteries.
- Page 27 GEN. 3 Locate the power meter on the left side crank arm. Remove battery cover screws using a Phillips #0 screwdriver. Slide out the old batteries by rotating the crank arm downward. Insert (2) AA batteries according to the orientation shown on the power meter.
- Page 29 6mm hex key Warranty Information Equinox Media LLC provides a limited warranty for your in-home, indoor, non-commercial use of the SoulCycle at- home bike. A complete description of the terms and conditions of the limited warranty, including the scope of coverage, applicable warranty periods, and certain important exclusions and limitations, can be accessed at: www.variis.com/warranty.
- Page 30 Notices POWER SUPPLY, TOUCHSCREEN, AND BATTERY WARNINGS To avoid injury, ensure the mounting screws that attach the touchscreen to the bike are securely fastened during installation, and check regularly To reduce risk of serious injury or property damage, read all safety to ensure they remain secured.
- Page 31 Power Meter Manufacturer Information: This device complies with part 15 of the FCC rules. Operation is subject to Product Name: Foundation Fitness, LLC. the following two conditions: mfg Stages® Cycling, LLC. Stages Power® Meter Model Name: SPM2A This device may not cause harmful interference, and www.stagescycling.com, info@stagescycling.com FCC ID: ZBM-SPM2...
Need help?
Do you have a question about the SOULCYCLE and is the answer not in the manual?
Questions and answers