Table of Contents
Advertisement
Quick Links
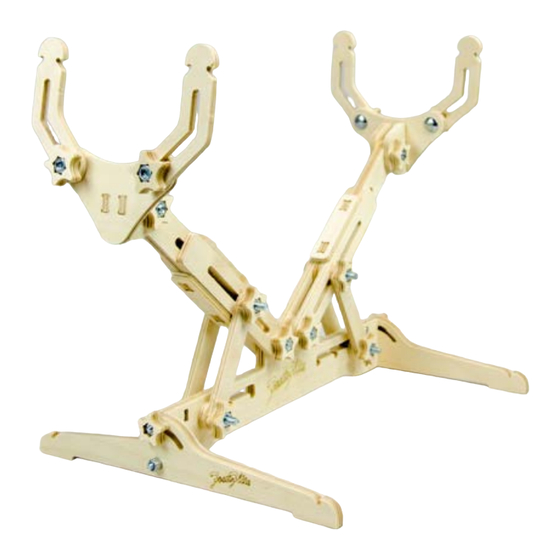
Small-Pro Table Top Model Airplane Stand
Thank you for purchasing the Small-Pro Table Top model airplane stand. Your stand was designed by
modelers just like you looking for an economical and versatile stand to make it easier to work on and
protect model aircraft on the workbench and at the field. We hope you enjoy your stand and find many
uses for it. If you have any questions please contact us. The Small-Pro Table Top stand kit includes all the
wood and hardware for one complete stand. Check over the parts and hardware before you start your
build. If there are any damaged pieces or missing hardware please contact us before beginning the assem-
bly process.
The following is included in the kit:
• 1 - 6mm x 10" x 15" 5 ply Plywood (Sheet 1)
• 1 - 9mm x 10" x 15" 7 ply Plywood (Sheet 2)
• 4 - 1/4" x 1" Carriage Bolts
• 4 - 1/4" x 1 1/4" Carriage Bolts
• 4 - 1/4" x 2" Carriage Bolts
• 12 - 1/4 - 20 Nuts
• 4 - 10-24 x 1½" Round Head Bolts
• 2 - 10-24 Nuts
• 2 - 10-24 Nylon Lock Nuts
Phone: 507-933-0501
Foam-Flite - Mankato MN
©Copyright 2017 Foam-Flite
You will need the following to assemble the kit:
• Heavy Duty Razor for removing wood parts
• Sandpaper
• 5 Minute Epoxy, Wood Glue or CA Glue
• 3/8" and 7/16" wrench
e-mail: sales@foam-flite.com
Advertisement
Table of Contents

Summary of Contents for Foam-Flite Small-Pro Table Top Model Airplane Stand
- Page 1 Small-Pro Table Top Model Airplane Stand Thank you for purchasing the Small-Pro Table Top model airplane stand. Your stand was designed by modelers just like you looking for an economical and versatile stand to make it easier to work on and protect model aircraft on the workbench and at the field.
- Page 2 The assembly is very simple and requires just a few tools. The plywood parts are held in place on the sheets by small tabs left in the wood. These will need to be cut free and it’s easiest using a heavier razor blade with a han- dle.
- Page 3 4) Flip the center piece over and place the 4 - 10/24 x 1 1/2” bolts into the slots with the round head sitting in the square holes. Fill the slots with your choice of glue and set it aside until the glue is set up or dry. 5) Locate the upper arm pieces and slide brace pieces.
- Page 4 8) Locate the lower arm pieces, two 1 1/4” carriage bolts, two star knobs and two 1/4-20” nuts. 9) Place the 1 1/4” Carriage bolt through the hole in one arm then slide the bolt through the center base piece. Slide the second lower arm piece onto the bolt then secure it in place with a star knob and 1/4-20 bolt. Be sure to draw the carriage bolt into the first lower arm piece.
- Page 5 11) Slide the carriage bolts in from the side with the knuckle pieces. Place the cradle arms onto the bolts on the opposite side then secure them in place with the 1/4-20 nuts and star knobs. Repeat this for the second cradle assembly. 12) Locate the completed cradle assembly and locate the upper arm assembly as well as a 1 1/4”...
- Page 6 14) Slide the upper arm and cradle assembly into the slot between the lower arms. Make sure it can move smoothly. If it is too tight lightly sand the pieces so that it can move smoothly but is not too loose. 15) Locate the four plywood arm supports, four 2”...
- Page 7 LIMIT OF LIABILITY: In use of our products, Foam-Flite’s only obligation shall be to replace such quantity of the product prov- en to be defective. User shall determine the suitability of the product for his or her intended use and shall assume all risk and liability in connection therewith.
Need help?
Do you have a question about the Small-Pro Table Top Model Airplane Stand and is the answer not in the manual?
Questions and answers