Table of Contents
Advertisement
812G GigaHub Quick Start Guide
This document provides general installation practices for the GigaHub
model 812G.
This document also provides guidance for site preparation, installation, and
basic troubleshooting.
Package Contents
GigaHub - Model 812G
Power Adapter (Optional - may ship separately or with UPS*)
Wall mount bracket (Integrated Fiber Management Tray)
Tabletop mounting stand
GigaHub Quick Start Guide (this document)
Product identifi cation labels with login credentials (x2)
* Note: For instructions on installing the optional UPS, refer to the
GigaHub Installation Guide.
Scan the QR code at left to access the installation
instructions for this product. All product documentation is
available online from the Calix Resource Center
( support.calix.com).
P/N 220-00833, Rev 11
www.calix.com
Advertisement
Table of Contents

Related Manuals for Calix GigaHub 812G

Summary of Contents for Calix GigaHub 812G
- Page 1 This document also provides guidance for site preparation, installation, and basic troubleshooting. Scan the QR code at left to access the installation instructions for this product. All product documentation is available online from the Calix Resource Center ( support.calix.com). Package Contents GigaHub - Model 812G...
-
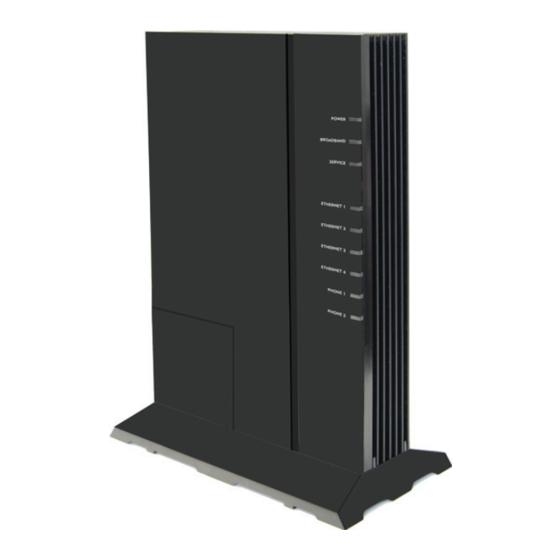
Page 2: A Quick Look
A Quick Look Reset Button Telephone Ports (x2) Power POWER (RJ-11) Broadband BROADBAND Service SERVICE Ethernet ETHERNET 1 Ports (x4) ETHERNET 2 (RJ-45) Ethernet (1-4) ETHERNET 3 ETHERNET 4 PHONE 1 Telephone (1-2) PHONE 2 Power On/Off (Toggle Switch) Model 812-2 Only Power Adapter Port Model 812-2... -
Page 3: Wall Mounting
Tabletop Mounting The 812G GigaHub can be mounted on a tabletop in a “tower” confi guration using the tabletop stand shipped with the product. ETHERNET 2 ETHERNET 1 PHONE 1 PHONE 2 Slide GigaHub down Line-up GigaHub and onto Tabletop Stand until Tabletop Stand as shown. -
Page 4: Wall Mounting Dimensions
Wall Mounting Dimensions In order to facilitate wall mounting of the 812G GigaHub, a Fiber Manage- ment Tray (wall mount bracket) is required (included with the GigaHub). 6.0” (15.2 cm) 3.0” (7.6 cm) 3.375” (8.5 cm) 4.125” (10.5 cm) † 3.25”... -
Page 5: Connecting The Equipment
Connecting the Equipment Remove the 812G GigaHub from its packaging and inventory all parts. Remove the fi ber access cover and set aside temporarily. Plug in the power adapter to an available wall socket and attach the other end to the Gigahub’s power port. Attach the fi... -
Page 6: Default Device Settings
Connect an active optical fi ber to the 812G GigaHub’s bulkhead fi tting, power the unit on, and allow the network OLT (for example, a Calix E7) to discover the device as an unprovisioned ONT. At the OLT, the net- work administrator will provision the GigaHub and provide operational parameters remotely. - Page 7 Home Gateway Settings To turn up home gateway services on the 812G GigaHub, complete the following tasks: Connect your PC to any LAN Ethernet port on the GigaHub using a standard Ethernet cable. Open a browser and enter the IP address of the GigaHubs Embedded Web Interface (EWI): http://192.168.1.1.
-
Page 8: Frequently Asked Questions
Frequently Asked Questions Q: How do I reset the device without having to unplug the unit? A: If the RESET button is depressed for less than 5 seconds, it resets the unit using the current confi guration settings. Q: How do I reset the device back to factory settings? A: Pressing the RESET button on the back of the unit for at least 5 seconds, or access the “Restore Defaults”... -
Page 9: Safety Information
Safety Information The 812G GigaHub is a highly sophisticated electronic device. To get the most out of it, be sure to read the following about product care, safety and effi cient use. • Treat the product with care, keep it in a clean and dust free environ- ment. -
Page 10: Potentially Explosive Atmosphere
Potentially Explosive Atmosphere Do not use the GigaHub in an area where a potentially explosive atmo- sphere exists. Intended Use This product is classifi ed as telecommunication equipment not intended for direct purchase by the public. This product is designed and approved for use in an indoor location only. CAUTION! Use of any controls, adjustments, or procedures other than those specifi... -
Page 11: Regulatory Information
Class 1 Laser Device WARNING! Optical Safety for Fiber Optic Modules. Never look at the transmit laser while it is powered on. Never look into the fi ber optic port when the device is powered on. Never look into the end of the fi ber optic cable at any time. Children Do not allow children to play with the GigaHub. -
Page 12: Environmental Conditions
Environmental Conditions Maximum environmental values during use: Temperature: 0° C to +40° C (32° to 104° F), Humidity: 5% to 95% RH, non-condensing RoHS Compliance This 812G GigaHub meets the requirements detailed in the European RoHS Directive (2002/95/EC). WEEE Directive Requirements according to WEEE directive (2002/96/EC) Disposal of old electrical and electronic equipment (Applicable in the European countries with separate collection systems).
Need help?
Do you have a question about the GigaHub 812G and is the answer not in the manual?
Questions and answers