Table of Contents
Advertisement
Quick Links
FLEX OG 5220 Start Up Guide
Default IP Address:
192.168.1.200
Default UN: admin
Default PW: admin
D2D Technologies
9802-12 Baymeadows Rd Suite 106 Jacksonville, FL 32256. USA
Phone: +1 904-323-4777
D2D Technologies.com
Support@d2dtechnlogies.com
Note: This manual is being updated frequently. Please go to
http://www.d2dtechnologies.com/support/
to be certain that you have the latest copy.
Advertisement
Table of Contents

Summary of Contents for D2D FLEX OG 5220
- Page 1 FLEX OG 5220 Start Up Guide Default IP Address: 192.168.1.200 Default UN: admin Default PW: admin D2D Technologies 9802-12 Baymeadows Rd Suite 106 Jacksonville, FL 32256. USA Phone: +1 904-323-4777 D2D Technologies.com Support@d2dtechnlogies.com Note: This manual is being updated frequently. Please go to http://www.d2dtechnologies.com/support/...
-
Page 2: Table Of Contents
D2D Technologies FLEX OG 5220 _V2.0 CONTENTS D2 FLEX OG 5220 MODELS AND FEATURES ...................... 3 INSTALLING THE OPENGEAR OG 5220 INTO THE ROSS OPENGEAR, OGX CHASSIS........... 3 G 5220 B ............................4 ACKPLANE ..................4 NSTALLING THE CARDS INTO THE OPEN EAR FRAME SLOTS ............................... -
Page 3: D2 Flex Og 5220 Models And Features
D2 FLEX OG 5220 models and features BASE Model: The D2 FLEX OG 5220 comes standard with ASI to IP and IP to ASI conversion that allows the transmission of Internet Streaming with SRT: Secure Reliable Transport (SRT) that provides end to end security and optimized streaming performance across unpredictable networks for the best quality video possible. -
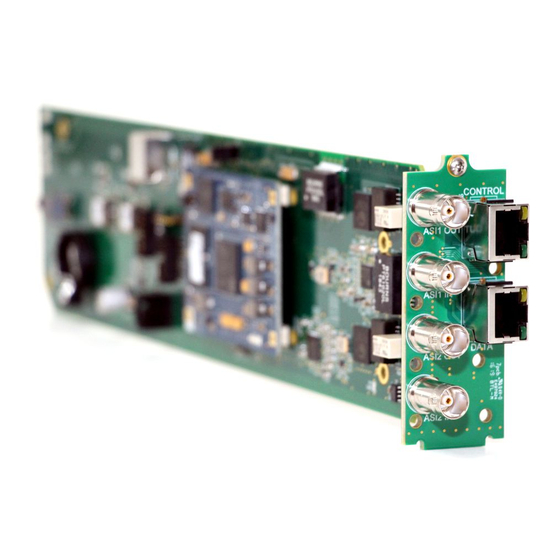
Page 4: Og 5220 Backplane
D2D Technologies FLEX OG 5220 _V2.0 1. oG 5220 Backplane Connect your inputs and outputs as needed. NOTE that the DATA output is an added feature and can be enabled as an extra license. Currently, for this manuals purpose. It is labled as “Future Use”. -
Page 5: Powering It Up
D2D Technologies FLEX OG 5220 _V2.0 3. Powering it up You MUST have both power supplies connected! Once you hook up the two power supplies, turn on the openGear chassis with the small, black switches located at either side, (PS 1 and PS 2). After you close the door, you’ll hear the fans power up and settle. -
Page 6: Connecting Directly To The Card. D2 Tcp/Ip - Control Port Setup Guide
3. 1 dedicated port and a dedicated static IP address from your IT or Network Facilities Administrator. If you are NOT familiar with the process of changing your PC’s IP settings, there are instructions here, or contact D2D Technologies support at: 904-323-4777 Option 2. - Page 7 D2D Technologies FLEX OG 5220 _V2.0 Once you type in the IP address, the username and password, you will land on the “System Status” Page. This will display the temperatures of the main chip as the current temperature, the peak temperature, and the “Uptime”.
-
Page 8: Changing The Login / Password Settings
D2D Technologies FLEX OG 5220 _V2.0 6. Changing the login / password settings On the top righthand side of the screen, click on the “Admin” Then click on Account Settings Rename the login (If desired) Retype in the password (admin) Create a new password. -
Page 9: Systems Settings Page
D2D Technologies FLEX OG 5220 _V2.0 7. Systems Settings Page System Gateway Set this to the gateway of the LAN that the OG card will be on if you will be communicating via the back Ethernet port on the back... -
Page 10: Inserting And Multiplexing Asi
D2D Technologies FLEX OG 5220 _V2.0 Inserting and multiplexing ASI All ASI connections (in and Out) are done via the 5220 card itself and cannot be sent to anywhere else in the frame Once a valid ASI stream is inserted into the backplane, it should show up on the status of the screen for the appropriate ASI. -
Page 11: Inserting And Multiplexing Tsoip
D2D Technologies FLEX OG 5220 _V2.0 Inserting and multiplexing TsoIP All IP connections (in and Out) can be done via the 5220 card ETH ports or via the openGear Chassis using the “INTERNL IP” configurations. (Note: At the time of this manual production, only the TOP ETH is active. - Page 12 D2D Technologies FLEX OG 5220 _V2.0 NOTE: If the stream is UDP, you can just replace the “SRT” with “UDP” Once the information is filled out, be sure to click on SAVE, then Click “Back To Streams. Once you are back on the Transport Streams page. You’ll need to click “Apply” and “Rescan Then, active data should show up on the IP in you set up on the Status page.
-
Page 13: Setting Up The Ip Output
D2D Technologies FLEX OG 5220 _V2.0 Setting up the IP output Once you have dragged all of the services needed for the IP output. Click on the Gear near the top of the output. That will bring you into the setup page for the IP output. -
Page 14: Transport Streams, Vct / Static Psip
D2D Technologies FLEX OG 5220 _V2.0 Transport Streams, VCT / static PSIP 1. Muxing, Manipulating and Adding programs On the “Transport Streams” menu, click on “Rescan” and let it scan, Once it has rescanned, click on the “plus sign” (+) next to the ASI In, you should see some programs show up. -
Page 15: Modifying The Elementary Streams
D2D Technologies FLEX OG 5220 _V2.0 3. Modifying the Elementary Streams On the bottom half of the Edit Outputs pages is the table of Elementary Streams. Below that is the “Modify Elementary Stream button”. NOTE: All PIDS are in Hexadecimal. - Page 16 D2D Technologies FLEX OG 5220 _V2.0...
-
Page 17: Using The Guide Feature To Add Dynamic Psip And Update The Epg
D2D Technologies FLEX OG 5220 _V2.0 Using the GUIDE Feature to add dynamic PSIP and update the EPG. 1. Adding PSIP via TitanTV or Gracenote. 1. Click on the gear icon on the appropriate output 2. That will bring you to the Edit Stream ASI (x) (OUT 1) menu 3. - Page 18 D2D Technologies FLEX OG 5220 _V2.0 • Event Description (ETT) Entire Audience Air_date: You have a choice. If you tend to air the same programs every week with little changes, you can use a day of the week format with 00 being Sunday and Saturday being day 06.
- Page 19 D2D Technologies FLEX OG 5220 _V2.0 3. Host Name: Is the IP address of the FLEX. 4. Username is: root. 5. Password is D2Dberry. 6. Navigate to the SCH Directory found in the root/d2flex directory. If there is no SCH directory, create one.
-
Page 20: Sending Or Receiving Asi Via Srt
D2D Technologies FLEX OG 5220 _V2.0 Sending or Receiving ASI Via SRT: SRT Server (Listener) Setup: This is the side that is sending the SRT The SRT server sends a transport stream by listening for an SRT client to call and initiate a connection. - Page 21 D2D Technologies FLEX OG 5220 _V2.0 SRT Client (Receive Side aka “Caller”) The SRT client receives a transport stream by calling an SRT server and initiating a connection. Configure the IP input port transport stream’s GigE Setting on the Input Port Edit Transport Stream page.
-
Page 22: Connecting To The Unit Via The Serial Port And Ip Address Discovery
D2D Technologies FLEX OG 5220 _V2.0 Connecting to the unit via the Serial Port and IP address Discovery If you cannot connect via IP or the unit has quit responding completely, you may be able to communicate with it via a serial connection: Move the card to a port that has ample space to the right side of it so you can reach in and plug in a mini USB into the USM_UART port closest to the SD drive. -
Page 23: Replacing A Battery In The Og 5220 Card
D2D Technologies FLEX OG 5220 _V2.0 Replacing a battery in the OG 5220 card. The cards have a CR 2032 battery that keeps the real time clock active if the NTP is not selected and the unit shuts down or reboots. If your card does not remember the time after a power cycle, and you do not rely on an NTP server, the battery can be replaced. -
Page 24: Troubleshooting Guide
D2D Technologies FLEX OG 5220 _V2.0 Troubleshooting Guide 1. No ASI into the unit: Go to the “TRANSPORT STREAMS” tab and press RESCAN. Make sure the ASI is plugged into the “RX” port Double check to make certain you have a valid ASI input Try resetting the unit via the “Systems”...
Need help?
Do you have a question about the FLEX OG 5220 and is the answer not in the manual?
Questions and answers