Advertisement
Quick Links
SOMA FABRICATIONS
PortFolder Rack (v.2) Instructions
Congratulations on your purchase of the Soma Portfolder Rack. Our rack is designed with versatility in mind.
While no rack can fit every bike, we have designed a level of adjustability that will fit most 700c and 26" wheel
bicycles. Please read ALL the instructions before starting installation.
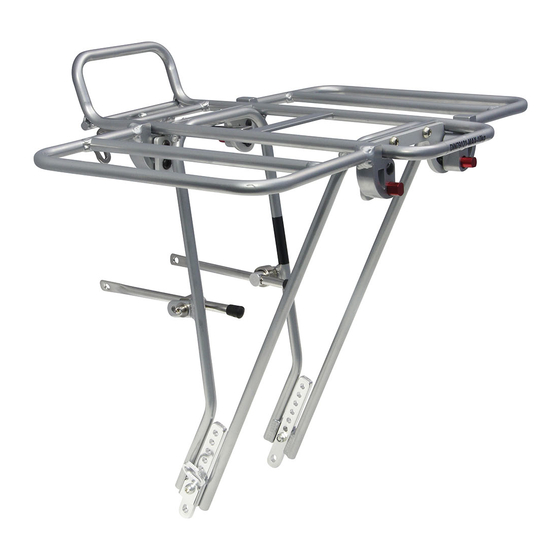
FIGURE 1:
FIGURE 2:
TONGUE
(C)
(D)
(E)
(F)
(H)
(G)
MID FORK STAY HARDWARE
(I)
Determining Compatibility and Fit:
The fork must have a drilled crown and an axle and axle
to crown distance of 365 to 410mm. Your fork needs
eyelets at the dropouts. Some forks with thick lugged
dropouts may interfere with rack mounting, but there
are workarounds depending on the fork design. Some
bicycles with steep head angles (< 73 degrees) or low
rake (<40mm) may have difficulties mounting this rack.
(B)
(K)
(J)
General Considerations:
The rack should sit as low as possible just above the
fender or tire for best appearance and bike handling.
The rack platform should be level or tilted a couple of
degrees back. It should not tilt forward. Angling it too
far back may cause load to interfere with cables or
bars. Note: With so many styles and sizes of bikes out
there, it is impossible for any rack (even a rack with
adjustability) to fit every bike.
Parts List
A)1- Rack Body
B) Height adjustment assembly: Comes pre-assemble
d on the rack. (Nut and bolt, hook, drilled stay)
C) 1 - Tongue
D) 1 - Stainless screw M5 x 36mm
(may not fit every fork) (nut may not be included)
E) 2 - Stainless screw M5 x 12mm with stainless
washer and Nylock nut
F) 2 - Mid fork stays w/plastic end cap
G) 2 - Nut for mid fork stays
H) 2 - Larger Spacer for midfork stay
I) 2 - M5 x 12mm screw
J) 2 - M5 x 8mm screw w/washer
K) 2 - M5 x 12mm screw w/washer
(Hardware subject to change)
Tools Needed:
- 4mm hex key
- 7mm (or adjustable) open wrench
Mounting the Rack:
MOUNTING THE RACK TO THE FORK DROPOUT
EYELETS:
This rack requires your fork to have integrated eyelets
at the dropouts or near the end of the fork. First
determine how far above the front tire you want
the rack. Usually 2cm is adequate. Unscrew the nut
and bolt at the (B) Height Adjustment Assembly and
move the drilled stay to the acheive the right height
and retighten the nut and bolt.
Use the M5 x 12mm bolt (L) with medium washer to
attach the rack to the fork eyelets. Tighten lightly.
Advertisement

Summary of Contents for Soma Fabrications PortFolder
- Page 1 PortFolder Rack (v.2) Instructions Congratulations on your purchase of the Soma Portfolder Rack. Our rack is designed with versatility in mind. While no rack can fit every bike, we have designed a level of adjustability that will fit most 700c and 26” wheel bicycles.
- Page 2 Because there isn’t a standard of fork leg widths MOUNTING THE TONGUE: we cannot guarantee this will fit your particular The next step is to attach the tongue to the eyelets underneath fork. the rack platform. If your fork does not have mini rack mounts, you Some bending of the tongue may be needed to make the rack will still be able to use these stays by purchasing fit optimally.
- Page 3 • Fold down the platform if you want to hook on a small pannier bag. Note: Not all pannier bags have hooks that can be positioned to fit on the rails of the PortFolder. WARNINGS: • Riding with any load on the front of your bike will make the bike harder to steer and operate.
Need help?
Do you have a question about the PortFolder and is the answer not in the manual?
Questions and answers