Table of Contents
Advertisement
Quick Links
Advertisement
Table of Contents

Summary of Contents for Mustech UM053
-
Page 2: Table Of Contents
Table of Contents 1. Precaution…………………………………………….…2 2. Preparation……………………………………………..4 Package Contents……………………………..…4 Part Names & Functions………………………..5 3. Specifications…………………….….………..………6 4. Use the Telescope…………………….………………..7 Charge Battery…………………….…..…………7 Insert Micro-SD Card……………..……….……8 Turn on/off the Telescope…….………………..9 Adjust Focus…………………………………….10 Capture….…………..…..…………………….12 Playback……………………..………………..13 Delete…………………………………………..13 ... -
Page 3: Precaution
Welcome Thank you for purchasing the LCD Digital Telescope. The 5-inch LCD 50x Digital Telescope & Monocular DV is a new-generation portable, easy to operate digital telescope that allows you to see what in the distance on its 5-inch display clearly. It allows you to capture 1080p video and 14M photo so easy. - Page 4 Use the Telescope only at -5℃-50℃. Sudden temperature change may form dew inside the telescope like entering a warm room in cold winter. Put it inside a handbag or plastic bag to slow down temperature changes. Do not point the telescope lens to the sun or strong light for a long time.
-
Page 5: Preparation
2. Preparation ■ Package Contents Telescope Capture remote Tripod Power adaptor Micro-SD card USB cable TV cable Pouch Manual... -
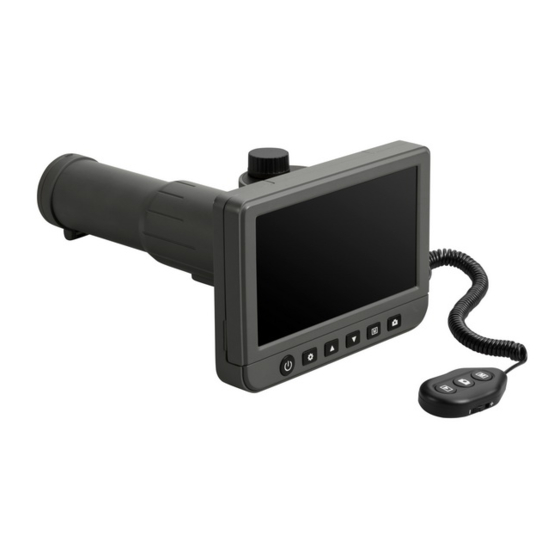
Page 6: Part Names & Functions
■ Parts Names & Functions Power on/off HDMI-out Setup Digital zoom 5V DC: charge battery Up/EV increase USB: download storage Down/EV decrease Charge indicator Photo/Video/Playback Capture remote input Capture Photo/Video/Playback Focus adjust Digital zoom TV-out Capture Micro-SD slot Playback... -
Page 7: Specifications
3. Specifications Magnification Ratio: 50x LCD: 5.0-inch IPS panel, 960x540 Video resolution: 1080P/720P Photo resolution: 14M/12M/10M/8M/5M Video format: MP4 Photo format: JPEG Battery: built-in rechargeable Li-ion battery DC input: 5V/1A or 2A TV-out: to any monitor with TV-in HDMI-out: to any monitor with HDMI-input Storage: Micro-SD card Size: 189mm (L) x132mm (W) x 94mm (H) -
Page 8: Use The Telescope
4. Use the Telescope As it is a high magnification telescope, it is highly suggested to mount it on a photography tripod. 4.1 Charge the Built-in Battery Before using the telescope, you are suggested to charge the built-in battery by the 5V/USB port. The required DC input is 5V. -
Page 9: Insert Micro-Sd Card
4.2 Insert a Micro-SD Card 1) Turn off the telescope 2) Insert the Micro-SD card into the Micro-SD card slot; gently press in until card is latched. Note: Do not force the card into the slot; forcing may damage telescope and the Micro-SD memory card. Align Micro-SD card position (as marked) and try again. - Page 10 4.3 Display Icons & Meanings Icon Meaning Photo capture mode Video capture mode Exposure Time length that still could be captured 01:27:06 (based on the current resolution) 1080FHD Current resolution Micro-SD card inserted Battery capacity Note: The icon displays will be off when there is no key pressed for 10s.
-
Page 11: Turn On/Off The Telescope
4.4 Turn On/Off the Telescope Press the On/Off button for 3s to power on the telescope. Press the button again to turn it off. -
Page 12: Adjust Focus
4.5 Adjust focus After pointing the telescope to a target object in the distance, you can rotate the Focus wheel slightly to get fine focus. -
Page 13: Capture
4.6 Capture Turn on the telescope, target an object in distance, rotate the Focus wheel to get a fine focus, press button and a photo will be captured and saved on Micro-SD card. By pressing button, you can switch to video mode. Then you can press button to start video recording. -
Page 14: Playback
4.7 Playback Press button, you can switch to playback mode, and then you can press to scroll the captured photos and videos. 4.8 Delete At playback status, press , you can choose to delete the current file or all files. -
Page 15: Digital Zoom
4.9 Zoom in/out At previewing status, you can push the digital zoom button on the telescope body or on the capture remote to zoom in or out digitally. -
Page 16: Download Files To Computer
4.10 Download Files to Computer by USB Connect the telescope to computer by USB cable and then you can view stored photos & videos. 4.11 Output to Monitor by TV-out or HDMI-out It can output to any monitor with TV input or HDMI input. -
Page 17: Screen Menu Introductions
5. Screen Menu Introductions You can press to enter camera setup, with options as follows. 5.1 Photo Resolution At photo mode, press , you can choose to select a resolution for photo taken among 14M/12M/10M/8M/5M. 5.2 Video Resolution At video mode, press , you can choose to select a resolution for video recording between 1080P/720P. -
Page 18: Capture Mode
5.3 Capture Mode At photo mode, press , you can choose Capture Mode to setup interval capture. For example, setup the microscope to take a photo every 5 seconds. 5.4 Exposure You can adjust the Exposure Value (EV) from the menu as follows. -
Page 19: Date/Time
5.5 Date/Time Press twice, you can choose to setup system date and time. 5.6 Date Stamp At photo mode, press to choose to setup whether put date and time mark on capture photos and videos. -
Page 20: Loop Recording
5.7 TV-out Mode Press twice, you can choose to select between NTSC and PAL for the TV output of the telescope, make it compatible with that of your TV. 5.8 Loop Recording At video mode, Press to choose to setup the length of each video clip;... -
Page 21: Hdr
5.9 HDR At video mode, press to choose to setup HDR to be on or off. ON is normally selected for backlight environment. 5.10 Auto Power Off Press twice, you can choose to select a time for the telescope to power off automatically without key operation. -
Page 22: Language
5.11 Language Press twice, you can choose to setup OSD language. 5.12 Format SD Press twice, you can choose to format the inserted Micro-SD card. -
Page 23: Default Setting
5.13 Default Setting Press twice, you can choose to reset the telescope configuration to default setting. -
Page 24: Troubleshooting
6. Troubleshooting Problems Solution The unit does not turn on. Charge the battery. Ensure that the power is on. Ensure the battery capacity is enough. Adjust the object e.g. point the telescope to a The screen is blank. colorful object in the distance since the viewing field of telescope is small. - Page 25 This symbol on the product or in the instructions means that your electrical and electronic equipment should be disposed at the end of its life separately from your household waste. There are separate collection systems for recycling in the EU. For more information, please contact the local authority or your retailer where you purchased the product.
Need help?
Do you have a question about the UM053 and is the answer not in the manual?
Questions and answers