Table of Contents
Advertisement
Quick Links
Advertisement
Table of Contents

Summary of Contents for OrcaVue XL
- Page 2 * The OrcaVue XL holds a maximum of 4-5 people * Only use on a level surface * The OrcaVue Gala is intended for use with cameras such as the iPhone, iPad, and GoPro that include internal video stabilization. Videos shot using cameras without these capabilities may...
-
Page 3: Table Of Contents
Contents 1. Controller 1.1 Unit Power 1.2 Camera Arm Swing Direction 1.3 Camera Arm Swing Speed 1.4 DMX Ports 1.5 Foot Switch Pedal 1.6 Wireless Remote 2. Camera Arm 2.1 Camera Arm Base 2.2 Camera Arm Mount 2.3 Camera Arm Height – 1 Extension 2.4 Camera Arm Height –... -
Page 4: Controller
1. Controller (Figure 1) Speed DMX Ports Dial (future updates coming) AC Power Port Foot Switch Port Power Direction Knob Knob 1.1 Unit Power 1. The Power switch (PWR) controls the power to your unit, and has three positions: AC, OFF and BAT (figure 3): o Use the up position (AC) when you are powering the unit using AC power, typically from a wall outlet. -
Page 5: Camera Arm Swing Direction
1.5 Foot Switch Pedal 1. The Foot Switch Pedal is a wired solution to turn the OrcaVue unit ON or OFF. o Simply plug the foot switch cord into the Foot Switch Port (Figure 4 & 5) and ensure that the controller box has power (red light is on). -
Page 6: Wireless Remote
Figure 4 Figure 5 1.6 Wireless Remote 1. The OrcaVue remote provides a wireless means for turning your OrcaVue unit ON or OFF (Figure 7). 2. There is no need to plug anything in. Simply make sure that the controller box has power and press the remote button to Start or Stop your OrcaVue unit. -
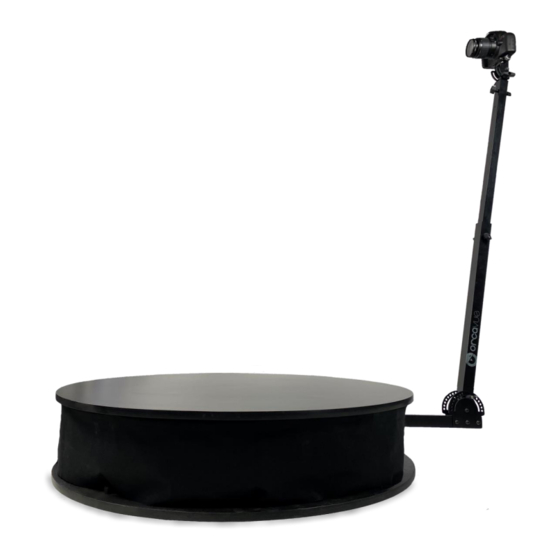
Page 7: Camera Arm
2. Camera Arm 2.1 Securing the Camera Arm Base 1. Unfold the camera arm by loosening the thumbscrew and pulling out the silver positioning pin at the pivot point (Figure 8). 2. The silver positioning pin is placed behind the arm and determines its angle. Place the pin in a hole that corresponds to your desired position. - Page 8 6. Attach the camera and shoe to the arm mount by loosening the silver nob so that the mount becomes wide enough to accommodate the shoe. (Figure 12). Camera Shoe Figure 11 Figure 10 7. Tighten the silver nob to firmly connect the shoe into the mount. (Figure 13). Silver nob Figure 12 Figure 13...
-
Page 9: Camera Arm Height - 1 St Extension
2.3 Camera Arm Height – 1 Extension 1. Adjust the height of the camera arm by removing the bottommost thumbscrew on the OrcaVue XL camera arm (Figure 14). Telescope the tube all the way up until you see the thumbscrew hole (Figure 15). -
Page 10: Camera Arm Height - 2 Nd Extension
2.4 Camera Arm Height – 2 Extension 1. Adjust the final height of the camera arm by removing the upper most thumbscrew in the middle section of the camera arm (Figure 17). Telescope the tube up or down and select one of the seven available thumbscrew holes closest to your desired height as shown in Figure 18. -
Page 11: Counterweight System
2.5 Counterweight System 1. The purpose of the counterweights (Figure 20) is to ensure that the camera arm is balanced and spins smoothly. If there is a large imbalance, you may notice inconsistent rotational speed or a wobble during rotation of the camera arm. Weight imbalances should be avoided because they place unneeded stress on the rotation mechanism and in the most severe instances could cause damage to the unit. -
Page 12: Arm Support Mode
3. Arm Support Mode 3.1 Isolation Mode The OrcaVue XL has the ability to completely isolate the camera arm from the platform by using what is known as ‘Isolation Mode.’ This setup is effective when using a camera without stabilization, and the subject is creating large amounts of movement on the platform causing the camera arm to wobble or shake. -
Page 13: Operation
For complete warranty information, please reference: https://orcavue.com/legal/commerce_terms_conditions.html 5.2 Support For additional information on using your OrcaVue unit, please go to the following page where you will find an FAQ, additional written instructions as well as videos covering both hardware and software: https://orcavue.com/support Page 13 Version 2.3... -
Page 14: Specifications
6. Specifications Page 14 Version 2.3...
Need help?
Do you have a question about the XL and is the answer not in the manual?
Questions and answers