
Summary of Contents for FlyingDutchmanPlans Goose V2
- Page 2 Link to GooseV2 playlist: https://www.youtube.com/playlist?list=PLkpKj72K3uYmgntGXOHDq5Y_r17no_eFl Link to prototype build thread : https://www.rcgroups.com/forums/showthread.php?3515473-GooseV2-new-lasercut-kit If you have any question about the GooseV2 feel free to email me at Flyingdutchmanplans@hotmail.com For questions about the kit contact Sebastiaan (owner RC-Europe.eu) at rceuropeorder@gmail.com Enjoy the build, Bart Lammerse...
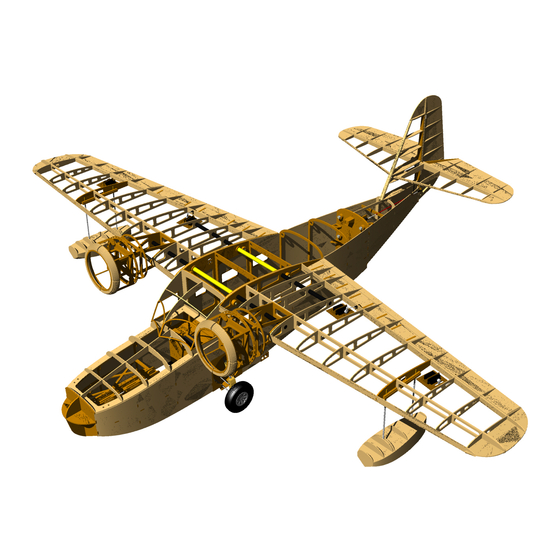
- Page 3 Build the model stand from parts on sheet 23...
- Page 5 Hardware for this build stage Pre-bend upper folding arm steel wire Pre-bend suspension arm steel wire Upper folding arm 3d printed part Lower folding arm 3d printed part Lower T-Bone 3x20mm cut to from supplied steel wire Folding hinge pin 3x12mm cut to from supplied steel wire Lower folding arm inner...
- Page 6 Lubricate the tube with grease Brass tube 5x4.1x65mm Pre bend 4mm landing gear part 3d printed upper part 3d printed lower part Steel wire hinge pin 3x12mm Steel wire lower folding arm reinforcement 3x41mm. Steel wire T-bone 3x20mm Slide the first two axle member Position the previously build folding arm parts on the suspension arms Slide the remaining axle member parts in place and glue assembly,...
- Page 7 Glue the two plywood plates to the axle member and drill 4mm hole Locknut M4 Brass tube 5x4.1x22mm (lenght may be different when not using Du-Bro wheels) Washer M4 large OD Use more washers if wheel does not clear axle member Allen bolt M4x55mm Brass tube 4x3.1mm Du-Bro 3/16'' gear straps...
- Page 8 FF-F6 FF-G1 FF-G2 FF-G1D Arrow on part points to nose...
- Page 9 Sand beveled edge FF-G4 FF-F4...
- Page 10 FF-F4D FF-G4D Install previously build retracts Nylon steering arm with 4mm hole Washer M4...
- Page 11 Threaded pushrod M2 Du-Bro EZ connector Heavy Duty .22'' Ball link M2 Washer M2 Machine screw M2x12mm Nut M2 Hitec HS-75BB Retract servo Setup linkage, mount wheels and test the retract system Du-Bro Lightweight wheel 4''...
- Page 13 Hardware for this build stage Tailwheel unit 3d printed parts Hinge pin 3x33mm Steel wire Hinge pin 2x12mm Cut from leftover m2 pushrod Hinge pin 2x7mm Cut from leftover m2 pushrod Axle 3x25mm 3mm steel wire Pushrod Cut to size Pushrod connector Metal clewis Hitec HS-85BB...
- Page 14 3d printed parts Steel wire 3x33mm 3d printed parts Steel wire 2x7mm Steel wire 3x33mm Steel wire 2x12mm Du-Bro tailwheel 1.5'' Steel wire 3x25mm...
- Page 15 Hitec HS-85BB Servo Pushrod connector Flange to attach watertight cuff Threaded pushrod M2 & metal clewis Setup linkage and test operation. Pushod may need to be bend to prevent binding to the 3d printed part...
- Page 17 Hardware for this build stage Round magnet 5x3mm Wing joiner tube 13x12.1mm Cut to from supplied brass tube Nylon screw Nylon nut Machine screw Spring or rubber band For closing gear door Gear door hinge Make from leftover pushrod & tube Spring attachment Make from pushrod inner wire Canopy lock...
- Page 18 Assemble fuselage sides Use the window frames and parts labeled 'press' on sheet 23 to form the windows. See video on YouTube for tips and tricks FF-W1 FF-W2 Window frames need to be flush with the outside of the fuselage. Make sure to build one left and one right side!
- Page 19 Fuselage boxframe sub assembly FF-F5 Assemble FF-BX1 FF-BX1 Previously build landing gear box FF-F8 FF-BX1 FF-F7...
- Page 20 Battery lock sub assembly Keep the locktab free of glue! FF-L4 FF-L2 Round magnet 5x3mm Round magnet 5x3mm FF-L3 FF-L2 FF-L1 Locktab should move without friction FF-F12 Split fuse former sub assembly FF-LC2 FF-LC1 FF-TR Canopylock determines position of support frame Nylon nuts M6 Glue canopy lock in place FF-F12D...
Need help?
Do you have a question about the Goose V2 and is the answer not in the manual?
Questions and answers