
Summary of Contents for marko MHT-QWM
- Page 1 Wall Mounted Quartz Patio Heater Model No: MHT-QWM Factory Model No: PNH-2000D Instruction Manual...
- Page 2 1. WARNINGS • This electrical appliance complies with technical safety and electromagnetic compatibility standards. • Never touch the heater while in operation due to risk of burns. • Never touch the heater with wet hands. • Never rotate the heating element of the appliance during operation. To change the tilt angle of the heating part, we advise you to wait for 15 minutes after the appliance has been switched off to allow it to cool.
- Page 3 • Children should be supervised to ensure that they do not play with the appliance. 2. VOLTAGE Before using the appliance for the first time, ensure that your mains voltage matches the rating label on the heater (220-240V). This is a class I appliance and must be earthed.
- Page 4 4. MOUNTING POSITION When choosing your mounting position, you must ensure the following: • Distance between the top of the product and the ceiling must be more than 0.5M • Distance between the side of the product and the corner must be more than 0.5M •...
- Page 5 5. ASSEMBLY Box Contents: • Patio Heater Head • Heater Control Panel Box • Black Fixing Screw (for mounting the control panel box to the heater head) • 4x Wall Mounting Screws • 4x Plastic Wall Expansion Plugs Please note: We have included expansion plugs and wall mounting screws that we believe are sufficient for securely fixing your heater.
- Page 6 B: Mark your wall with the hole positions to match the mounting plate, as shown in the diagram below. C: Using an 8mm drill, create the 4 mounting holes as marked in the previous step. The holes should be approximately 3.5cm deep. D: Put the 4 plastic expansion plugs (included) into the mounting holes one by one –...
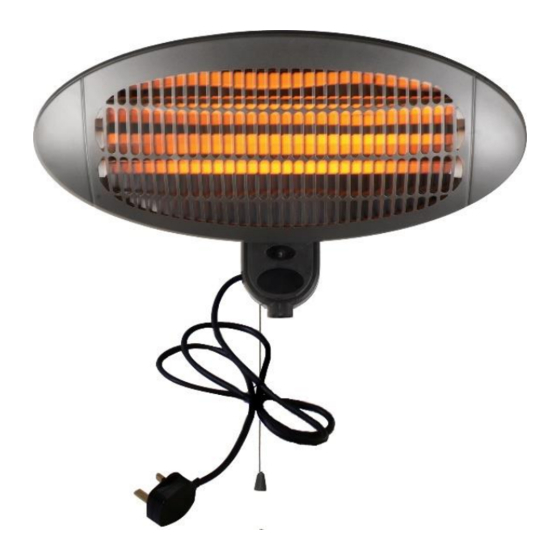
- Page 8 6. OPERATION The heater head angle can be adjusted up and down, up to 45 degrees for more directional heat. The heater is switched on by means of the pull switch. The slight vibration noticeable when the appliance is switched on will stop after a few seconds.
Need help?
Do you have a question about the MHT-QWM and is the answer not in the manual?
Questions and answers