
Summary of Contents for Aqua Communications SnakeEye III
- Page 1 SnakeEye III REMOTE VISUAL INSPECTION SYSTEM Operator’s Manual Rev. B 1.800.561.8187 information@itm.com www. .com...
-
Page 2: Table Of Contents
Contents 1. INTRODUCTION 2. OPERATING CAUTIONS and HAZARDS 3. GETTING TO KNOW YOUR SnakeEye™III 4. PUTTING IT TOGETHER Cable Connections: General Guidelines Cable Connection to the Display Unit Cable Connection to the Camera Head Extension Wand Connection to the Camera Head Finger Adapter 5. -
Page 3: Introduction
1. INTRODUCTION Congratulations on your purchase of SnakeEye™ III, the portable information device for Remote Visual Inspection (RVI) SnakeEye™ III is a hand-held, electronic appliance that incorporates the latest in remote visual inspection technology. It will provide years of reliable service when properly operated and maintained. -
Page 4: Operating Cautions And Hazards
2. OPERATING CAUTIONS and HAZARDS Symbol Legend Caution: Possible Damage to the Equipment Warning: Possible Electric Shock Failure to operate and maintain SnakeEye™III in accordance with the instructions in this manual may result in damage to the unit, damage to other personal property, or personal injury. - Page 5 Always install the cover and plugs from the IP68 kit before submersing the Display Unit in water. IP (Ingress Protection) 68 is the standard for a waterproof and dustproof cover. The IP68 Kit (RP–16), when properly installed, protects the Display Unit from submersion in 10-feet of water for one hour, and is sealed so that no dust whatsoever can enter.
-
Page 6: Getting To Know Your Snakeeye™Iii
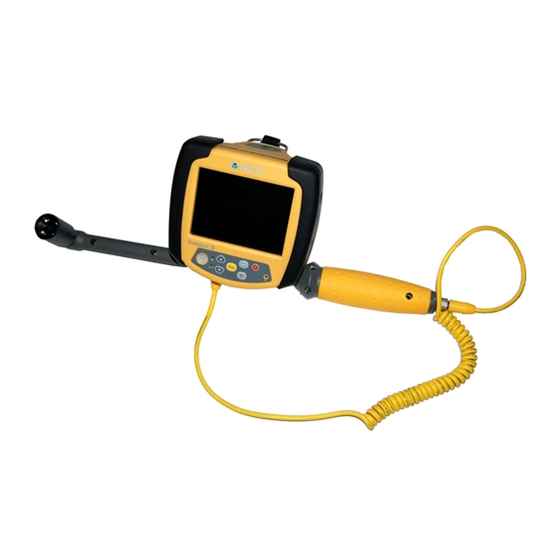
3. GETTING TO KNOW YOUR SnakeEye™III Please take a moment to familiarize yourself with the various components that comprise SnakeEye™III. P. 4 1.800.561.8187 information@itm.com www. .com... - Page 7 Part Part Picture Battery Pack (2 NiMH) OA–04 DC Adapter 12 Volt & Power RP–09 Cord AC Adapter (Universal) RP-16 LED Camera RP–02 a. Front: LED Lights and Lens b. Rear: Connector 4-foot Cable RP–03 P. 5 1.800.561.8187 information@itm.com www. .com...
- Page 8 18 Inch Wand with Swivel Mount RP–04 Finger Adapter RP–06 IP68 Kit RP-17 Battery Charger RP–07 a. Power LED b. Charging LED c. Refresh LED d. Battery Catch Space Reserved for C-Mount OA-01 Optional Accessory Camera Space Reserved for Spare OA-04 Optional Accessory Batteries...
- Page 9 Display Unit RP-01- 12.1 Operating Panel a. Camera LEDs key b. Mirror/Flip Image key c. Audio Record key d. Snapshot key 12.2 Post-production Panel e. Speaker f. Low Battery Indicator g. SD Card Indicator h. ▲ (Up Arrow key) i. ▼ (Down Arrow key) j Menu key k.
- Page 10 12.3 SD Card and USB Port o. Secure Digital Card Slot p. USB Port q. Hole for Cover Screw r. SD Card Cover (IP68) 12.4 Ports & Battery Chamber s. Battery Chamber t. Connector to Cable u. Video In/Out v. DC Power In w.
-
Page 11: Putting It Together
Cable Connections: General Guidelines The cable connector pins must be properly seated and the cable nuts properly tightened in order to effect a proper connection. In the SnakeEye III system, all male connectors are the same, and all female connectors are the same. -
Page 12: Extension Wand Connection To The Camera Head
d. Extension Wand Connection to the Camera Head When connecting an extension wand to the camera head, again use caution. The Extension Wand is designed to extend the effective operating range of the unit. This accessory comprises a rigid handle, unidirectional swivel mount and a sliding switch which controls the angle of the Camera Head (from 0°... -
Page 13: Powering Up
5. POWERING UP SnakeEye™III is powered by one of three sources, each supplied with the unit: Power by 6 volt DC Battery Pack. SnakeEye™III is supplied with two interchangeable, rechargeable Nickel Metal Hydride (NiMH) Battery Packs. Power by 12 volt DC current supplied directly by the DC Adapter (plugged into an automobile cigarette lighter or Aqua’s optional EnergyBox™... -
Page 14: Power By Ac
The fuse is spring loaded and caution must be taken to ensure that the spring does not "fly out" of the end of the fuse compartment when it is opened. Replacement fuses are available at most electronic supply and hardware stores. Replace only with the same rating. -
Page 15: How To Operate: "Lights, Camera, Action
If there are no problems found, the SnakeEye III will go into its “Live Video Mode”. To turn off the SnakeEye III, the user needs to press and hold the “Power” button for one second, or until he/she hears a beep tone. The user can then release the “Power” button to turn off the system. - Page 16 When this happens, the system will display the remaining available SD card storage space at the top right corner of the display screen and stop the audio recording function. SnakeEye III will create a file name according to the following format: YYYYMMDDHHMMSSXX.wav (YYYY: Year;...
- Page 17 5. Go to the “Menu Mode” by pressing the “Menu” button on the postproduction keypad. Menu Mode: In the “Menu Mode”, the SnakeEye III allows you to: 1. Review the images recorded by selecting the “Photo Playback” on-screen-commend. In the “Photo Playback”...
- Page 18 When the user connects the SnakeEye to a computer using the USB port, the user can control the SD card of the SnakeEye III and download/edit/delete files the same as they could on any other external storage media. Add Voice on Specified Image: When reviewing the full-screen image, the user can add a voice note linking to the current image by clicking the “Audio Recording”...
- Page 19 “Microphone” icon and the timer begins counting. The SnakeEye III will create an audio file with the same file name as the image file but will be followed by the .wav extension. This special voice note file will NOT be listed on the audio file list when the user selects “Audio Playback”...
- Page 20 2X. When in the “2X Mode”, the SnakeEye III will enlarge the image taken by the camera head 100%. Caution: Once the “2X” Mode” has been chosen, all images taken will be “2X”...
- Page 21 “Function Key” mode and make the changes, or the user can simply power off the SnakeEye III and the system will return to the default values, which are “Zoom (1X); Backlight (Off); and Enhance (Off)”.
- Page 22 4.2 “Time Stamp” on/off once highlighted, press the “Enter” key to toggle the time stamp on/off. When “on”, the date and time will be displayed on the screen and recorded on any images taken. When “off” the date and time will not be on the screen and will not be recorded on any images taken.
- Page 23 “Key Beep” Once highlighted, the user can set the volume level for the “Key Beep” to mute, low, medium, or high for each key stroke. While “Key Beep” is highlighted, the user can press the “Enter” key to toggle between the volume levels. This volume change will be indicated right after the “KEY BEEP”...
- Page 24 You can also delete all files from the SD card. Turn on the PC before you connect the USB cable from PC to the SnakeEye III. Then, the PC will automatically detect SnakeEye III as an external storage media while you turn on the SnakeEye III. P. 22 1.800.561.8187...
- Page 25 Make It IP68 Compliant To make SnakeEye III IP68 compliant, the user MUST insert a fully-charged battery into battery compartment and then attach the following items: 1. Microphone Cover 2. Speakerphone Cover 3. SD Card Cover 4. Access Cover (user doesn’t have to use this part if the IP68 is not required for easier operation) 5.
- Page 26 Step 4: Ensure the Access Cover is properly installed for dustproof/waterproof. Step 5: Install Microphone Cover Step 6: Install Speakerphone Cover Step 7: Install SD Card Cover & Tighten Screw Step 8: Connect cable to Display Unit & Camera Head P.
-
Page 27: Maintenance
7. MAINTENANCE Clean the Camera Head and all other parts/accessories only with a clean, damp cloth after using the products. The battery must be refreshed when it is brand-new and/or is stored for an extended period of time. The Refresh switch is designed to activate a dormant battery due to long storage cycle or possibly re-energize a used battery that has gone through many charge/discharge cycles. -
Page 28: Troubleshooting
8. TROUBLESHOOTING Although the SnakeEye™III is a technologically sophisticated tool, most problems are simple to identify and resolve. Should you encounter a problem, please refer to the following guide before contacting us. Problem Possible Cause Solution Power indicator light not on Dead Battery Replace with charged battery Battery not properly seated... -
Page 29: Optional Accessories
Never use replacement parts from any source other than Aqua Communications. Use of such parts may damage the unit or create hazardous conditions and will void the warranty. The following SnakeEye™III accessories are available through Aqua Communications or authorized Distributors: Part No. - Page 30 RP-04 Rigid Wand Adapter RP-04-3 3 Foot Wand RP-05 Finger Adapter RP-07 Battery Charger RP-08-01 AC Adapter (120V) RP-09 DC Adapter RP-10 Video I/O Cable RP-11 Carry Case RP-12 Camera Lens Cap (3) for SE I RP-12-1 Camera Lens Cap (1) for SE II RP-13 Display Window RP-14...
-
Page 31: C-Mount Camera (Part Number Oa-01)
C-Mount Camera (Part Number OA-01) This accessory adapts SnakeEye™III to bore scopes and fiberscopes, providing visual access to areas as small as 4 mm in diameter. Whereas inspection through a borescope or fiberscope may be limited to one individual viewing an area through a single eyepiece, this optional configuration allows numerous individuals to view the same area as a full color image on the SnakeEye™III Display Unit. -
Page 32: Gooseneck Adapter (Part Number Oa-06)
Thread C-Mount Adapter (not included) into C-Mount Spacer. Because some fiberscopes and borescopes require a proprietary adapter, consult with the reseller or manufacturer of your fiberscope or borescope (not included) to ensure that you acquire the right part. Connect eyepiece of fiberscope or borescope to C-Mount Adapter. *Refer to Fiberscope/Borescope Manual before powering up. -
Page 33: Energybox™ (Part No. Oa-09)
Output : 12Vdc, 8.5Ah (which can power up two 12V DC appliances at the same time. If it only provides power to a SnakeEye III, it can run for ten hours and up). Dimension : 173 * 73 * 86mm (excluding the cable and belt). -
Page 34: Telescoping Pole (Part No. Oa-07-N)
Telescoping Pole (Part No. OA-07-n) Camera and Display mounting platform to extend the viewing reach of SnakeEye. Each pole has multiple extension locking positions spaced at six-inch intervals. The pole may be rotated within the handle to give 360° viewing. The camera head may be articulated 130°... - Page 35 The Display Unit can be tilted for a better viewing angle when the pole is tilted up or down. The Pole can be pivoted within the handle to pan the camera around. Hold the pole beyond the display for best balance and comfort. P.
-
Page 36: Sun Shield (Part No. Oa-06)
Sun Shield (Part No. OA-06) Attach the supplied self-adhesive Velcro to the front of the SnakeEye™ display as shown in the illustration nearby. The sunshield can now be attached. The Sunshield is attached by folding into a rectangular shape as shown in the photograph. -
Page 37: Operating The Battery Charger
capacity and shut down the charge cycle before the battery reaches maximum capacity due to high temperature protection termination within the charger. Operating the Battery Charger In situations where fully charged batteries are required to be on hand at all times a battery maintenance program must be employed. -
Page 38: Snakeeye™Iii Limited Warranty
10. SnakeEye™III LIMITED WARRANTY "We," "our" or "us" refers to Aqua Communications, the manufacturer of SnakeEye™III. "You" or "your" refers to the original owner of the SnakeEye™ unit covered under this warranty. The name of the original owner is to be noted on the enclosed Warranty Card.
Need help?
Do you have a question about the SnakeEye III and is the answer not in the manual?
Questions and answers