Table of Contents
Advertisement
Advertisement
Table of Contents

Related Manuals for Progeny Preva Dental X-Ray System

Summary of Contents for Progeny Preva Dental X-Ray System
- Page 1 Preva Dental X-Ray System User Manual 00-02-1576 Rev. L ECN: P1647...
- Page 2 Modifications and/or additions to the equipment may only be carried out by Progeny Dental or by third parties expressly authorized by Progeny Dental to do so. Such changes must comply with legal requirements as well as with the generally accepted technical rules.
- Page 3 More Than Imaging. Excellence. Progeny Dental 675 Heathrow Drive Lincolnshire, Illinois 60069 U.S.A. Phone: (888) 924-3800 Fax: (847) 415-9801 WWW.progenydental.com...
- Page 4 Preva Dental X-Ray System User Manual 00-02-1576 Rev. L ECN: P1647 Progeny Dental 675 Heathrow Dr. Lincolnshire, Illinois 60069 U.S.A. Phone: (888) 924-3800 Fax: (847) 415-9801 WWW.progenydental.com...
- Page 5 © Progeny Dental 2006, U.S. Patents D470237, D469182, D470589, 6,837,468, and 6,664,853...
-
Page 6: Table Of Contents
Authorized Representatives ......................5 Safety ............................5 Explanation of Symbols on Technical Labels................6 Obtaining Technical Support.....................6 Operating the Preva Dental X-Ray System ..............7 Using the Operator Panel ......................7 Taking an X-Ray ........................9 Using the 12 inch Cone (30-A2033)..................10 Recommended Maintenance ..................11 Regular Maintenance ......................11... -
Page 7: General Information
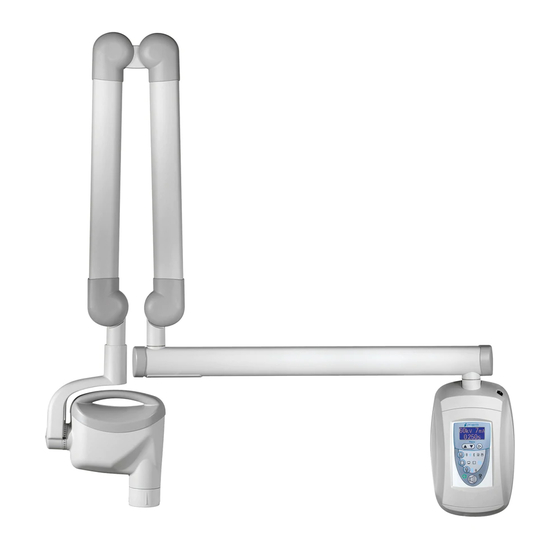
See Appendix A for the installation instructions for the mobile unit. The Preva Dental X-Ray System should only be installed and serviced by approved Installation Progeny dealer personnel. Contact Progeny at (888) 924-3800 if you need assistance and Service locating an approved dealer. - Page 8 General Information Preva Figure 1 Component Diagram Caution: Do not hang lead aprons on the horizontal extension arm.
-
Page 9: Compliance With Applicable Standards
Radiation Performance Standards 21 CFR, Subchapter J, at the time of Protection manufacture. The certified components of the Preva Dental X-Ray System comply with IEC 60601-1-3 Radiation protection/x-ray equipment. Classified by Underwriters Laboratories Inc. with respect to electrical shock, fire... -
Page 10: Ec Declaration Of Conformity
ISO 13485 EN46001 FDA 510K File Number K043092 Progeny, Inc. declares that the products described herein meet all the applicable Declaration Essential Requirements of the EC Medical Device Directive 93/42/EEC in Annex I. For Class IIb products described herein, the product is manufactured,... -
Page 11: Authorized Representatives
• The Preva Dental X-Ray System is ordinary type medical equipment without protection against ingress of liquids. To protect against short-circuit and corrosion, no water or any other liquid should be allowed to leak inside the equipment. -
Page 12: Explanation Of Symbols On Technical Labels
THIS X-RAY UNIT MAY BE DANGEROUS TO PATIENT AND OPERATOR UNLESS SAFE EXPOSURE FACTORS AND OPERATING INSTRUCTIONS ARE OBSERVED. X-RAY EMISSION Mains HOT WIRE Mains NEUTRAL WIRE Earth Ground Obtaining Technical Support PROGENY DENTAL Contact 675 Heathrow Dr. Lincolnshire, Illinois 60069 U.S.A. Phone: 888-924-3800 Fax: 847-415-9801 techsupport@progenydental.com... -
Page 13: Operating The Preva Dental X-Ray System
Preva Operating the Preva Dental X-Ray System Using the Operator Panel When the Preva Dental X-Ray System is powered on, the Operator Panel Power On selections are those that were in use when the system was last powered off. Settings... - Page 14 Operating Instructions Preva Exposure When the system is powered on, the Operator Panel, Figure 2, displays the exposure settings (kV, mA, and seconds) for the currently selected tooth, image Settings receptor type, and patient size. Use the Tooth Selection, Image Receptor Type, and Patient Size buttons to select other exposure settings.
-
Page 15: Taking An X-Ray
Operating Instructions Preva Taking an X-Ray 1. Turn the power switch, located at the upper right of the Control Unit, to the “On” position. The Ready Indicator on the front of the Operator Panel, Figure 2, will light. 2. Verify that the unit is set for the correct Image Receptor Type. The icon for the currently selected Image Receptor Type is illuminated. -
Page 16: Using The 12 Inch Cone (30-A2033)
Preva Using the 12 inch Cone (30-A2033) The Preva Dental X-Ray System is factory set for use with the standard supplied 8 inch (20 cm) Cone. The 12 inch (30 cm) Cone (30-A2033) is available. Using the longer cone requires longer exposure times. See the System Configuration... -
Page 17: Recommended Maintenance
This maintenance program should consist of annual system function checking. It is the owner’s responsibility to arrange for this service and to assure that the personnel performing this are fully qualified to service Progeny Dental x- ray equipment. Cleaning and Disinfecting... -
Page 18: Checking System Functions
Preva Checking System Functions The following checks must be performed to complete the installation of the Preva Dental X-Ray System and as part of the recommended maintenance as indicated in the User Manual. Failure to perform these checks may result in an installation that does not comply with U.S. Radiation Performance Standards 21 CFR Subchapter J. -
Page 19: System Function Checklist
Checking System Functions Preva System Function Checklist Ensure that the wall support is adequate and that the system is properly Wall Mounting mounted to the wall. Ensure that all certified components bear labels that include the model and Labels serial number, date of manufacture and a statement of certification as noted elsewhere in this manual. -
Page 20: New Tube Seasoning Procedure
Checking System Functions Preva New Tube Seasoning Procedure X-ray tubes that sit dormant for several months can become electrically unstable. To remedy this condition, it is recommended you perform a “new tube seasoning procedure.” This process establishes stable high voltage operation and will ultimately extend the life of the tube. -
Page 21: Solving Performance Issues
After five seconds, the system will return to the normal operating Error condition. Be advised that this will result in an underexposed image. Obtaining Technical Support Contact PROGENY DENTAL 675 Heathrow Dr. Lincolnshire, Illinois 60069 U.S.A. Phone: 888-924-3800 Fax: 847-415-9801... -
Page 22: Pre-Programmed Exposure Times
The tables below show the factory default exposure settings for each combination of Tooth, Image Receptor Type, and Patient Size on the Operator Panel. These exposure settings can be modified using the System Configuration mode. See the System Configuration section for details. 8-inch Cone Progeny® Schick Dexis® Ph. Plate... -
Page 23: System Configuration
System Configuration Preva Changing Language Five languages are preprogrammed in the display panel. To change follow the steps below. 1. Push and hold the Tooth and Patient selection switches, a menu screen will appear after about 5 seconds. (See Figure 34A) 2. -
Page 24: System Configuration Mode
System Configuration Preva System Configuration System Configuration Mode The Preva Dental X-Ray System has a software-driven system configuration About System mode. When the Preva is in system configuration mode, you can perform the Configuration following procedures: Mode • Adjusting the Display •... -
Page 25: Adjusting The Display
Preva Adjusting the Display The Preva Dental X-Ray System allows the operator to adjust the display image. 1. From the system configuration main menu, shown in Figure 3, select ADJUST DISPLAY. You will see the Display Options menu shown in Figure 2. -
Page 26: Changing Pre-Programmed Exposure Settings
Preva Changing Pre-programmed Exposure Settings The Preva Dental X-Ray System allows the operator to increase or decrease image density for all presets for a receptor simultaneously or to change each of the technique factors for a preset individually. You can also restore factory default settings. - Page 27 System Configuration Preva Preprogramming 1. Energize the system. 2. Press the Tooth Selection and Patient Size Selection buttons for five full to Digital seconds. Sensors 3. Select CHANGE PRESETS from the Menu Options screen. 4. Select SELECT RECEPTOR from the Preset Options menu (Figure 5). 5.
- Page 28 System Configuration Preva Other Digital Exposure Settings The tables below show other exposure settings for each combination of Tooth, Image Receptor Type and Patient Size on the Operator Panel. These exposure settings can be programmed, see the System Configuration section for details; “Changing Pre-programmed Exposure Setting”; “Change Presets Individually”.
- Page 29 System Configuration Preva Record Your Pre-programmed Exposure Settings If the pre-programmed exposure settings do not produce the density desired, adjust the settings using System Configuration mode. Record your settings in the table below. 8 inch (20 cm) Cone Digital Receptor D-speed Film E/F Speed Film Tooth Selection...
- Page 30 System Configuration Preva 12 inch (20 cm) Cone Digital Receptor D-speed Film E/F Speed Film Tooth Selection Setting Adult Child Adult Child Adult Child Incisor seconds Bicuspid seconds Bitewing seconds Lower Molar seconds Upper Molar seconds...
-
Page 31: Showing Current System Configuration
System Configuration Preva Showing Current System Configuration The Preva Dental X-Ray System displays the current system configuration. This display is informational only. 1. From the Main System Configuration menu, shown in Figure 3, select CONFIGURE UNIT. You will see the Configuration menu shown in Figure 2. -
Page 32: Changing The Cone Size
Set Configuration menu, Figure 7, with options to change the cone size. The Preva Dental X-Ray System is factory set for use with the standard supplied 8 inch (20 cm) Cone. The 12 inch (30 cm) Cone (30-A2033) is available. -
Page 33: Diagnostic Mode
System Configuration Preva Diagnostic Mode The Preva Dental X-Ray System has a diagnostic mode in which you can display About a summary of maintenance data or display feedback values after each exposure. Diagnostic Mode 1. From the Main System Configuration menu, shown in Figure 3, select Showing the CONFIGURE UNIT. -
Page 34: Specifications
Specifications Preva Specifications Preva Dental X-Ray System The following specifications contain information required to be provided to the user per Federal Regulation 21 CFR. 100-230 VAC +/- 10% 50/60 Hz Line Voltage Line Load Max. current 5 amps Maximum Rated... - Page 35 Specifications Preva Figure 8 Tube Rating Charts...
Need help?
Do you have a question about the Preva Dental X-Ray System and is the answer not in the manual?
Questions and answers
I have an error message that the MA Level is too low
The error message "MA Level is too low" on the Progeny Preva Dental X-Ray System means that the selected milliampere (mA) setting is below the required level to produce a proper x-ray exposure. This could result in an underexposed image. The operator may need to increase the mA setting to achieve the desired image density.
This answer is automatically generated
our on/off switch turns off after we turn it on...what could be the cuase?