Table of Contents
Advertisement
Available languages
Available languages
Quick Links
Advertisement
Table of Contents

Related Manuals for Axis Washer Kit A

Summary of Contents for Axis Washer Kit A
- Page 1 AXIS Washer Kit A Installation Guide...
- Page 2 Every care has been taken in the preparation of this and used in accordance with the instructions, may cause document. Please inform your local Axis office of any harmful interference to radio communications. However, inaccuracies or omissions. Axis Communications AB cannot...
- Page 3 Internet, you can: • find answers to resolved problems in the FAQ database. Search by product, category, or phrase • report problems to Axis support staff by logging in to your private support area • chat with Axis support staff •...
-
Page 5: Hazard Levels
AXIS Washer Kit A Safety Information Read through this Installation Guide carefully before installing the product. Keep the Installation Guide for future reference. Hazard Levels DANGER Indicates a hazardous situation which, if not avoided, will result in death or serious injury. - Page 6 • Use only accessories that comply with technical specification of the product. These can be provided by Axis or a third party. • Use only spare parts provided by or recommended by Axis. • Do not attempt to repair the product by yourself. Contact Axis support or your Axis reseller for service matters. Transportation...
-
Page 7: Package Contents
AXIS Washer Kit A Installation Guide This Installation Guide provides instructions for installing AXIS Washer Kit A. Package Contents • Washer Kit • Strap • Silicon sheath • Pipe connector • Washer pipe support • Locking bracket for pipe support •... -
Page 8: Hardware Overview
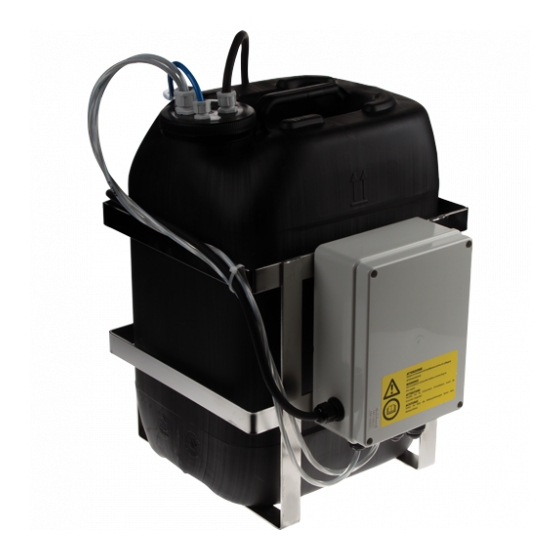
AXIS Washer Kit A Hardware Overview 230V 120V FUS1 FUS2 FUS3 RS485 Tank Metal cage Connection box Control terminal J9 Power supply terminal Fuse positions Specifications Operating Conditions Maximum temperature Minimum temperature Minimum temperature Antifreeze liquid in solution Antifreeze liquid in solution... -
Page 9: Power Consumption
120V • Fuses AXIS Washer Kit A comes with a pre-mounted fuse for 230V in position FUS1. If the power supply is different, remove the fuse from position FUS1 and insert it in correct position (FUS2 or FUS3). See table. -
Page 10: Install The Hardware
AXIS Washer Kit A See Hardware Overview for fuse positions. NO TICE TICE TICE • Make sure that the power source and connecting cables are suitable for the power consumption of the system. • Use a power cable that is suitable for outdoor use. -
Page 11: Pump Connection
AXIS Washer Kit A Neutral (N) Phase (L ) Earth Silicone sheath Strap NO TICE TICE TICE • The Earth cable should be about 10mm longer than the other two, so that it will not be disconnected accidentally if pulled. -
Page 12: Washer Installation
AXIS Washer Kit A 220mm 120mm Plug Float Pump NO TICE TICE TICE Do not to start the pump when the tank is empty. Washer Installation Support unit Cable glands Washer pipe support Base unit... - Page 13 AXIS Washer Kit A Screws Washers Screw gaskets Gasket Fastening the support unit, place the washer pipe support in the desired position. Insert the cables inside the support so that they protrude by about 50cm. Insert the cable in the cable glands.
-
Page 14: Further Information
To calibrate the jet, direct the nozzle towards the glass of the housing. See image below Further Information For the latest version of this document, see www.axis.com Visit Axis learning center www.axis.com/academy for useful trainings, webinars, tutorials and guides. -
Page 15: Warranty Information
AXIS Washer Kit A Warranty Information For information about Axis’ product warranty and thereto related information, see www.axis.com/warranty/... -
Page 17: Niveaux De Risques
AXIS Washer Kit A Informations sur la sécurité Lisez attentivement ce guide d'installation avant d'installer l'appareil. Conservez le guide d'installation pour toute référence ultérieure. Niveaux de risques DANGER Indique une situation dangereuse qui, si elle n'est pas évitée, entraînera le décès ou des blessures graves. - Page 18 • Le produit Axis doit être installé par un professionnel habilité. A A A VIS • Le produit Axis doit être utilisé conformément aux lois et règlementations locales en vigueur. • Conserver ce produit Axis dans un environnement sec et ventilé.
-
Page 19: Guide D'installation
AXIS Washer Kit A Guide d'installation Ce guide d’installation vous explique comment installer le dispositif de lavage A AXIS. Contenu de l’emballage • Dispositif de lavage • Sangle • Gaine en silicone • Raccord tuyau • Support tuyau du dispositif de lavage •... -
Page 20: Aperçu Du Matériel
AXIS Washer Kit A Aperçu du matériel 230V 120V FUS1 FUS2 FUS3 RS485 Réservoir Cage métallique Boîtier de raccordement Borne de commande J9 Borne d’alimentation Positions du fusible Caractéristiques techniques Conditions d’utilisation Température maximale Température minimale Température minimale Liquide antigel dans solution Liquide antigel dans solution (performance maxi.) -
Page 21: Consommation Électrique
24 V Fusibles Le dispositif de lavage A AXIS est livré avec un fusible préinstallé pour le 230 V en position FUS1. Si l'alimentation est différente, retirez le fusible de la position FUS1 et insérez-le dans la position qui convient (FUS2 ou FUS3). Voir le tableau. -
Page 22: Installation Du Matériel
AXIS Washer Kit A cf. Aperçu du matériel pour la position des fusibles. A A A VIS • Vérifiez que les câbles d'alimentation et de raccordement conviennent à la consommation électrique du système. • Utilisez un câble d'alimentation adapté à une utilisation en extérieur. -
Page 23: Installation De La Pompe
AXIS Washer Kit A Neutral (N) Phase (L ) Earth Gaine en silicone Sangle A A A VIS • Pour éviter toute déconnexion intempestive, le fil de mise à la terre doit être plus long d'environ 10 mm que les deux autres fils. - Page 24 AXIS Washer Kit A 220mm 120mm Bouchon Flotteur Pompe A A A VIS Ne jamais démarrer la pompe si le réservoir est vide. Installation du système de nettoyage Support Presse-étoupes Support tuyau du dispositif de lavage Unité de base...
- Page 25 AXIS Washer Kit A Rondelles Joints de vis Joint Au moment de fixer le support, placez le support tuyau du dispositif de lavage dans la position souhaitée. Insérez les câbles à l'intérieur du support de sorte qu'ils dépassent d'environ 50 cm. Insérez le câble dans les presse-étoupes. En gardant l'unité de base à environ 20 cm (7,9 po) du support, serrez les presse-étoupes.
- Page 26 Pour obtenir plus de renseignements Pour la dernière version de ce document, consultez le site www.axis.com Visitez le centre d’apprentissage en ligne Axis sur le site www.axis.com/academy pour en savoir plus sur les formations, les webinaires, les tutoriels et les guides.
-
Page 27: Informations Sur La Garantie
AXIS Washer Kit A Informations sur la garantie Pour obtenir de plus amples informations sur la garantie du produit AXIS et des renseignements connexes, allez sur le site www.axis.com/warranty/... -
Page 29: Weitere Nachrichtenstufen
AXIS Washer Kit A Sicherheitsinformation Lesen Sie das Installationshandbuch sorgfältig durch bevor sie das Produkt installieren. Bewahren Sie das Installationshandbuch für zukünftige Zwecke auf. Gefährdungsstufen GEFAHR Weist auf eine gefährliche Situation hin, welche, falls nicht verhindert, zu Tod oder schweren Verletzungen führt. - Page 30 Bestimmungen erfolgen. • Lagern Sie das Axis Produkt in einer trockenen und belüfteten Umgebung. • Achten Sie darauf, dass das Axis Produkt weder Stößen noch starkem Druck ausgesetzt ist. • Achten Sie darauf, dass das Axis Produkt keinen Vibrationen ausgesetzt ist.
- Page 31 AXIS Washer Kit A Installationsanleitung In dieser Anleitung wird die Installation der AXIS Waschanlage A beschrieben. Lieferumfang • Waschanlage • Kabelbinder • Silikonummantelung • Rohrverbindungsstück • Rohrhalterung • Klemme für Rohrhalterung • Zufuhrrohr • Wascherrohr (mit Düse) • Bolzen •...
-
Page 32: Übersicht Über Die Hardware
AXIS Washer Kit A Übersicht über die Hardware 230V 120V FUS1 FUS2 FUS3 RS485 Tank Metallkäfig Anschlusskasten Steuerungsanschluss J9 Netzteilanschluss Position der Sicherungen Technische Daten Betriebsbedingungen Maximale Temperatur Minimale Temperatur Minimale Temperatur Frostschutzmittellösung (volle Frostschutzmittellösung Leistung) (reduzierte Leistung) 60 °C -10 °C... - Page 33 24 V Sicherungen Die AXIS Waschanlage A wird mit einer 230-V-Sicherung auf Position FUS1 geliefert. Entfernen Sie bei einer anderen Versorgungsspannung die Sicherung aus Position FUS1 und setzen Sie diese an der richtigen Position (FUS2 oder FUS3) ein. Siehe Tabelle.
-
Page 34: Installieren Der Hardware
AXIS Washer Kit A Informationen zu Sicherungspositionen finden Sie unter Übersicht über die Hardware. HINWEIS HINWEIS HINWEIS • Stellen Sie sicher, dass die Stromquelle und die Anschlusskabel für den Stromverbrauch des Systems geeignet sind. • Verwenden Sie ein für den Einsatz im Außenbereich geeignetes Netzkabel. - Page 35 AXIS Washer Kit A Neutral (N) Phase (L ) Earth Silikonummantelung Kabelbinder HINWEIS HINWEIS HINWEIS • Der Erdungsleiter sollte etwa 10 mm länger sein als die beiden anderen, sodass dieser bei Zugbelastung nicht unbeabsichtigt getrennt wird. • Alle Leiter der Anschlüsse müssen von den anderen Niedrigspannungsstromkreisen getrennt werden.
- Page 36 AXIS Washer Kit A 220mm 120mm Stopfen Schwimmer Pumpe HINWEIS HINWEIS HINWEIS Nehmen Sie die Pumpe nicht bei leerem Tank in Betrieb. Installation der Waschanlage Halterung Kabelverschraubungen Rohrhalterung Geräteeinheit...
- Page 37 AXIS Washer Kit A Schrauben Unterlegscheiben Schraubendichtungen Dichtung Platzieren Sie beim Befestigen der Halterung die Rohrhalterung in der gewünschten Position. Ziehen Sie die Kabel durch die Halterung, bis diese etwa um 50 cm herausragen. Führen Sie die Kabel durch die Kabelverschraubungen. Sorgen Sie für einen Abstand von etwa 20 cm zwischen Geräteeinheit und Halterung.
-
Page 38: Weitere Informationen
Schließen Sie den Zufuhrschlauch an. Richten Sie die Düse auf das Glas des Gehäuses, um den Strahl einzustellen. Siehe folgende Abbildung. Weitere Informationen Unter www.axis.com finden Sie die neuste Version dieses Dokuments. Besuchen Sie das Axis-Schulungszentrum www.axis.com/academy für anregende Schulungen, Webinare, Lernprogramme und Anleitungen. - Page 39 AXIS Washer Kit A Gewährleistungsinformationen Informationen zur Gewährleistung der Axis Produkte und andere, hierzu relevante Informationen, finden Sie unter www.axis.com/warranty/...
-
Page 41: Livelli Di Pericolo
AXIS Washer Kit A Informazioni di sicurezza Leggere con attenzione questa guida all'installazione prima di installare il dispositivo. Conservare questo documento per usi futuri. Livelli di pericolo PERICOLO Indica una situazione pericolosa che, se non evitata, provoca morte o lesioni gravi. - Page 42 VVISO VVISO • Il dispositivo Axis deve essere utilizzato in conformità alle leggi e alle disposizioni locali. • Conservare il dispositivo Axis in un ambiente asciutto e ventilato. • Evitare di esporre il dispositivo Axis a urti o pressioni eccessive.
-
Page 43: Guida All'installazione
AXIS Washer Kit A Guida all'installazione La presente guida all'installazione fornisce le istruzioni necessarie per installare il kit rondella AXIS A. Contenuto della confezione • Kit rondella • Fascetta • Guaina in silicone • Connettore del tubo • Supporto tubo della rondella •... -
Page 44: Panoramica Dell'hardware
AXIS Washer Kit A Panoramica dell'hardware 230V 120V FUS1 FUS2 FUS3 RS485 Serbatoio Gabbia in metallo Scatola di connessione Morsettiera di controllo J9 Terminale alimentatore Posizioni dei fusibili Dati tecnici Condizioni di funzionamento Temperatura massima Temperatura minima Temperatura minima Liquido antigelo in soluzione... -
Page 45: Consumo Energetico
120V • Fusibili Il kit rondella AXIS A viene fornito con un fusibile premontato per 230V in posizione FUS1. Se l'alimentatore è diverso, rimuovere il fusibile dalla posizione FUS1 e inserirlo nella posizione corretta (FUS2 o FUS3). Vedere la tabella. -
Page 46: Installazione Dell'hardware
AXIS Washer Kit A 120 VCA FUS2 24 VCA FUS3 Per le posizioni dei fusibili, vedere Panoramica dell'hardware. A A A VVISO VVISO VVISO • Assicurarsi che la sorgente di alimentazione e i cavi di collegamento siano adatti per il consumo energetico del sistema. - Page 47 AXIS Washer Kit A Neutral (N) Phase (L ) Earth Guaina in silicone Fascetta A A A VVISO VVISO VVISO • Il cavo di terra deve essere circa 10 mm più lungo degli altri due cavi, per evitare lo scollegamento accidentale.
- Page 48 AXIS Washer Kit A 220mm 120mm Tappo Galleggiante Pompa A A A VVISO VVISO VVISO Non avviare la pompa quando il serbatoio è vuoto. Installazione della rondella Unità di supporto Pressacavi Supporto tubo della rondella Unità base...
- Page 49 AXIS Washer Kit A Viti Rondelle Guarnizioni viti Guarnizione Per fissare l'unità di supporto, posizionare il supporto tubo della rondella nella posizione desiderata. Inserire i cavi all'interno del supporto in modo che sporgano di circa 50 cm. Inserire il cavo nei pressacavi.
-
Page 50: Ulteriori Informazioni
Per calibrare il getto, dirigere l'ugello verso il vetro della custodia. Vedere l'illustrazione seguente. Ulteriori Informazioni Per la versione più recente di questo documento, visitare il sito all'indirizzo www.axis.com Visitare il centro di apprendimento Axis alla pagina www.axis.com/academy per servizi di... -
Page 51: Informazioni Sulla Garanzia
AXIS Washer Kit A Informazioni sulla garanzia Per informazioni sulla garanzia del dispositivo Axis e informazioni ad esso relative, consultare la pagina www.axis.com/warranty/... -
Page 53: Niveles De Peligro
AXIS Washer Kit A Información de seguridad Lea esta Guía de instalación con atención antes de instalar el producto. Guarde la Guía de instalación para poder consultarla en otro momento. Niveles de peligro PELIGRO Indica una situación peligrosa que, si no se evita, provocará lesiones graves o la muerte. - Page 54 VISO VISO • El producto de Axis debe utilizarse de acuerdo con la legislación y la normativa locales. • Almacene el producto de Axis en un entorno seco y ventilado. • Evite la exposición del producto de Axis a choques o a una fuerte presión.
-
Page 55: Guía De Instalación
AXIS Washer Kit A Guía de instalación Esta guía de instalación incluye las instrucciones necesarias para instalar el kit A del limpiador AXIS. Contenido del paquete • Kit de limpiador • Brida • Cubierta de silicona • Conector de la tubería •... -
Page 56: Información General Del Hardware
AXIS Washer Kit A Información general del hardware 230V 120V FUS1 FUS2 FUS3 RS485 Depósito Cesta metálica Caja de conexiones Terminal de control J9 Terminal de fuente de alimentación Posiciones de los fusibles... -
Page 57: Especificaciones
24 V Fusibles El kit A del limpiador AXIS incluye un fusible premontado de 230 V colocado en la posición FUS1. Si la fuente de alimentación es diferente, extraiga el fusible de la posición FUS1 e insértelo en la posición correcta (FUS2 o FUS3). Vea la tabla. -
Page 58: Instalación Del Hardware
AXIS Washer Kit A ATENCIÓN • Las conexiones eléctricas se deben realizar con la fuente de alimentación desconectada y el disyuntor abierto. • Al iniciar la instalación, asegúrese de que las especificaciones de la fuente de alimentación se corresponden con las que requiere el dispositivo. -
Page 59: Conexión De La Fuente De Alimentación
AXIS Washer Kit A A A A VISO VISO VISO • Se recomienda llenar el depósito de agua a temperatura ambiente. Si utiliza la bomba a temperaturas inferiores a 3°C, añada una pequeña cantidad de líquido anticongelante para limpiadores de cristal al agua. Puede utilizar cualquier líquido anticongelante estándar. -
Page 60: Instalación De La Bomba
AXIS Washer Kit A Conexión de la bomba Conecte el movimiento horizontal y vertical al terminal J9 tal y como se describe en la siguiente tabla. Terminal Descripción Cámara Q86 Control de la bomba GND (control de la bomba) Nota Todas la conexiones del terminal J9 deben tener una tensión de seguridad muy baja. - Page 61 AXIS Washer Kit A Instalación del limpiador Unidad de soporte Prensaestopas Soporte de la tubería del limpiador Unidad base Tornillos Arandelas Juntas de los tornillos Junta Al fijar la unidad de soporte, coloque el soporte de la tubería del limpiador en la posición deseada.
- Page 62 AXIS Washer Kit A Tubería del limpiador Tuerca Ojiva Corte los cables según el tamaño y restaure o realice las conexiones a la unidad de posicionamiento. Acorte la tubería del limpiador según sea necesario. Afloje la tuerca y deslícela por la tubería.
-
Page 63: Más Información
Visite el centro de aprendizaje de www.axis.com/academy para consultar guías, tutoriales, seminarios web y cursos que pueden resultarle útiles. Información de garantía Para obtener más detalles sobre la garantía del producto Axis y la información relacionada con ella, consulte www.axis.com/warranty/... - Page 65 AXIS Washer Kit A 安 安 安 全 全 全 情 情 情 報 報 報 本製品を設置する前に、このインストールガイドをよくお読みください。 インス トールガイドは、後で参照できるように保管しておいてください。 危 危 危 険 険 険 レ レ レ ベ ベ ベ ル ル ル 危 危 危 険 険 険...
- Page 66 AXIS Washer Kit A 安 安 安 全 全 全 手 手 手 順 順 順 警 警 警 告 告 告 • 本製品の設置は、訓練を受けた専門技術者が行ってください。 注 注 注 記 記 記 • 本製品は、お使いになる地域の法律や規制に準拠して使用してください。 • 本製品は乾燥した換気のよい環境に保管してください。 • 本製品に衝撃または強い圧力を加えないでください。 • 本製品に振動を加えないでください。 • 本製品を不安定なブラケット、表面、または壁に設置しないでください。...
- Page 67 AXIS Washer Kit A イ イ イ ン ン ン ス ス ス ト ト ト ー ー ー ル ル ル ガ ガ ガ イ イ イ ド ド ド このインストールガイドでは、AXISワッシャーキットAをインストールする手順 について説明します。 パ パ パ ッ ッ ッ ケ ケ ケ ー ー ー ジ ジ ジ の の の 内 内 内 容 容 容...
- Page 68 AXIS Washer Kit A ハ ハ ハ ー ー ー ド ド ド ウ ウ ウ ェ ェ ェ ア ア ア の の の 概 概 概 要 要 要 230V 120V FUS1 FUS2 FUS3 RS485 タンク 金属製ケージ 接続ボックス...
- Page 69 AXIS Washer Kit A 認 認 認 証 証 証 規 規 規 格 格 格 EN 50130–4 認 認 認 証 証 証 規 規 規 格 格 格 EN 61000–6–3 FCC Part 15 Subpart B Class B EN 60950–1 EN 60950–22...
- Page 70 AXIS Washer Kit A 120 V AC FUS2 24 V AC FUS3 ハードウェアの概要 ヒューズ位置については、 を参照してください。 注 注 注 記 記 記 • 電源および接続ケーブルが、システムの消費電力に適していることを確認 してください。 • 屋外対応に適した電源ケーブルを使用してください。 ハ ハ ハ ー ー ー ド ド ド ウ ウ ウ ェ ェ ェ ア ア ア の の の 設 設 設 置 置 置...
- Page 71 AXIS Washer Kit A Neutral (N) Phase (L ) Earth シリコンシース ストラップ 注 注 注 記 記 記 • アース線は他の2本より10 mmほど長くし、引っ張られたときに不意に切断 しないようにする必要があります。 • ターミナルの導体はすべて、他の低電圧回路から分離する必要がありま す。 ワイヤーが切断されても、感電からの保護が失われないようにする必 要があります。 ポ ポ ポ ン ン ン プ プ プ 接 接 接 続 続 続...
- Page 72 AXIS Washer Kit A ポンプおよびフロートをタンク内部に入れ、プラグを取り付けます。以下の図 を参照してください。 220mm 120mm プラグ フロート ポンプ 注 注 注 記 記 記 タンクの空の場合は、ポンプを起動しないでください。 ワ ワ ワ ッ ッ ッ シ シ シ ャ ャ ャ ー ー ー の の の 設 設 設 置 置 置...
- Page 73 AXIS Washer Kit A ケーブルグランド ワッシャーパイプサポート ベースユニット ネジ ワッシャー スクリューガスケット ガスケット サポートユニットを固定し、ワッシャーパイプサポートを希望する位置に配置しま す。 ケーブルをサポートユニットの内部に挿入し、50 cmほど突き出るようにし ます。 ケーブルをケーブルグランドに挿入します。 ベースユニットをサポートユ ニットから20 cmほどの位置に保ち、ケーブルグランドを固定します。 ベースユ ニットをスタンドに取り付け、ケーブルを内部に配線します。 付属のネジ、ワッ シャー、スクリューガスケット、およびガスケットを使用して、ベースユニッ トをサポートユニットに装着します。 ワッシャーパイプ ナット オジーブ ケーブルをカットしてサイズを調整し、ポジショニングユニットへの接続を復元 または作成します。 必要に応じてワッシャーパイプを短くします。 ナットを緩 め、パイプに沿ってスライドさせます。 パイプの末端をオジーブに挿入します。 カップリングにナットを固定します。 注意 ワッシャーパイプをしっかりと締め、水漏れしないようにします。 水漏れ が生じる場合は、さらに締める必要があります。...
- Page 74 AXIS Washer Kit A 12 cm. (4 3/4 in .) ブラケット ネジ ワッシャー ホースクリップ デリバリーホース 付属のブラケット、ネジ、およびワッシャーを使用して、パイプをワッシャーサポー トに装着します。 付属のホースクリップを使用してカップリングを固定し、デリ バリーホースに接続します。 液を吹き出す位置を微調整するには、ノズルをハウジングのガラスに向けます。 下 の図を参照してください 関 関 関 連 連 連 情 情 情 報 報 報 www.axis.com 本書の最新バージョンについては、 にアクセスしてください。 www.axis.com/academy Axisラーニングセンター ( ) にアクセスしてください。役に立...
- Page 75 AXIS Washer Kit A 保 保 保 証 証 証 情 情 情 報 報 報 www.axis.com/warranty/ Axisの製品保証と関連情報については、 をご覧ください...
- Page 76 Installation Guide Ver. M1.3 AXIS Washer Kit A Date: September 2015 © Axis Communications AB, 2015 Part No. 1506888...
Need help?
Do you have a question about the Washer Kit A and is the answer not in the manual?
Questions and answers