Advertisement
Quick Links
Installation and Setup Instructions
PC200 Dual Output Ramping Proportional Controller
General:
Power requirement
Fuse
Digital Outputs: Type
Output
PWM Outputs: Frequency
Dither
Output
Adjustments
Joystick Input: +5V OUT
+2.5V OUT
SIGNAL IN
Adjustments
Switch Input:
FWD
REV
DISABLE
Mounting:
Environmental: Storage
Operating
* DO NOT USE THIS INPUT FOR SAFETY CONTROL. When using 2 controllers with 2-axis joystick,
AB(+) terminal of one controller can be connected to DISABLE terminal of a second controller to prevent
simultaneous operation of X and Y axis.
SPECIFICATIONS
9-30Vdc, 250mA nominal + power to external loads
15-Amp Fuse; total load must not exceed 15-amps
Sourcing
Same as supply voltage, 5 Amps max. each
1000Hz
100Hz, 0-10% of maximum current
Same as supply voltage, 0-5Amps max.
Minimum/Maximum:
Ramp Up/Dn:
Joystick power; 50mA max (1k ohm pot recommended)
Tap reference; 50mA max (1k hom pot recommended)
0-5Vdc or 0.5 to 4.5Vdc jumper selectable; 2.5Vdc center
Threshold:
Dry contact
Dry contact
Connect to system power to disable control*
(4) #6 x 3/4" self-tapping screws (included)
-40degC to 85degC
-10degC to 60degC
DIMENSIONS
4.25"
(108mm)
#6 SCREW
BOSS
(TYP OF 4)
3.85"
(98mm)
0.2"
(5mm)
0-5A (Can be adjusted for min>max)
0.1-5 Seconds
0 to +/-2Vdc
0.375"
(9.5mm)
0.39"
(10mm)
0.71"
(18mm)
Advertisement

Summary of Contents for Miratron PC200
- Page 1 Installation and Setup Instructions PC200 Dual Output Ramping Proportional Controller DIMENSIONS 4.25" 0.375" (108mm) (9.5mm) 0.39" #6 SCREW (10mm) BOSS (TYP OF 4) 0.71" (18mm) 3.85" (98mm) 0.2" (5mm) SPECIFICATIONS General: Power requirement 9-30Vdc, 250mA nominal + power to external loads Fuse 15-Amp Fuse;...
-
Page 2: Input Wiring
WIRING INPUT WIRING POWER +9-30VDC POWER INPUT IS REVERSE POLARITY PROTECTED AND FUSED TO 15-AMPS. FOR NORMAL OPERATION, GROUND GROUND LEAVE DISABLE TERMINAL OPEN. DISABLE TERM- INAL NOT FOR SAFETY CONTROL APPLICATIONS. CONNECT TO POWER DISABLE TO DISABLE JOYSTICK or POTENTIOMETER: MAX/CW POTENTIOMETER (1) COMMON... -
Page 3: Output Wiring
WIRING OUTPUT WIRING PROPORTIONAL and DIGITAL VALVE OUTPUTS 2-WIRE SOLENOIDS 1-WIRE GROUNDED SOLENOIDS NOTE: Wiring diagram applies to all solenoid valve outputs. ALTERNATE PROPORTIONAL OUTPUT WIRING OUT1+ Combined *OUT1+2 (See table) OUT1 - OUT2 + NOTE: Connect one side of coil to OUT2 - OUT1-, OUT2-, or Ground CASCADE CONNECTION FOR 2-AXIS JOYSTICK (4-OUTPUTS) -
Page 4: Operation
OPERATION JOYSTICK JOYSTICK JOYSTICK REVERSE CENTER FORWARD 5A (ADJUSTABLE) OUT1 5A (ADJUSTABLE) OUT2 5A (ADJUSTABLE) OUT1+2* << > << << > > ADJUSTABLE THRESHOLD 0.5v 2.5v 4.5v Voltage on SIGNAL teminal *NOTE: OUT1+2 Created by connecting both OUT+ terminals to one side of solenoid and connecting one or both OUT- terminals to other side of solenoid. - Page 5 APPLICATIONS #1: COMBINED PROPORTIONAL AND DIGITAL OUTPUTS WITH TAPPED POTENTIOMETER JOYSTICK #2: COMBINED PROPORTIONAL AND DIGITAL OUTPUTS WITH HALL-EFFECT JOYSTICK #3: PROPORTIONAL OUTPUT WITH SWITCHES OR DIGITAL JOYSTICK #4: DIGITAL LATCHING OUTPUT WITH POTENTIOMETER JOYSTICK NOTE: APPLICATIONS SHOWN ARE EXAMPLES ONLY. MANY OTHER HYDRAULIC CIRCUITS AND CONTROL COMBINATIONS ARE POSSIBLE.
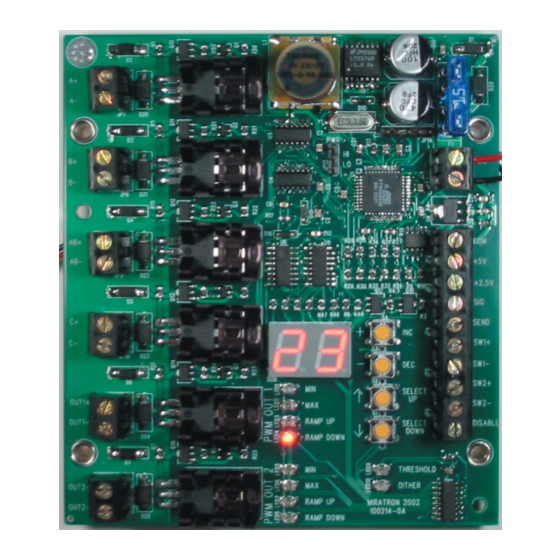
- Page 6 SETUP Step 1 Apply power to controller. Step 2 Move JP13 to appropriate input signal range. Use 0.5 to 4.5v for hall-effect joystick applications. Use 0 to 5v for potentiometer SELECT applications. RAMP UP SELECT Step 3 Press SELECT UP or SELECT DOWN buttons to choose which RAMP DN DOWN parameter to adjust.
Need help?
Do you have a question about the PC200 and is the answer not in the manual?
Questions and answers