Table of Contents
Advertisement
Quick Links
Advertisement
Table of Contents

Related Manuals for Kennell ZC4-A2001N

Summary of Contents for Kennell ZC4-A2001N
- Page 1 IP+HD SDI Integrated Camera User manual V1.0...
- Page 3 Safety Notes Before installing the device, please read this manual carefully and follow instructions indicated to ensure proper operation. Please keep this manual for future reference. Please powering on the device, please check the input power voltage carefully, the camera accepts DC12V, otherwise, it may cause damage to the camera.
- Page 4 Warnings 1. If you need to extend the power cable, please extend the power cable from the part on below picture (220V/110V), do not extend from part 1 on below picture (DC12V), otherwise it will cause unexpected damage to the device. 2.
-
Page 5: Table Of Contents
CONTENTS ABOUT THE PRODUCT -------------------------------------------------------- 1 -------------------------------------------------------------------------------- 1 FEATURES ------------------------------------------------------------ 1 & LIST OF PARTS ACCESSORIES ---------------------------------------------------------------- 2 & MAIN PARTS INTERFACES INSTALLATION ---------------------------------------------------------------- 3 ------------------------------------------------------------------------------ 3 WALL MOUNT OPERATION ------------------------------------------------------------------- 4 ---------------------------------------------------------------------- 4 INTERNET EXPLORER ------------------------------------------------------------------------------------- 4 MENU SPECIAL PRESETS LIST ------------------------------------------------------ 5 MENU SETTINGS -------------------------------------------------------------- 6 --------------------------------------------------------------------- 6 MENU CONFIGURATION... -
Page 7: About The Product
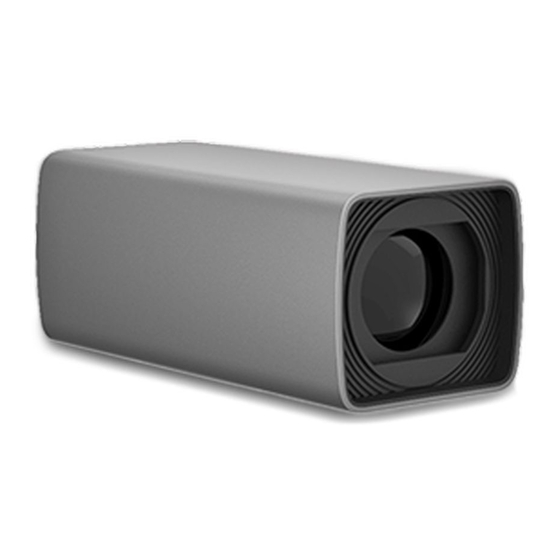
List of Parts & Accessories ABOUT THE PRODUCT When you open the box, check all accessories according to the packing list. In case of any items missing, please contact your supplier. Features 2.14MP, 1/2.8” CMOS; Camera (1) H.265/H.264 video compression; ... -
Page 8: Main Parts & Interfaces
Main Parts & Interfaces Camera Front View Pin Definition of Control Port Definition RS-485B RS-485A RS-232RXD RS-232TXD Bottom View 1 Camera Lens Rear View 2 RS-232/RS-485 3 3G-SDI Interface 4 3.5mm Audio 5 USB Interface 6 TF Card Slot 10 Mounting Hole (1/4”) 7 Power Input(DC12V)... -
Page 9: Installation
INSTALLATION The installation type of the camera is wall mount. Note Use screws to fix the camera on the Before installing, make sure there is enough space to install the camera and its bracket, fix the limit screw to lock the parts. -
Page 10: Operation
Input IP address+ port number 88 (default is OPERATION 88) in the IE address bar:http://IP:88, such as http://192.168.18.229:88; 4.Install plug-in; Before operation, make sure all connections 5.Name: admin Initial password: No are correct and firm. password. Internet Explorer Menu 1.Make sure PC and the camera are in the Choose 95—Menu in the preset list to open same LAN;... -
Page 11: Special Presets List
Menu Confirm In menu, press to confirm or get into submenu. Press to return to previous menu level or exit the menu. SPECIAL PRESETS LIST Preset Function Number Enter menu Switch the video format to 1920X1080p50 Switch the video format to 1920X1080p25 Switch the video format to 1920X1080i50 Switch the video format to 1280X720p50 Switch the video format to 1920X1080p60... -
Page 12: Menu Settings
MENU SETTINGS Menu Configuration <VIDEO> SHARPNESS 0, 1, 2, 3, 4, 5, 6, 7, 8, 9, 10, 11, 12, 13, 14, 15 Refer to BRIGHTNESS 0, 1, 2, 3, 4, 5, 6, 7, 8, 9, 10, 11, 12, 13, 14 CONTRAST 0, 1, 2, 3, 4, 5, 6, 7, 8, 9, 10, 11, 12, 13, 14 GAMMA MODE... - Page 13 <EXPOSURE> MODE FULL AUTO Refer to P10 MANUAL GAIN 0, +2, +4, +6, +8, +10, +12, +14, +16, +18, +20, +22, +24, +26, +28,+30 SPEED 1/1, 1/2, 1/3, 1/6, 1/12, 1/25, 1/50, 1/75, 1/100, 1/120, 1/150, 1/215, 1/300, 1/425, 1/600, 1/1000,1/1250, 1/1750, 1/2500, 1/3500, 1/6000, 1/10000...
- Page 14 <COLOR> WB MODE AUTO, ATW, ONE PUSH, INDOOR, OUTDOOR, MANUAL, SODIUM LAMP, FLUO LAMP Refer to P11 SATURATION 0, 1, 2, 3, 4, 5, 6, 7, 8, 9, 10, 11, 12, 13, 14 0, 1, 2, 3, 4, 5, 6, 7, 8, 9, 10, 11, 12, 13, 14 <ZOOM FOCUS>...
-
Page 15: Menu Explanation
Submenus Menu Explanation From main menu, navigate to select <EXPOSURE> menu, click to enter the submenu. Main Menu ❶ ❸ <EXPOSURE> Call preset 95 to enter menu. MODE FULL AUTO EXP-COMP ❷ LEVEL ❶ MENU ANTI FLICKER VIDEO… EXPOSURE… ]SELECT []BACK COLOR…... -
Page 16: Video
Video <EXPOSURE> MODE FULL AUTO VIDEO menu is used to change video value. EXP-COMP LEVEL <VIDEO> SHARPNESS ANTI-FLICKER BRIGHTNESS CONTRAST ]SELECT []BACK GAMMA MODE 2DNR LEVEL MODE 3DNR LEVEL WIDE DYNAMIC FULL AUTO: Gain, Shutter Speed and Iris ]SELECT []BACK value are adjusted automatically as per working environment. -
Page 17: Color
IRIS PRI:Gain and shutter speed value are <COLOR> adjusted automatically as per working WB MODE MANUAL environment; Iris value is adjustable manually. R.GAIN IRIS: F14, F11, F9.6, F8, F6.8, F5.6, F4.8, B.GAIN F4, F3.4, F2.8, F2.4, F2, F1.6, CLOSE. SATURATION EXP-COMP: When EXP-COMP is on, below level options become available -7, -6, -5,-4, -3, -2, -1, 0, +1, +2, +3, +4, +5, +6, +7. -
Page 18: System
PROTOCOL: VISCA, PELCO-D, PELCO-P. <ZOOM FOCUS> ZOOM SPEED BAUD RATE: 2400, 4800, 9600, 38400. FOCUS SPEED VIDEO FORMAT: 1080p60, 1080p50, ZOOM TRIG AF 1080p30, 1080p25, 1080i60, 1080i50, POWER UP ACTION HOME 720p60, 720p50. MOUNT MODE: STAND, CEILING. ]SELECT []BACK RS485 PORT: ZOOM SPEED: 1, 2, 3, 4, 5, 6, 7, 8. -
Page 19: Restore Defaults
It displays current camera address, protocol, baud rate, video format, mount mode and firmware version number. Restore Defaults < RESTORE DEFAULTS> PRESS [OK] CONFIRM PRESS [BACK] CANCEL []BACK RESTORE DEFAULTS: This option is used to reset all menus to default value. -
Page 20: Network Setting
Internet Explorer Network Setting 1 Make sure PC and camera in the same LAN; 2 support Windows 7 and above system,not support Windows XP; Quick Guide 3 Input IP address+ port number 88 (default is The camera can be accessed and controlled 88) in the IE address bar: via the following ways: http://IP:88, such as:... -
Page 21: Ipcamconf
IPCamConf Setup IPCamConf from the disc in the packing, and connect the camera to the same LAN, then enter the main interface as following. Main interface includes: ①System menu, ②camera list, ③video control, ④video view, ⑤camera subject information. ●①System menu:Includes five main functions as below. ●②Camera list: The software will automatically search all devices from the same network and list all those found in the camera list. - Page 22 ●③Video control: To set the Pan/Tilt/Zoom of the camera; ●④Video View: To get the video information of the camera, snapshot, audio playback settings and SD card video. ●⑤Camera subject information:Device ID, IP address, Video stat, Type, Image edition and etc.
-
Page 23: Local Monitoring And Setup
Local monitoring and setup The IP camera is a plug and play-device-within the LAN, which can quickly realize the monitoring within the LAN. This section introduces how to realize the simple monitoring and setup within a LAN. Video Browsing After the IPCamConf software starts up, it will automatically search all the online cameras inside the LAN. - Page 24 PTZ Control And Presets, Cruise Setting Double click one camera, then the PTZ control, presets and cruise Settings can be carried out in the PTZ page of video control area. Left side: proceed PTZ control, including PTZ direction adjustment, zooming, focusing and aperture adjustment, prompt message will show up when the mouse is moved to the button.
- Page 25 2) Cruise Setting And Start & Stop Cruise means the camera scans the scene according to the preset path (the information of the cruise path needs to be provided by the presets setting). Cruise path setup steps: plan setup button, popup Cruise path setting box. ●...
- Page 26 Note ZC4 can't use P/T, only zoom Color Settings Click the color button to set video-related parameters as required. Color: in proper order are brightness, contrast, color and saturation of the display screen. Snapshot And Audio Management At the bottom of the video view, are snapshot, audio, and SD card video management. ●...
- Page 27 ● Click to set up audio input. Slide the microphone volume cursor to adjust the volume. ● Click to start/ stop SD card recording. Camera Information In the camera list, double-click the name of a camera (the selected camera will be changed to red) to view the video image of the camera in the video view area.
- Page 28 ● Camera version: shows the version of the camera. Video Playback Select [playback] from the system menu and the software enters the video playback interface. Click [real time] to exit the interface. ● Video playback Select a camera to playback, at the bottom of the playback of the video view, select the playback time, set the playback speed, and capture the video snapshot and save the function.
- Page 29 ● PTZ setting: if the camera configure the external PTZ, the address and baud rate need to be configured. ● Restart camera: restart the camera. ● Camera name: Fill in the name of the camera to tell the difference. After modification, click to save.
- Page 30 1) Start recording: when checked, the recording will start and the recording file will be saved on the SD card, then the operation of other parameters can be effective. ● Video recording: select this option to indicate that once the camera is online, it will automatically record the video and save the recording file on the SD card.
- Page 31 Camera Upgrade Click the menu [upgrade camera] and enter the upgrade camera page, as shown in figure. The prerequisite of camera upgrade is to obtain relevant upgrade files from software developers. To get the upgrade file, click browse to select the upgrade file in the camera program file path. ●...
- Page 32 The video download function can only download the video on the SD card. Select the camera you want to download and click start to download. If you want to cancel the download, click stop to download. Click to open the directory to see the save path of the downloaded video file.
- Page 33 ●RTMP URL: represents the identifier to be configured to transmit video stream to RTMP server, which can be self-setup. ●Camera port: represents the port that transmits the video data of the camera. When setting the port, select 1 port with a range of 3479~7997, and select 5000 in the example diagram. Then click the save icon on the right.
- Page 34 ● Default gateway: use the same parameters as other PCS in the LAN. ● DNS server - preferred: use the same as other PCS in the LAN. ● DNS server - standby: available when the preferred DNS server is not available. ●...
-
Page 35: Annex 1 Technical Specifications
ANNEX 1 TECHNICAL SPECIFICATIONS Image Sensor 1/2.8" CMOS,214 megapixel Focal Lens f=3.9mm-46.8mm f=4.7mm-94.0mm Iris F1.6-F2.8 F1.6-F3.5 Optical Zoom 12 x 20 x Digital Zoom 12 x Field of View 72.5° -6.3° 59.5° -2.9° Focus System Auto, Manual, PTZ Trigger, One Push Trigger Min. - Page 36 Dimensions 170mm×80mm×70mm Weight 0.83KG Color Grey...
-
Page 37: Annex 2 Size And Dimension
ANNEX 2 SIZE AND DIMENSION Front Bottom Side... -
Page 38: Trouble Shooting
TROUBLE SHOOTING Problem Possible Cause Solution Power supply failure Check power supply No lens action or Power adapter damaged Replace power adapter video after power on Power cable connection got loosen Check & reconnect Wrong address, protocol, baud rate Check & set again No control with video Wrong connection or open circuit of Check &... - Page 40 The user manual is only for a reference, if there are any changes or differences, please ask for the latest version from your supplier CA/YF-ZC4NV2-ZD-020 Y06021500031...