Advertisement
Table of Contents
PilatesEquip™
-‐ The Joint Workshop Pty Limited
Unit 4 ( rear), 6 G undah R oad, M t Kuring-‐gai N SW 2080
P: 02 9457 8880
www.pilatesequip.com
E: i nfo@pilatesequip.com
A.B.N. 43 152 175 463
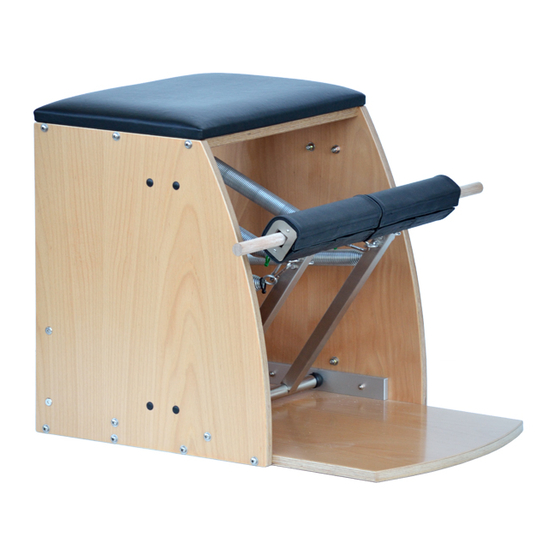
Wunda C hair – Post J an 2010
This document must be r ead before using the equipment.
All of the following points and instructions should b e c ommon knowledge t o all instructors and t o anyone t hat e xercises on this
equipment.
If you don't u nderstand an i nstruction, please contact P ilatesequip™ f or a clarification.
Improper use of this equipment may cause serious bodily harm. Please read the f ollowing:
•
Before starting any program, consult a p hysician; read and f ollow the i nstruction manual; and obtain thorough
instructions f rom a qualified P ilates instructor.
•
All pre-‐existing injuries must be disclosed t o your p hysician and P ilates instructor.
•
Use equipment o nly for i ntended e xercises
•
Equipment is only t o be adjusted b y, or with t he guidance of, a t rained P ilates instructor.
•
Use equipment o nly when it is p roperly adjusted for your size and a bility.
•
Stop e xercising if you experience any p ain or discomfort.
•
Keep clothing, body parts and hair clear o f all moving parts.
•
Do not use if e quipment appears worn, broken or d amaged.
•
Do not allow children to use o r be around equipment without adult supervision.
Also, n ote t hat you should:
•
Get equipment serviced regularly. See www.pilatesequip.com/instructions for a t o most up-‐ t o-‐ d ate service checklist.
•
Never let go of expanded Springs. T his is d angerous f or p eople using the equipment, o r t o o thers i n the vicinity of t he
equipment, and will immediately s horten the Spring life.
•
Make sure t he Locking P in to the Sliding Spring M ount i s fully inserted into t he T rack h oles before using the chair.
•
Always remove o r attach springs w hen t he user is o ff t he Pedals.
•
Always adjust spring tension when t he user is off the P edals.
•
Fit t he Spring's Clip to t he eye of t he appropriate Eyenut, located o n the s ide t he P edal Arms.
Instructions. Read f ully b efore y ou start.
If using equipment on t imber f loors, please p lace protective f elt o n the f eet o f each leg. P urchase from a hardware.
Spring tension
•
Black -‐ full tension heavy ( the o uter mounted springs)
•
Green -‐ half tension light ( the i nner mounted s prings)
•
Adjustment: 1-‐5, f rom l ightest to strongest
Spring a djustment by the sliding spring m ount and track.
The Sliding Spring M ount has a L ocking Pin t hat can be f licked or pulled, to allow it t o t ravel up and d own the Track, to change
the spring tension. P osition 1 being t he lightest and 5 being t he strongest. T he Locking P in is s pring l oaded s o when i t's aligned
with a h ole i n t he T rack ( represented b y t he numbers 1-‐5), t he Locking Pin i nserts itself into the h ole and l ocks the Sliding Spring
Mount into position. M ake sure the Locking P in i s f ully inserted before using t he chair. Always adjust spring tension when t he
user i s off the P edals.
Pedal Rod
•
Insert t he P edal R od through t he centre of b oth P edals to convert it to a single p edal chair. H ave the s ame amount of
rod exposed on e ach side o f the P edal, b efore u se.
•
Remove t he Pedal R od completely to use it as a s plit pedal chair.
Advertisement
Table of Contents

Need help?
Do you have a question about the PilatesEquip Wunda Chair and is the answer not in the manual?
Questions and answers