Table of Contents
Advertisement
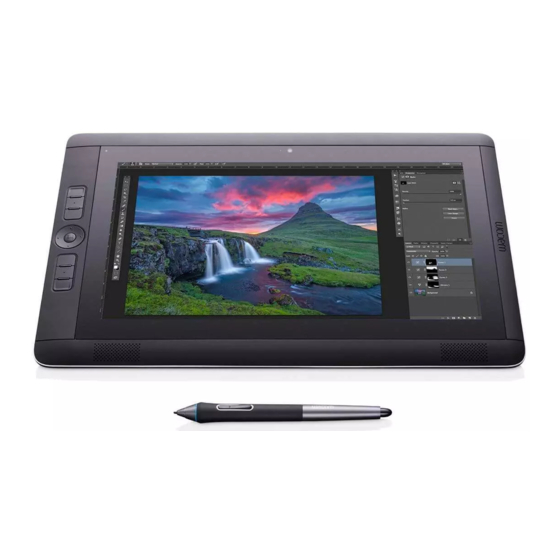
About your Cintiq Companion 2
Introduction
Your Cintiq Companion 2 is a high-performance mobile computer that supports both pen and
touch input, and is designed to accommodate your work preferences. The Cintiq operates in two
different modes: plugged into your computer, or as a completely mobile, battery-powered device.
See Cintiq Companion 2 Modes for
Desktop Mode. When you connect the Cintiq to a computer using the Windows™ or
Macintosh™ operating system, it functions as a pen display that supports pen and touch
input for design and graphics work. It also can be used to play music from your
computer, or for video conferencing.
Mobile Mode. When the Cintiq is disconnected from your computer, it functions as a
Windows tablet with its own processor, pen and touch input, and connections to the
Internet and accessory devices. While on the go you can review and edit your work, and
access the Internet, email, and the features and functionality of the operating system.
If you change modes by connecting or disconnecting the Cintiq, it will automatically switch to
the new mode. You can move and share information between the two modes using a Micro SD
card.
The Cintiq Companion 2 can be used in landscape or portrait orientation, lying flat on your desk
or in your lap. In landscape orientation, it can be placed in one of three inclined positions, using
the optional stand. When drawing or sketching, you have up to 2048 pressure levels and a
comfortable drawing surface.
See
Cintiq Companion 2 features for
general information and system requirements. Refer to your Quick Start Guide for additional
information and illustrations. The product Help topics can also help you make the best use of
your new Cintiq, and can be accessed from the Wacom Tablet Properties or the Wacom Desktop
Center.
Your Cintiq can be used with the pen that came with your product, or a Wacom™ accessory pen
or tool specified for use with the Cintiq Companion 2.
Cintiq Companion 2 components
Professional-level pen input
Multi-finger touch input
Two speakers
descriptions of Desktop and Mobile Mode features.
illustrations of your pen display,
and Using your Cintiq for
Advertisement
Table of Contents

Subscribe to Our Youtube Channel
Summary of Contents for Wacom Cintiq Companion 2
- Page 1 You can move and share information between the two modes using a Micro SD card. The Cintiq Companion 2 can be used in landscape or portrait orientation, lying flat on your desk or in your lap. In landscape orientation, it can be placed in one of three inclined positions, using the optional stand.
- Page 2 Note: Accessories may not be supplied with all models. Check the contents listed on the product packaging. Battery status and operation Battery status for the Cintiq Companion 2 is shown in the Wacom Desktop Center and on the pen display. ...
- Page 3 Rocker Ring: The four-position Rocker Ring allows you to further customize your functions. You can assign the positions of the Rocker Ring and Center Button to various settings, menu and keystroke options from the Rocker Ring tab in the Wacom Tablet Properties. See Using the Rocker Ring.
- Page 4 Cintiq Companion 2 Mobile and Desktop Modes The Desktop Mode is enabled when the Cintiq is connected to your computer with the 2-in-1 cable, and the Wacom driver software for PC or Mac operation has been installed. The driver for...
- Page 5 See the Quick Start Guide included with your Cintiq for specific instructions on setup and driver installation. See About your Cintiq Companion 2 for a description of the features of your new Cintiq. Pen and touch Pen and touch in Mobile Mode function much the same as in Desktop Mode.
-
Page 6: Care And Maintenance
10. Click OK to accept the calibration, or Try Again to recalibrate. Care and maintenance Simple care and maintenance will ensure optimum performance from your Wacom product. Keep the pen and pen display clean and free of dust and dirt. - Page 7 (1/25 inch) in length. Replacement nibs and a nib removal tool are provided inside the pen case. If you need pen nibs or other accessories, please visit the Store page of the Wacom website. To replace the pen nib: 1.
- Page 8 The ? icon displays the Help topics for the selected tab. Notes: Wacom Tablet Properties will not launch unless a supported tablet or pen display is connected to the computer. If you have only an Intuos connected, you will not see the Device and Tool rows in...
-
Page 9: Advanced Options
Advanced options The Options dialog lets you set several use preferences for your pen tablet. Click on the Wacom Tablet Properties Options... button to access the Options dialog. Note: The Brightness Adjustment setting is available only on the Intuos Pro. -
Page 10: Application-Specific Settings
After adding an application, its icon appears in the Application list whenever the associated tool is selected in the Tool list. Select the application, then customize the Wacom Tablet Properties tab settings for your tool and application. - Page 11 To create an application-specific setting: 1. In Tablet Properties, choose the Device and the Tool for which you want to create an application-specific setting. 2. Select the application from the Application list and click the + button. 3. In the Currently Open Applications box, select an application for which to create custom settings, or browse to select the executable file of any application installed on your computer.
-
Page 12: Button Functions
ExpressKey settings for that application. Button functions Use the Wacom Tablet Properties to customize the functions that are assigned to tool buttons, ExpressKeys or the Touch Ring settings. Note that button function options may vary, depending on your tablet model. - Page 13 Enter your keystroke combination in the Keys box. The combinations can include letters, numbers, function keys and modifier keys. You can also choose combinations from the Add Special drop-down menu. Enter a Name for the defined keystrokes pair(s) and click OK. ...
- Page 14 Modifier...: Dialog that enables you to simulate modifier keys: Shift, Alt, or Ctrl for Windows, or Shift, Option, Command, and Control for Mac. Use the Key setting to perform modifier functions, and a modifier to simulate pressing the associated button on a mouse. Back and Forward: Simulates the Back or Forward command in browser applications.
-
Page 15: Display Toggle
You can use the Wacom Tablet Properties to customize the functions that are assigned to tool buttons, ExpressKeys, Touch Ring, or OSC Radial Menu settings. The following button functions control toggle settings. Other button functions are described in Button functions. - Page 16 After setting an ExpressKey or pen side switch to Display Toggle, you can use it to toggle the current tablet mapping between a base mapping and other monitors. The display options are: Pen display to desktop toggles the screen cursor from Cintiq to the entire system desktop.
- Page 17 Your Cintiq has four or more ExpressKeys, depending on the model. Select the ExpressKeys tab in Wacom Tablet Properties, then choose functions from the dropdown menus. For the Cintiq 22HD and Cintiq 24HD, which have a set of ExpressKeys on both the left and right bezels, there is a separate Left and Right designation or button that allows you to customize the ExpressKeys on each side individually.
- Page 18 The Radial Menu feature for all Intuos and Cintiq products is now available from the On-Screen Controls tab in Wacom Tablet Properties. You can choose a Radial Menu display by clicking the circular icon in the dialog that opens from the On-Screen Controls tab when you create, edit or duplicate a screen key panel.
- Page 19 Application-specific settings. Pen tablet tool and tablet settings that have been customized for individual applications. Application-specific settings are in effect whenever you use the application. Aspect. The ratio between the vertical and horizontal dimension of the tablet or display. Click force. The amount of force you must apply to the pen tip for a click to occur. Digital Ink.
- Page 20 Pixel. The smallest unit of measure on your display screen. Pressure sensitive. A quality of the Wacom pen tip and eraser that senses the amount of pressure being applied. This is used to create natural-looking pen, brush, and eraser strokes in applications that are pressure-sensitive.
- Page 21 Using integrated applications Some software applications may directly control ExpressKey, Touch Ring or Rocker Ring settings, which may cause them to perform differently than the function set in the Wacom Tablet Properties. When an ExpressKey setting is overridden by an application, the ExpressKey will automatically update, using either Application Defined or the new function name.
- Page 22 An integrated application will control the ExpressKeys, Touch Ring or Touch Strip only when that application is active and in the foreground. When you close that application or select a new application pane to work in, your Wacom Tablet Properties settings are returned to their previous state.
- Page 23 Tablet Properties will display each option sequentially, from top to bottom. Standard Gestures tab Touch options can be individually enabled or disabled within the Wacom Tablet Properties. Touch is on when it is selected in the Touch Options tab, or the toggle switch on the back of the Intuos is set to enable touch.
-
Page 24: Ordering Parts And Accessories
Ordering parts and accessories To purchase parts and accessories for your pen tablet or pen display, please visit the Wacom Store. You may also contact your local dealer, distributor, or Customer Care for your region. - Page 25 Wacom On-Screen Controls allow you to create a set of up to eight pen tablet or pen display functions, called a Screen Key panel, that will appear on your screen. Select a function by tapping the corresponding key with your pen or mouse, or with your finger if your tablet has touch functionality.
- Page 26 5. Enter the name for a new or existing panel. 6. To choose how you want the panel to be displayed, click the Layout button. The default layout for a Screen Key panel is a 1 x 8 vertical strip, with one key initially assigned to Settings.
- Page 27 On the Screen Key panels: To keep the panel open, click the Push Pin icon. To open Wacom Tablet Properties to the On-Screen Controls tab from the panel, click the Wrench icon. Also see: Using On-Screen Controls Customizing On-Screen Controls...
- Page 28 To assign a Screen Key panel to an ExpressKey or a Rocker Ring button: 1. Select the ExpressKey or Rocker Ring tab. 2. Select On-Screen Controls from the dropdown menu for an ExpressKey or Rocker Ring button, then choose the panel you want to assign to that item.
-
Page 29: Using On-Screen Controls
Also see: Creating On-Screen Controls Using On-Screen Controls Using On-Screen Controls All Screen Key actions can be performed on the Screen Key panel using your pen or mouse, or using your finger if your tablet has touch functionality. Access a Screen Key panel: Press the associated ExpressKey or Rocker Ring button. - Page 30 Use the Drag icon to the left of the menu to drag the menu to a new position in the list. Manage your On-Screen Controls: Save the panels you have created to your computer or to the Wacom Cloud, using the Backup and Restore features on the Wacom Desktop Center. See Wacom Desktop Center.
- Page 31 Companion 2 in Desktop Mode only. They are not supported in Mobile Mode. Display Settings - Advanced The Advanced... dialog of the Wacom Display Settings utility allows you to further customize Cintiq display settings. To open the dialog, click Advanced... from the Display Settings Main screen.
- Page 32 LCD Conditioning: Adjusts the display to prevent persistence, instances of color remaining on screen too long. Note: Wacom Display Settings are supported on the Cintiq Companion 2 in Desktop Mode only. They are not supported in Mobile Mode. Display Settings - Set Color The Set Color dialog of the Wacom Display Settings utility allows you to further customize Cintiq display settings.
- Page 33 Not all color setting options may be available on your Cintiq. Wacom Display Settings are supported on the Cintiq Companion Hybrid and Cintiq Companion 2 in Desktop Mode only. They are not supported in Mobile Mode. Pen and ink in Windows Microsoft Windows provides extensive support for pen input.
- Page 34 Note that the pen for some Intuos models does not have an eraser. Most Wacom products include a pen case or pen stand to hold or store your pen when it is not in use, and a nib removal tool. The nib removal tool is the metal ring in the center of the pen stand base.
- Page 35 Important: When it is not in use, place the pen in the pen stand with the tip down or across the pen stand, in the pen case, or flat on your desk. The pen stand will keep the tip from touching any surface.
- Page 36 See the documentation that came with your application for details. To learn more about these and other optional tools that can be used with your pen tablet or pen display, visit the Wacom website. Eraser tab Select the Eraser tab to adjust eraser sensitivity.
- Page 37 Use the Eraser Feel slider to customize the amount of pressure needed to erase. From the Erase dropdown menu, select the function to perform when using the eraser. Click Customize to further adjust the eraser sensitivity. With your screen cursor positioned over an empty area of the control panel, press down on the Current Pressure bar with the eraser to determine pressure levels.
- Page 38 Accessories such as the Art Pen and Airbrush are compatible with Intuos Pro, and are fully supported by the Wacom driver software. They appear in the Tool list after you touch the tablet surface with the tip of the pen. The Tablet Properties then shows the new tool and the options for customization.
-
Page 39: Managing Preferences
You can manage, back up and restore your tablet settings and preferences for single or multiple users, either to your computer or to the Wacom Cloud, using the Backup and Restore features on the Wacom Desktop Center. Wacom Cloud backup and restore uses Wacom storage on a secure remote server. - Page 40 You can download and install the driver from the Wacom website, for both Windows and Mac operating systems. The driver for the Cintiq Companion and Cintiq Companion 2 is pre-installed.
- Page 41 Help topics give you quick access to information about the features and capabilities of your pen display. You can access the Help topics for the Wacom Tablet Properties or Wacom Desktop Center at any time by clicking the ? icon on the panel or dialog you are using. Other topics can be found in the Help Table of Contents, or by using the Help Search feature.
- Page 42 2. Install the driver: Windows: Select the driver installation option that appears after the Intuos and your computer are connected. The driver will be downloaded and installed from the Wacom website. If you do not have an Internet connection, you may access the driver on the Installation CD, or download it from Wacom Customer Care.
- Page 43 Wacom Desktop Center selector bar, and the tools associated with it will appear in the Tools list. To work with any connected pen tablet or pen display, select it from the Device list and then customize your settings. To remove it, select it and click on the - button next to the Device list in the Wacom Tablet Properties.
-
Page 44: Settings View
Note: The functions can be defined for use with specific applications. However, some applications can override and control the Rocker Ring functions you select from the Wacom Tablet Properties. Settings View You can view the current settings for the ExpressKeys, Rocker Ring, Center or Home button, Touch Strips, Touch on/off, and the pen for your Cintiq at any time. - Page 45 You can set your Cintiq for touch by selecting the Standard Gestures tab on a Mac, or the Touch Options or My Gestures tab in Windows. In Windows, select the My Gestures tab is visible if you select the Use Wacom Gestures option in the Touch Options tab.
-
Page 46: Uninstalling The Driver
Note: Touch speed and acceleration settings in the Wacom Tablet Properties are independent of overall system settings. Changes you make to settings in the Wacom Tablet Properties do not affect similar system settings. However, changes made to overall control panel (system) settings may affect your pen tablet settings. -
Page 47: Technical Support
Help. You can access Help by clicking the question mark icon in the Tablet Properties, or selecting the Help & Support option from the Wacom Desktop Center. If the Help does not have the answer you are looking for, try the following options: ... - Page 48 See Testing the tablet for more information on testing components. 1. Open the Wacom Tablet Properties and click on the About button. In the dialog that appears, click Diagnose... The Diagnostics dialog shows dynamic information about the tablet, your tool(s), and appropriate information for touch-sensitive tablets.
- Page 49 Testing the ExpressKeys 1. With the Diagnostics dialog open, observe the Tablet Info column as you test each ExpressKey. Be sure you have selected the tablet you are testing from the Tablet Info column. 2. Test the keys by pressing them one at a time. Each time you press a key, its number is shown next to the Left Buttons category.
-
Page 50: Testing A Pen
(0.4 inch) of the tablet surface and press the side switch. The LED will brighten again. 4. Press the eraser against the surface. The LED will brighten. 5. Open the Wacom Tablet Properties and click on the About button. In the dialog that appears, click Diagnose... - Page 51 6. With the Diagnostics dialog open, and while observing the Pointing Device Info column, bring your pen within 10 mm (0.4 inch) of the tablet active area. A value for Proximity, the Device Name, Device Type, and a Device S/N (serial number) should be displayed.
- Page 52 © Copyright 2015 Wacom Co., Ltd. All rights reserved. Wacom, Intuos, Cintiq, and their respective logos are trademarks and/or registered trademarks of Wacom Co., Ltd. No part of this information may be reproduced except for your express personal use. Wacom makes reasonable efforts to provide current and accurate information. However, Wacom reserves the right to change any specifications and product configurations at its discretion, without prior notice and without obligation to include such changes.
-
Page 53: Troubleshooting
2. Visit the Wacom website for your region to view the product FAQs (Frequently Asked Questions). 3. If you are having a compatibility conflict with your pen tablet and a new hardware or... -
Page 54: General Problems
General problems The computer does not have an available USB port. Check if there is an available USB port on a USB hub. If not, you will need to add a USB hub or USB card. A tablet status LED does not illuminate. Verify that the tablet USB cable is properly connected to the tablet and to an... - Page 55 The tablet is set to ExpressKeys Right (or ExpressKeys Left), but at the Change the orientation of the tablet in the Wacom log on screen the tablet seems to work upside down. Desktop Center. Reinstall the tablet driver.
- Page 56 From the Go menu, select Utilities and launch the System Profiler. Select USB from the Hardware section of the Contents list. A Wacom USB tablet model should be listed. If a tablet model is not listed, check the USB tablet cable connection or try plugging the tablet into a different USB port.
- Page 57 Apple Support for further assistance. Wacom does not create Ink, and cannot support a third-party software application. ® Mac or Windows Use the Wacom Desktop Center Backup and Restore Utility to modify your preferences, and save them to your computer or to the You suspect the Cloud.
- Page 58 Wacom recommends using the side switch to double-click. Open the Wacom Tablet Properties and go to the Pen tab. Try increasing the Tip Double Click Distance or using a lighter Tip Feel.
- Page 59 The pen tip does not function. Be sure you are using a compatible Wacom pen, such as the pen that shipped with your product, or a Wacom tool specified for use with the product. Check the Pen tab and verify that a Click function is assigned to the tip.
-
Page 60: Using The Pen
a pen button to Mode Toggle..Then use the button to toggle between Pen mode and Mouse mode. Touch does not work. Enable touch by pressing an ExpressKey that is set to Touch On/Off. Open the Tablet Properties, click on the Touch icon, and go to the Standard Gestures, My Gestures, or Touch Options tab. -
Page 61: Wacom Desktop Center
In Windows, access the Wacom Desktop Center from the task bar on the standard desktop, or from a tile on the Windows 8 Start screen. On the Mac, access the Wacom Desktop Center from the Applications folder. - Page 62 ExpressKeys, Touch Ring, On-Screen Controls, and Rocker Ring settings. Backup & Restore Settings. Backup & Restore Settings to the Wacom Cloud. Choose this option to backup and restore your files using Wacom storage on a secure remote server, or to...
-
Page 63: Importing Expert Settings
Registration. Register your tablet on the Wacom product registration site. Importing expert settings The import expert settings feature enables you to import customized Wacom Tablet Properties settings that have been specified in an XML (Extensible Markup Language) file. Some software developers create custom settings files which are designed to provide optimum performance when using your Wacom pen tablet or pen display with their applications. -
Page 64: Working With Multiple Monitors
Working with multiple monitors If your computer is equipped with more than one monitor, your pen tablet or pen display will map to the monitors based on how they are configured in the Display Properties portion of your computer. If you are using more than one monitor and you are in extended monitor mode, the tablet maps to all monitors as if they were one large display.
Need help?
Do you have a question about the Cintiq Companion 2 and is the answer not in the manual?
Questions and answers